Updated . Built against the tool’s current screens and checked step by step. How we check this lesson
Copying the same post into Instagram, Facebook and TikTok can take a small firm's marketer half an hour a day, and on busy days nothing goes out at all. The fix is to plan the week once in a sheet and let the posting run itself, so your daily job becomes a two-minute check. In this free lesson you plan your posts in one Google Sheet and let n8n do the rest: every morning it takes the next row marked ready, has AI write a caption for Instagram, Facebook and TikTok, posts them through Blotato, and marks the row posted so nothing goes out twice. It's the same idea we use to post Stepthrough's own videos.
At a glance
| Question | Answer |
|---|---|
| What you build | Copying the same post into every social app can take half an hour a day, and on busy days nothing goes out. Plan a week of posts in one Google Sheet; every morning n8n has AI write a caption per platform, posts through Blotato and marks the row posted. |
| Tools | n8n and Blotato |
| Time | About 14 minutes, 40 steps in 8 parts |
| Level | Advanced |
| Cost | Free |
| Ways to learn it | Practice it step by step, watch the video, read the guide with screenshots |
The 8 parts, in short
- The plan: The content sheet.
- Only ready rows: Open the sheet step, Add a filter, Pick the column, status, and 2 more steps.
- A caption per platform: Open the AI step, Run it, Close the node.
- Add Blotato: Add the next step, Search for Blotato, Blotato, Install node, and 1 more step.
- Connect Blotato: Credential, New credential, Paste your Blotato key, Save.
- Post to Instagram: Name it, Account, Kestrel Tax & Advisory, The caption, and 2 more steps.
- Mark it posted: Add the last step, Search for Sheets, Update row in sheet, Pick the document, and 8 more steps.
- Test and publish: Test it, Publish, Publish it.
Start here first: Build an n8n AI Agent That Plans Your Content Calendar (module 1 of AI Automation for Marketing)
Part of: AI for Marketing Teams (step 3 of 23). Next up: Get Your Business Recommended by ChatGPT
Post to Every Channel Daily from One Sheet using n8n + Blotato: step-by-step guide with screenshots
About the screenshots. They come from Stepthrough’s simulated practice environment (a practice copy of n8n and Blotato), not the live tool, so no real account appears. The buttons and labels match the real screens the lesson was built against. Practice it yourself free at learn.ynteractive.com.
- Tools: n8n and Blotato
- Time: about 14 minutes, 40 steps in 8 parts
- Level: advanced
Part 1: The plan
Step 1: The content sheet
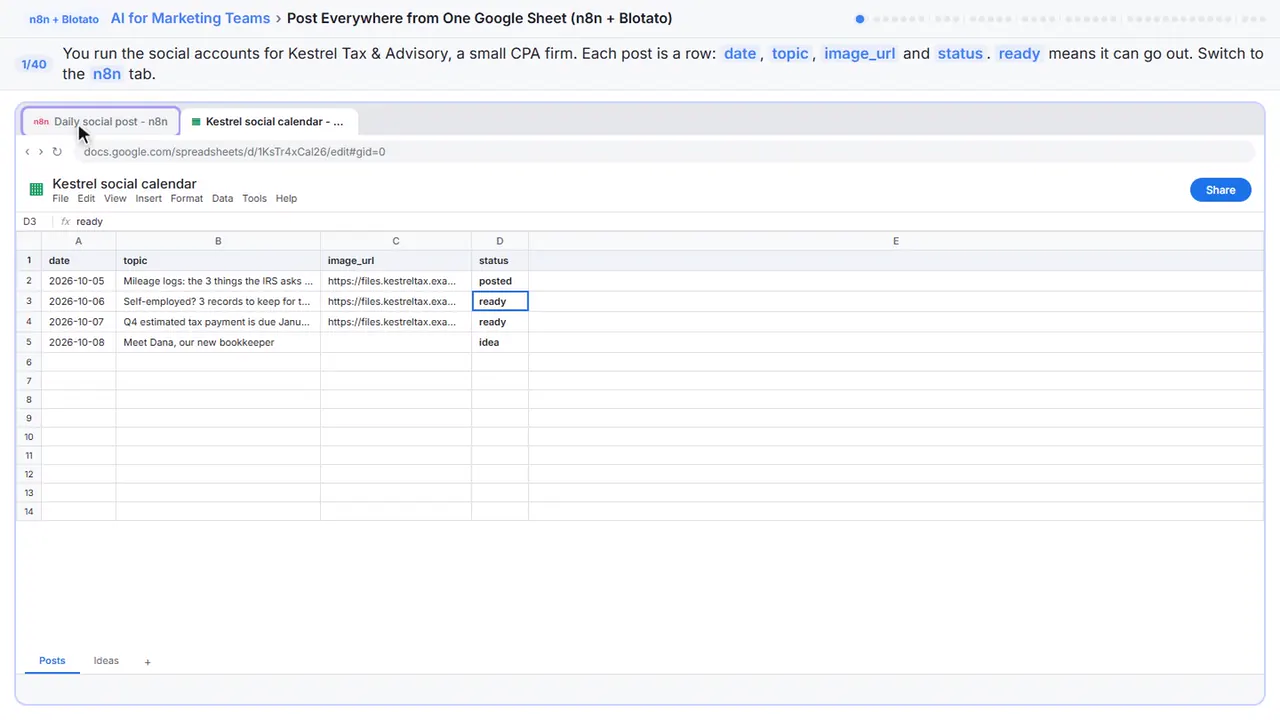
Pasting the same post into every app can take half an hour a day, and on busy days nothing goes out. So plan the posts once, in a sheet, and let them go out on their own. This is how we post Stepthrough's own videos. Here you'll build it for Kestrel Tax and Advisory, a small CPA firm. Each post is a row. Ready means it can go out, posted means it's gone. Switch to the n eight n tab.
Part 2: Only ready rows
Step 2: Open the sheet step
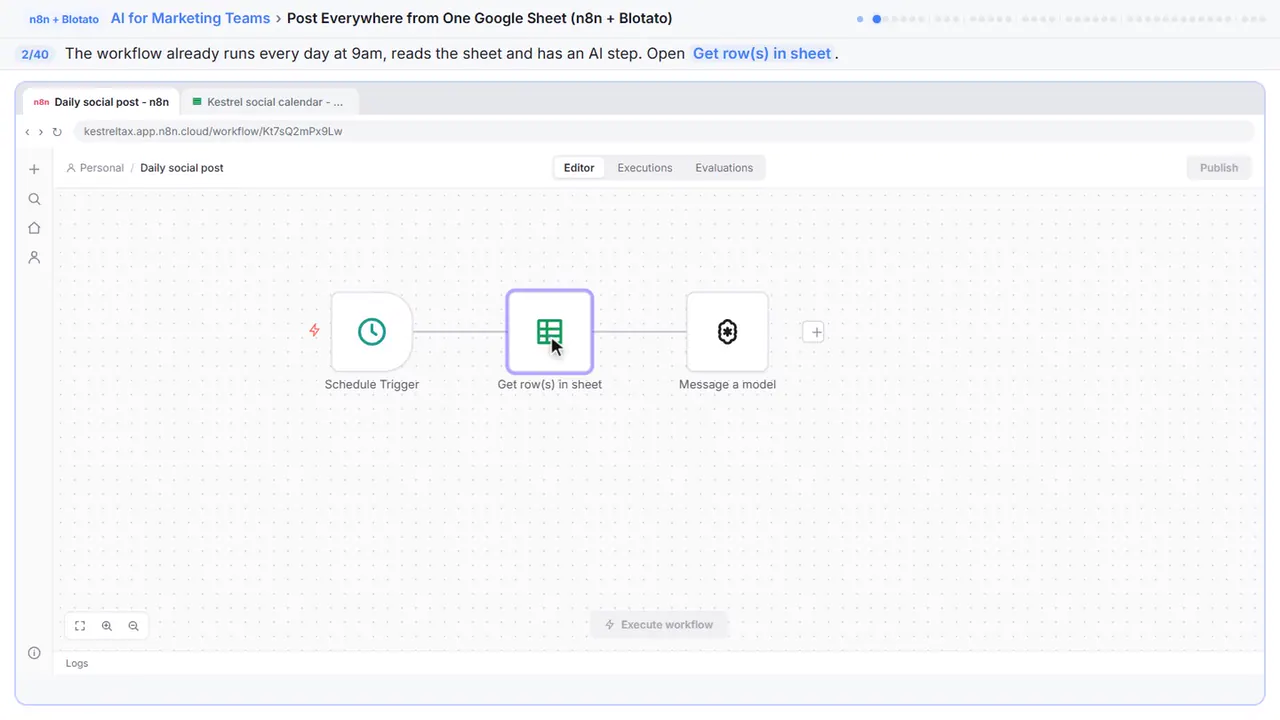
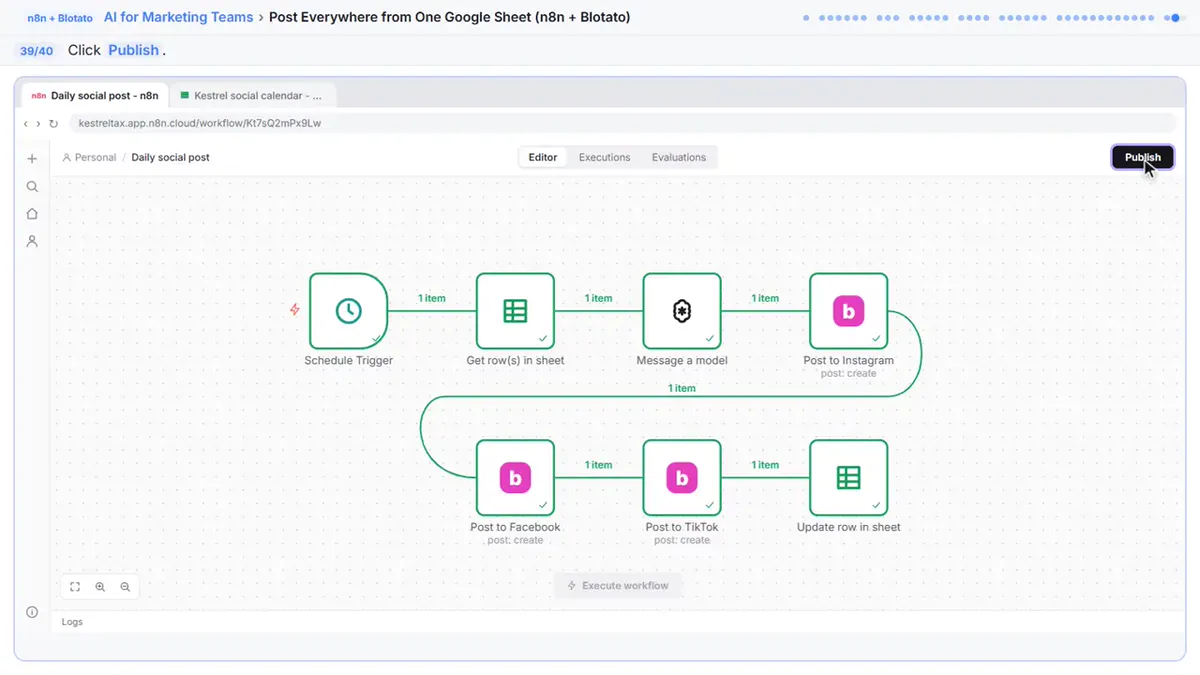
The start is already built, like in earlier modules: a schedule that fires every morning at nine, a step that reads the sheet, and an AI step.
Step 3: Add a filter
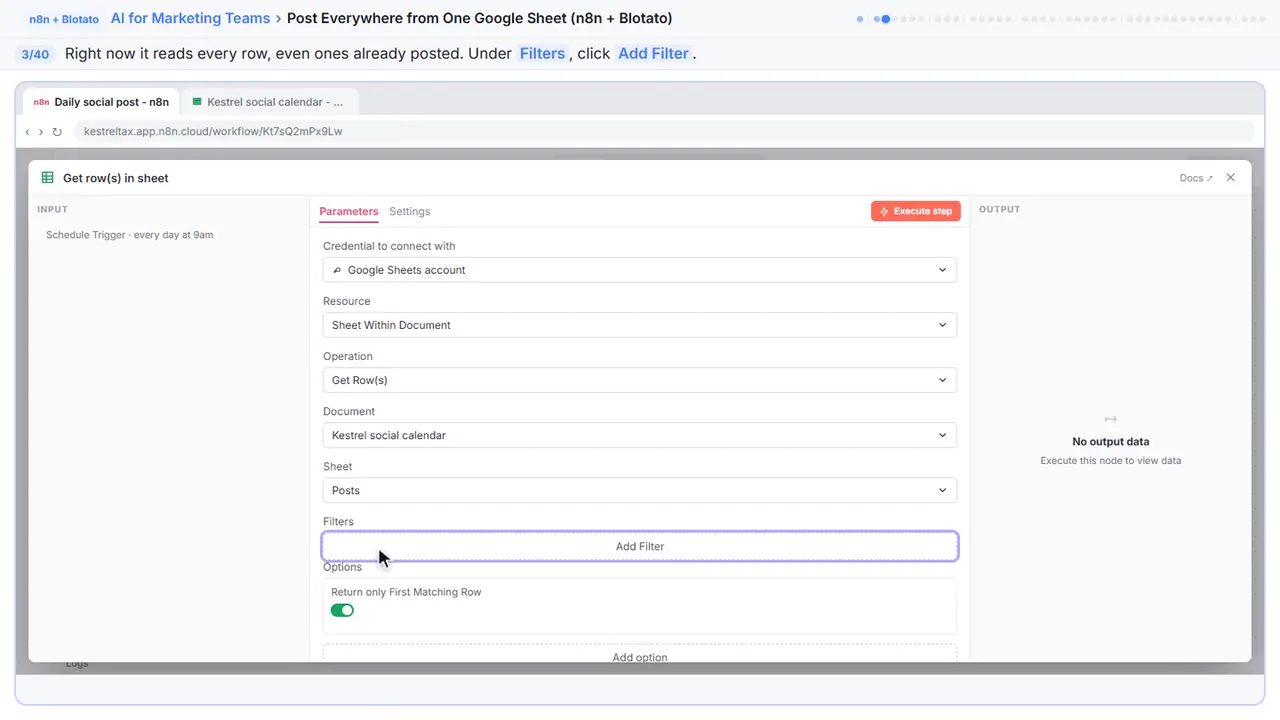
Right now it reads every row, even the ones already posted. Under filters, click add filter.
Step 4: Pick the column
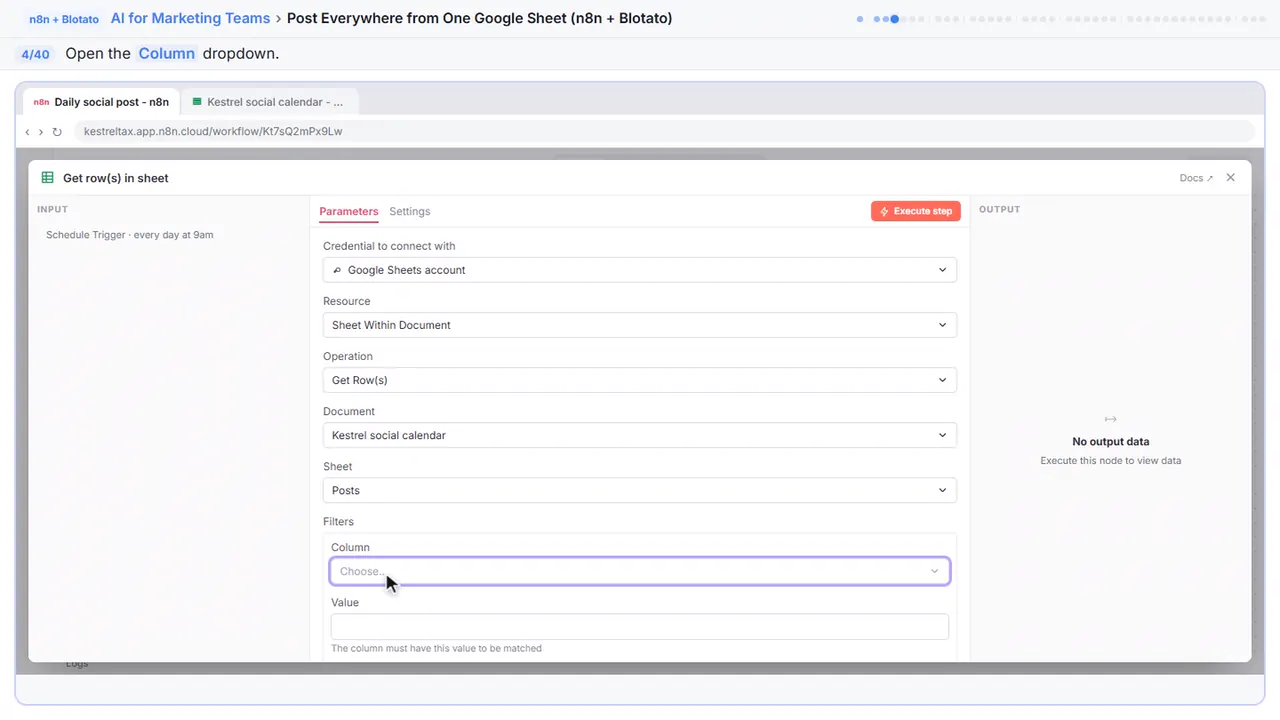
Step 5: status
Status.
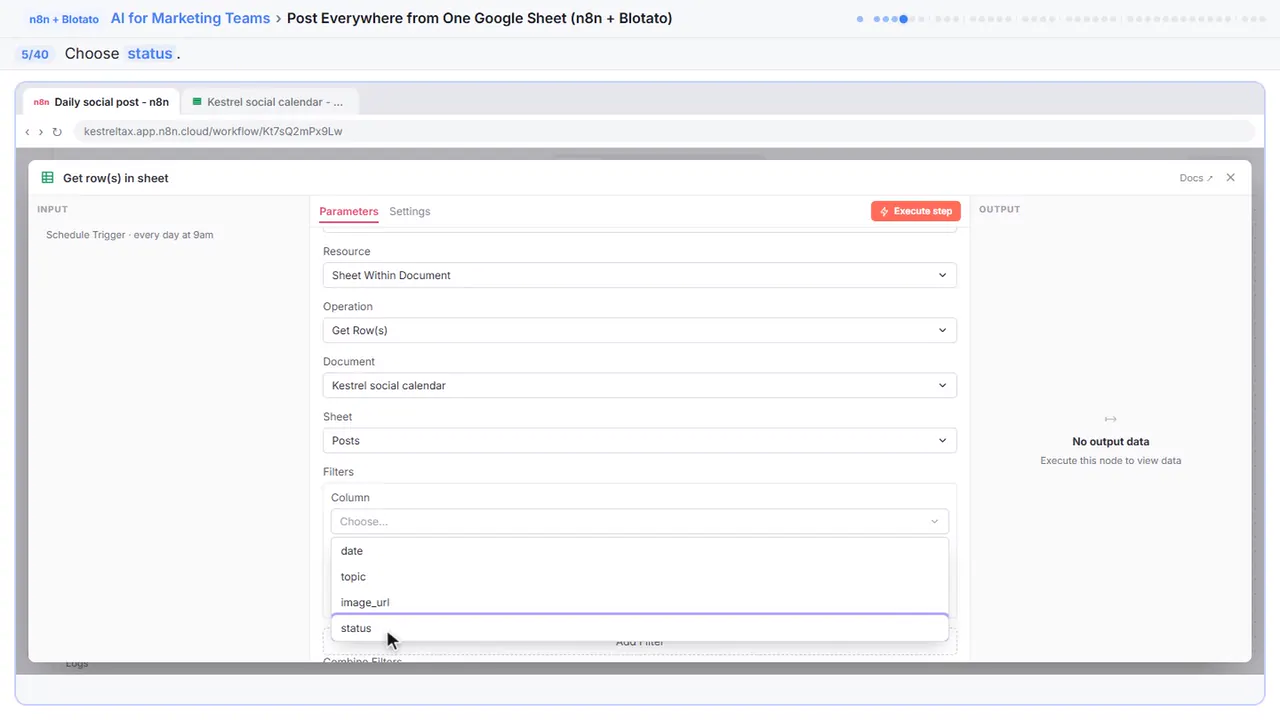
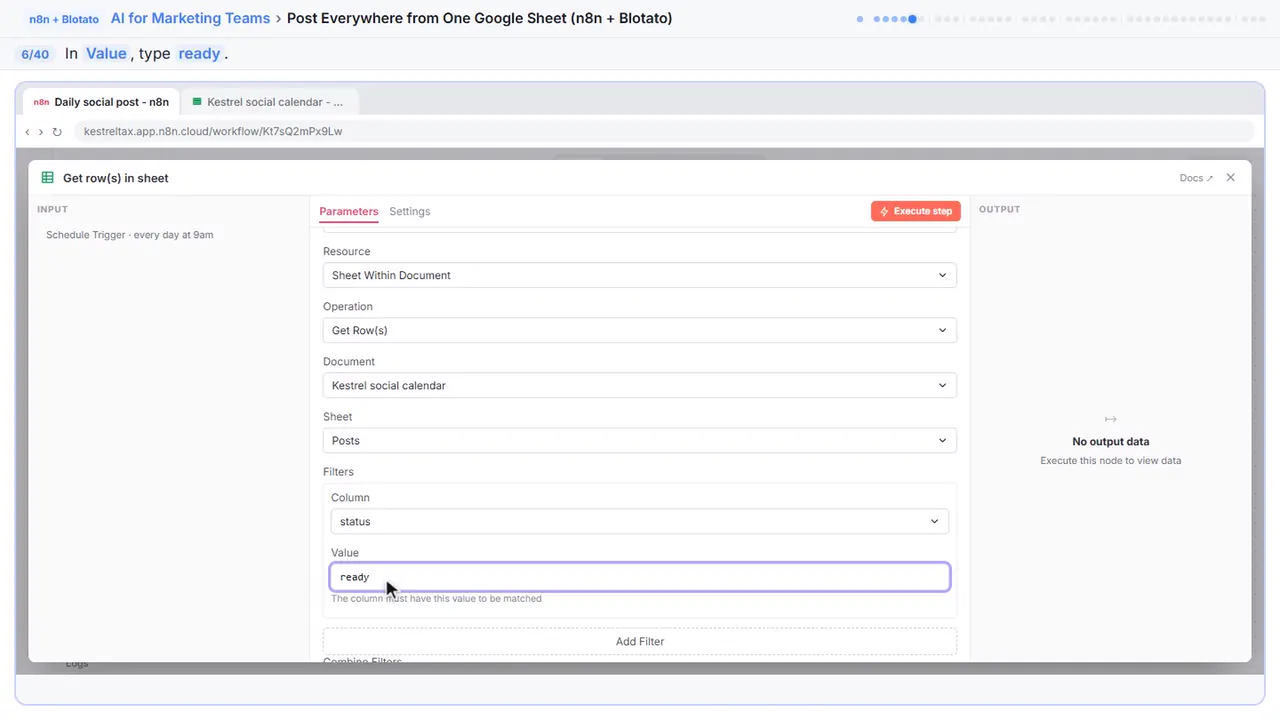
Step 6: Only ready rows
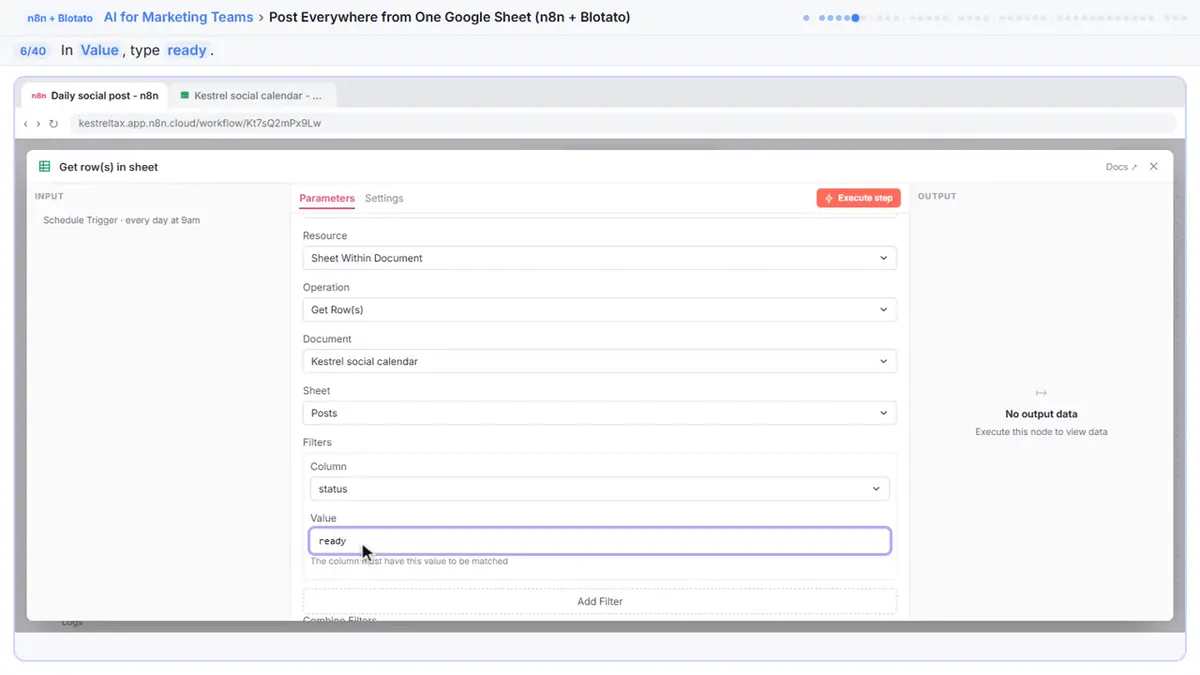
In value, type ready. Under options, return only first matching row is already on. So even when several rows are ready, it posts one a day, top one first.
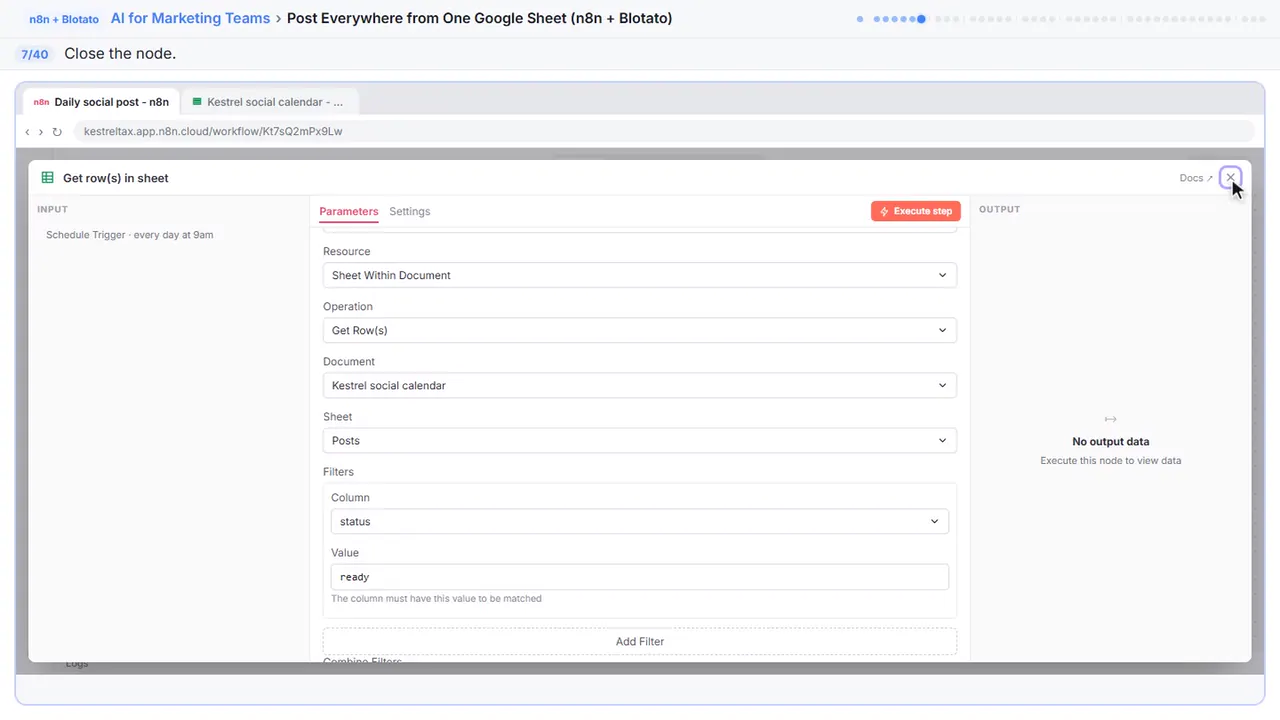
Step 7: Close the node
Close it.
Part 3: A caption per platform
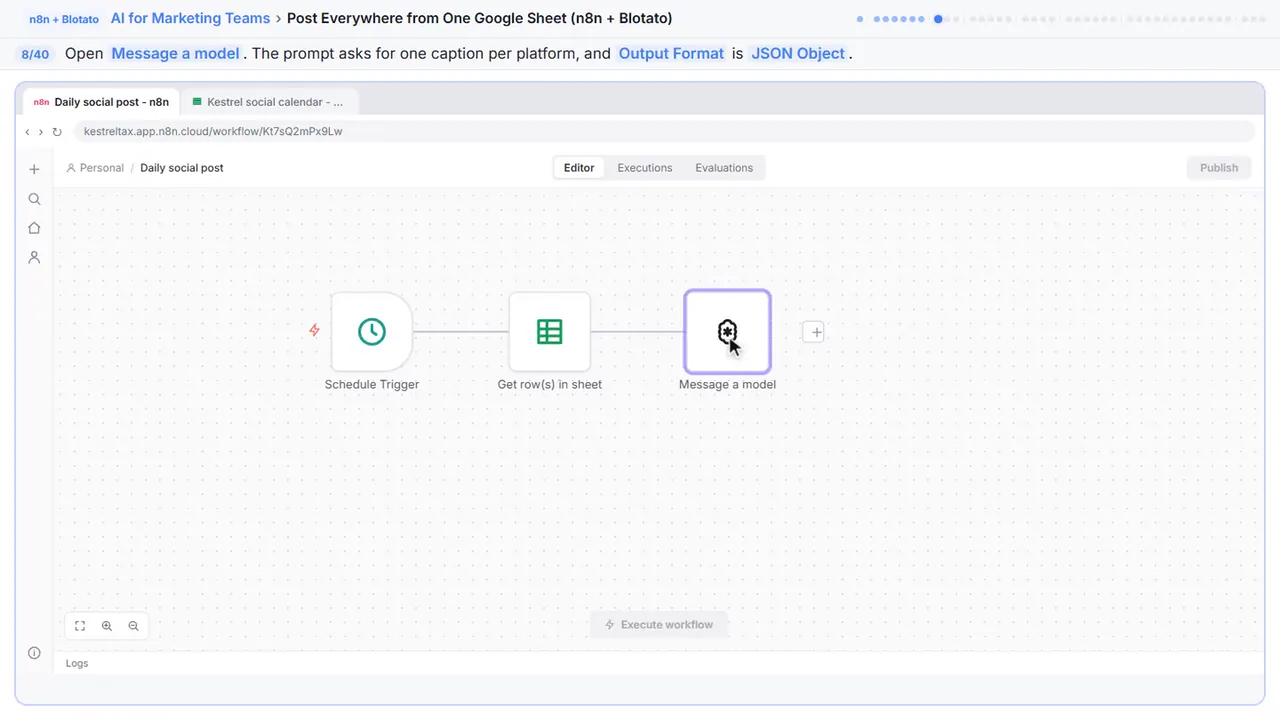
Step 8: Open the AI step
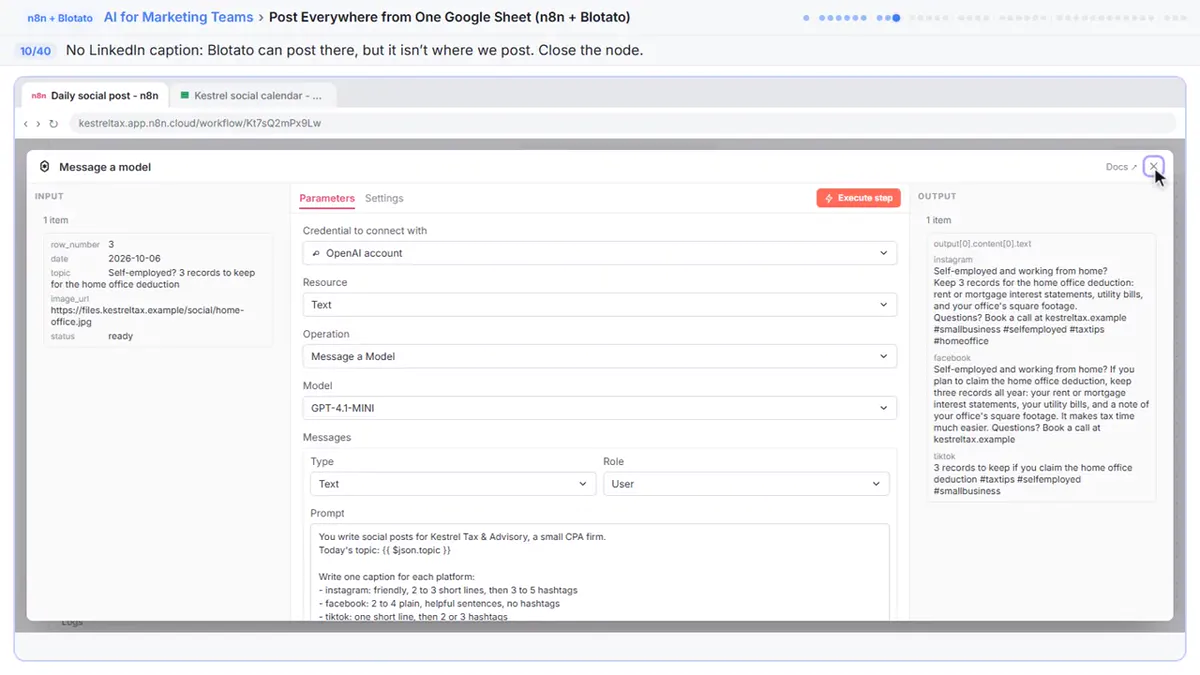
The prompt asks for three captions from the day's topic, Instagram, Facebook and TikTok, each in its own style. The output format is JSON, so each caption comes back separately.
Step 9: Run it
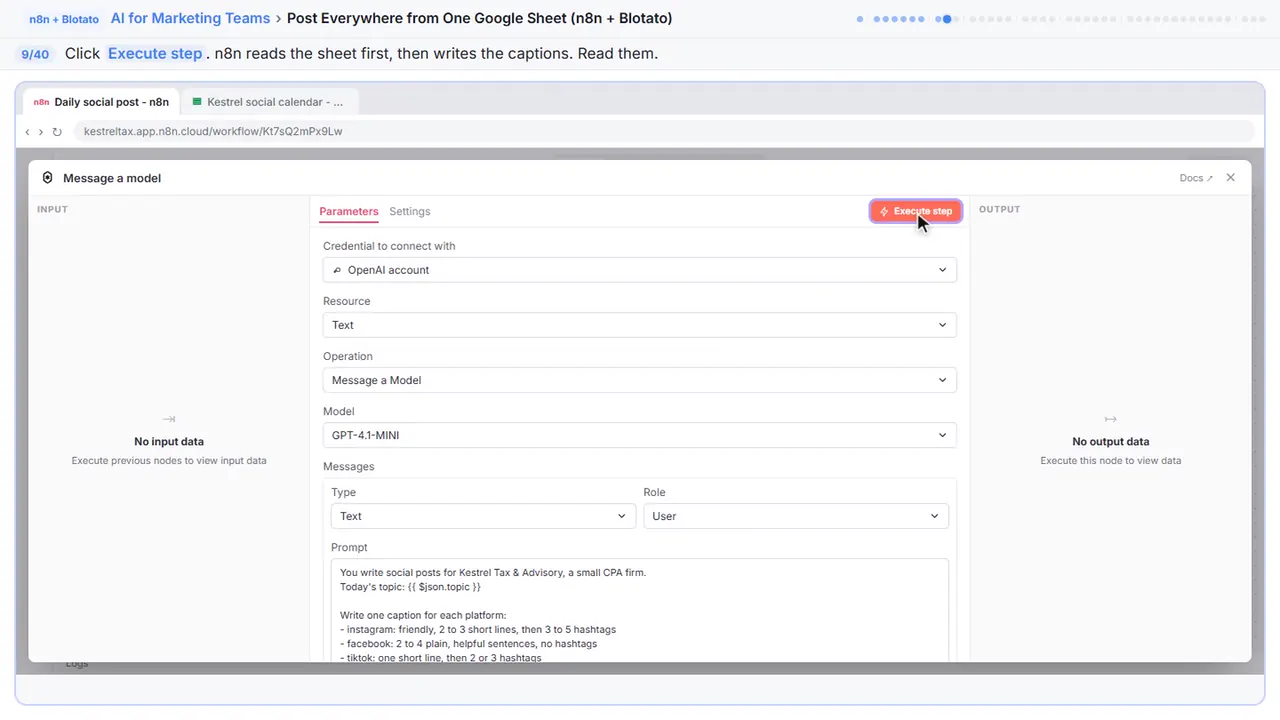
It reads the sheet, picks row three, and writes the captions. Read them. Checking these is your job until you trust it.
Step 10: Close the node
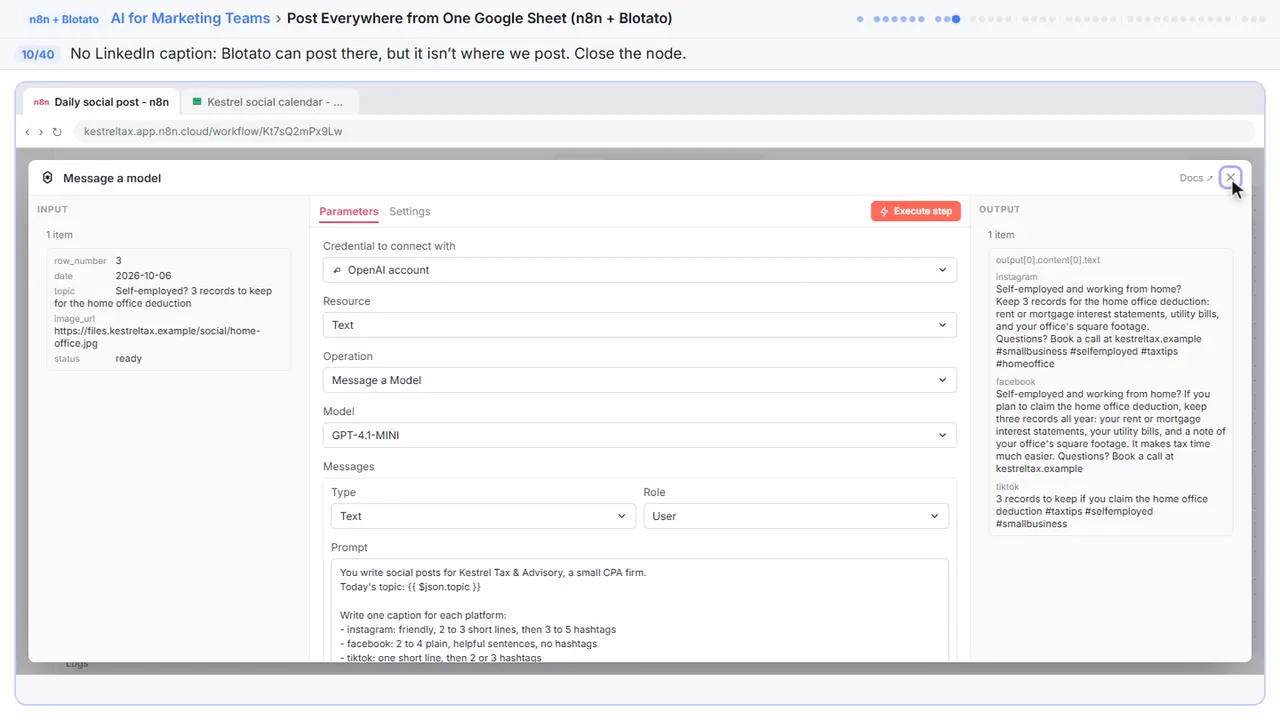
No LinkedIn caption, on purpose. Blotato can post there too, but it isn't where we post, so we leave it out. Close it.
Part 4: Add Blotato
Step 11: Add the next step
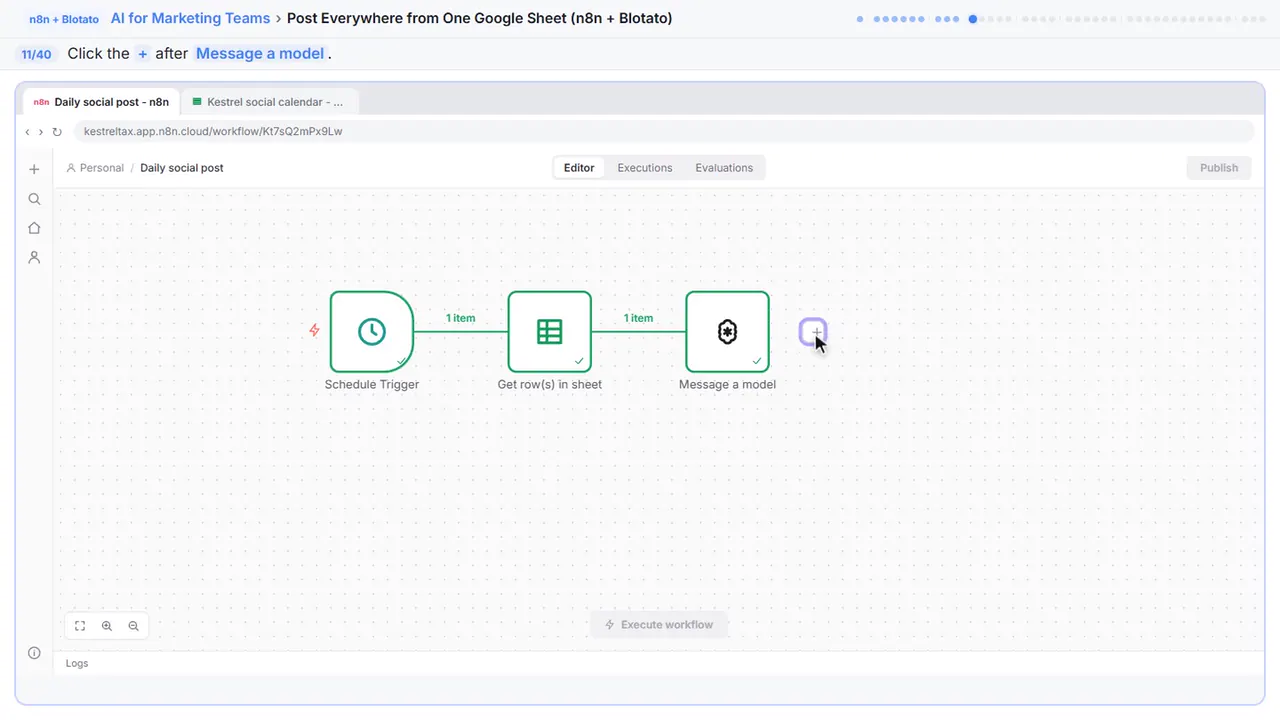
Now the posting.
Step 12: Search for Blotato
Step 13: Blotato
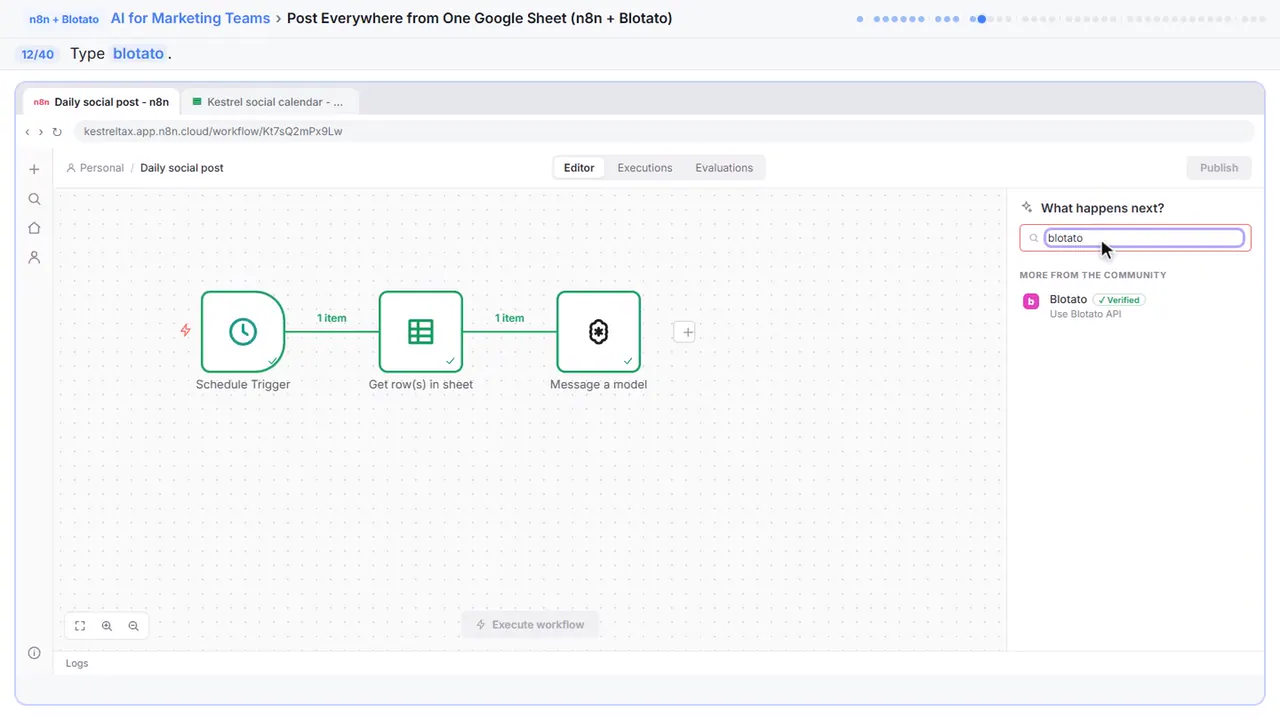
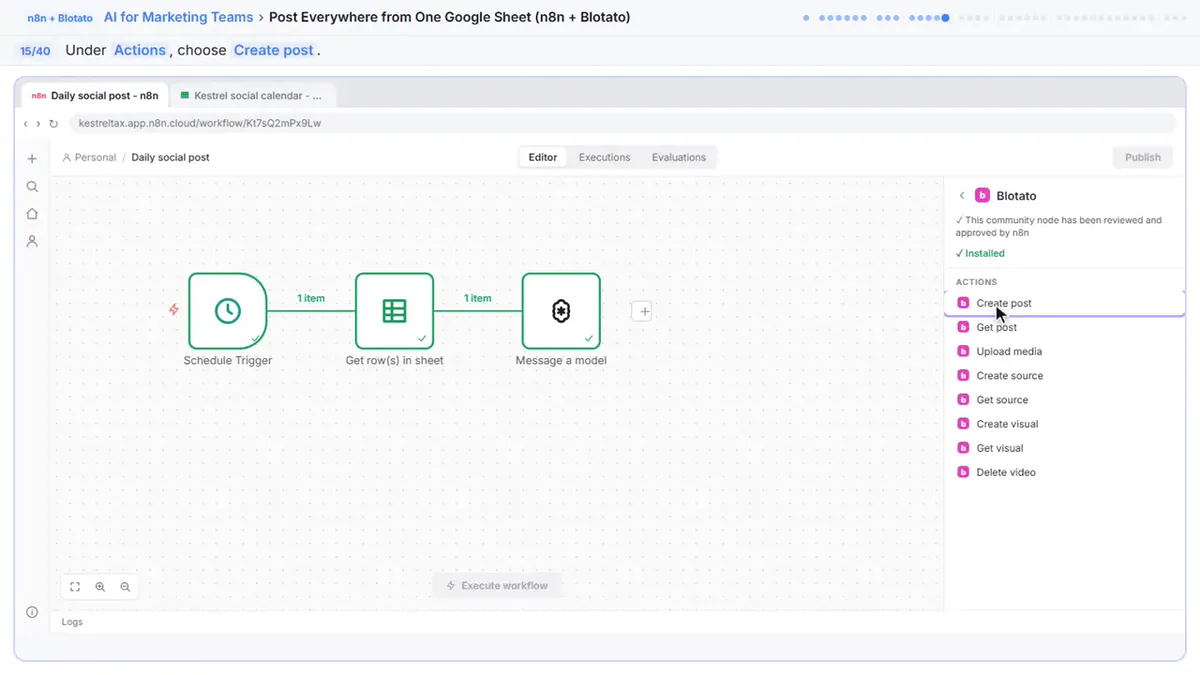
Blotato isn't built into n eight n. It's a verified community node, so it shows under more from the community.
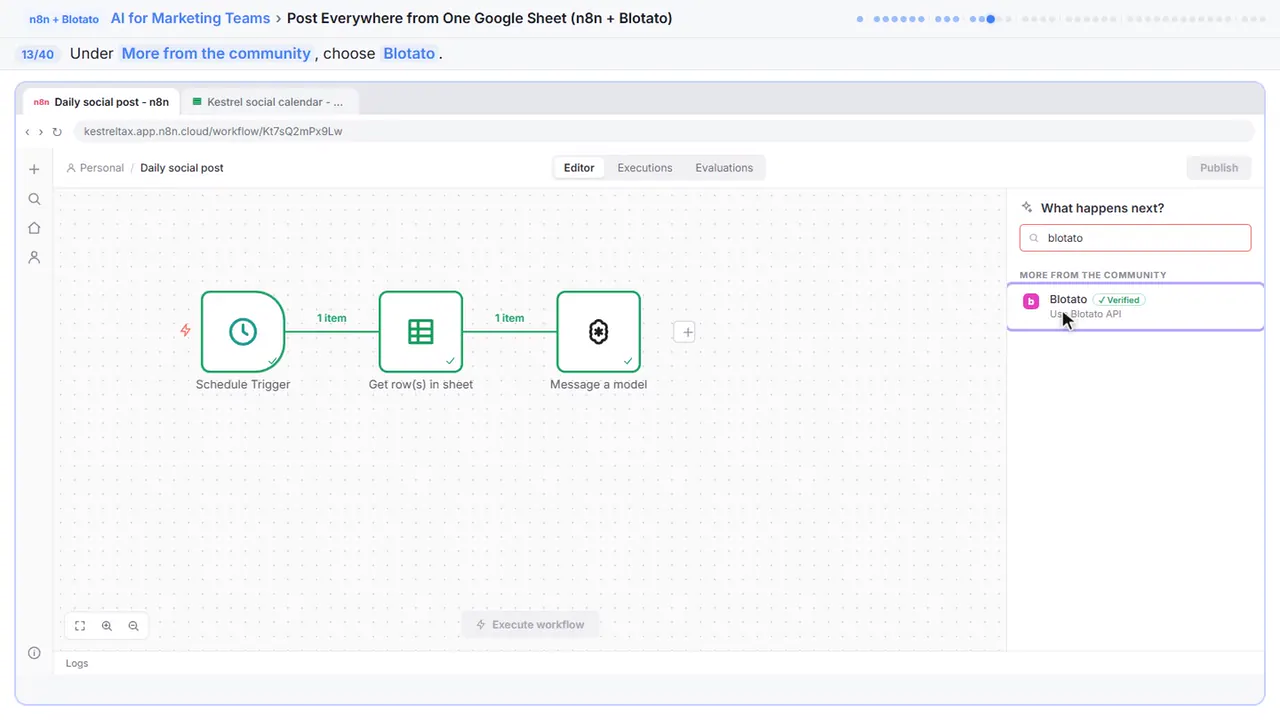
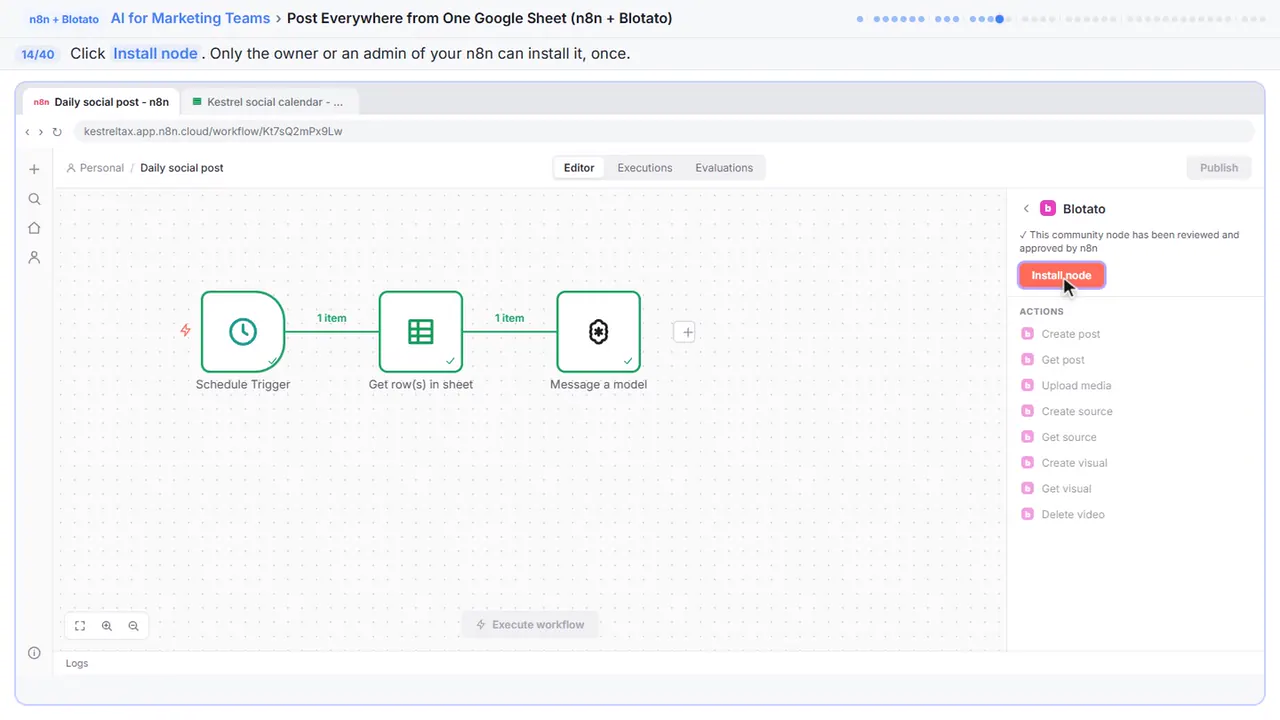
Step 14: Install node
Only the owner or an admin of your n eight n can do this, and only once.
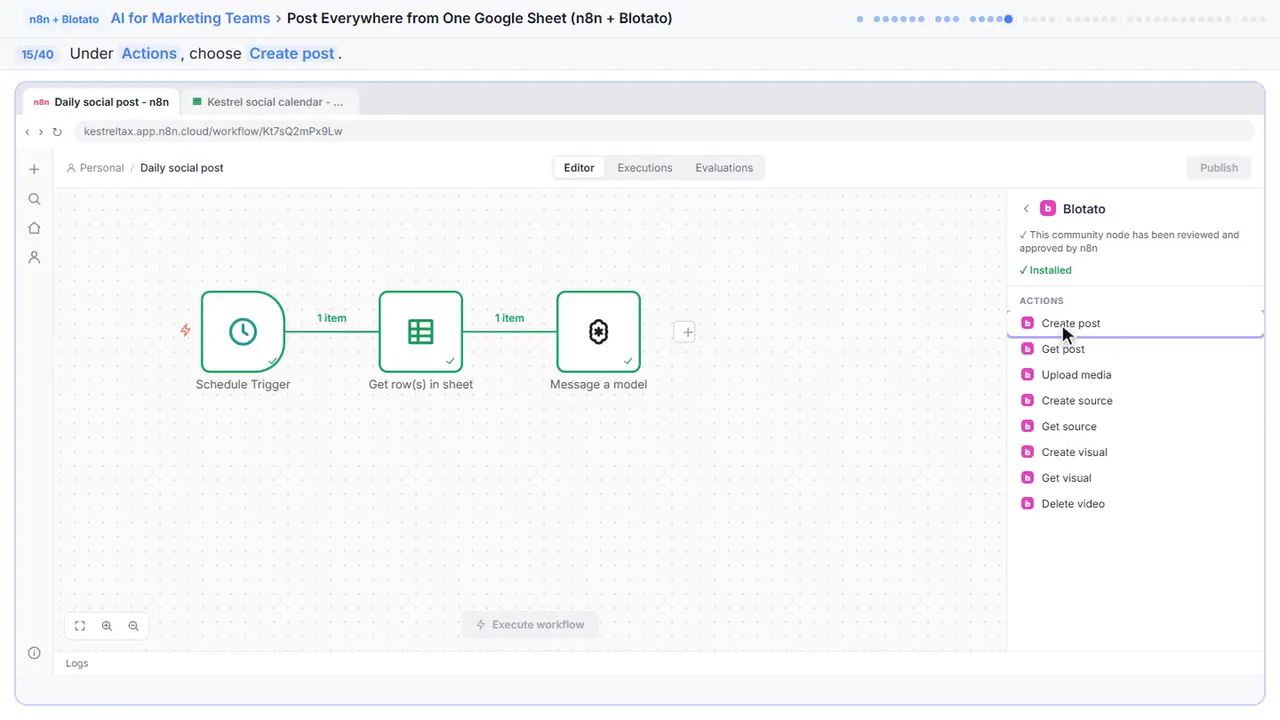
Step 15: Create post
You don't need upload media: Blotato takes the image link from the sheet directly.
Part 5: Connect Blotato
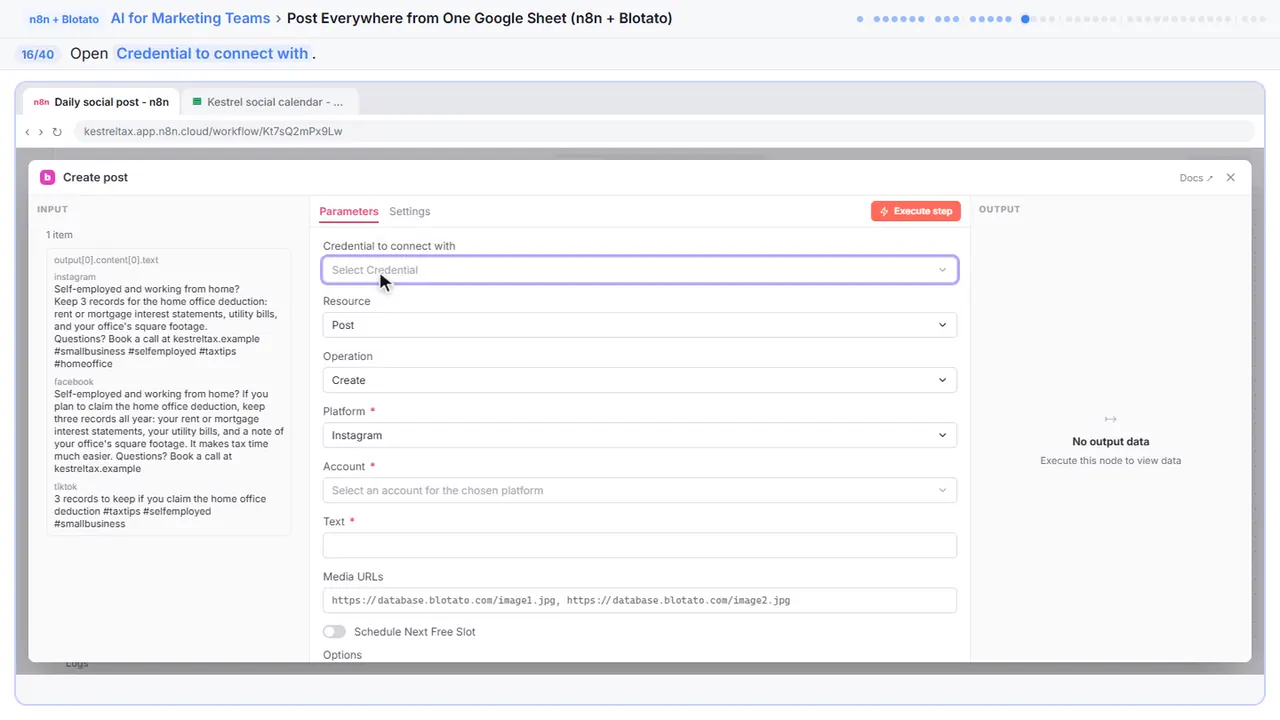
Step 16: Credential
Blotato needs an API key.
Step 17: New credential
Create new credential.
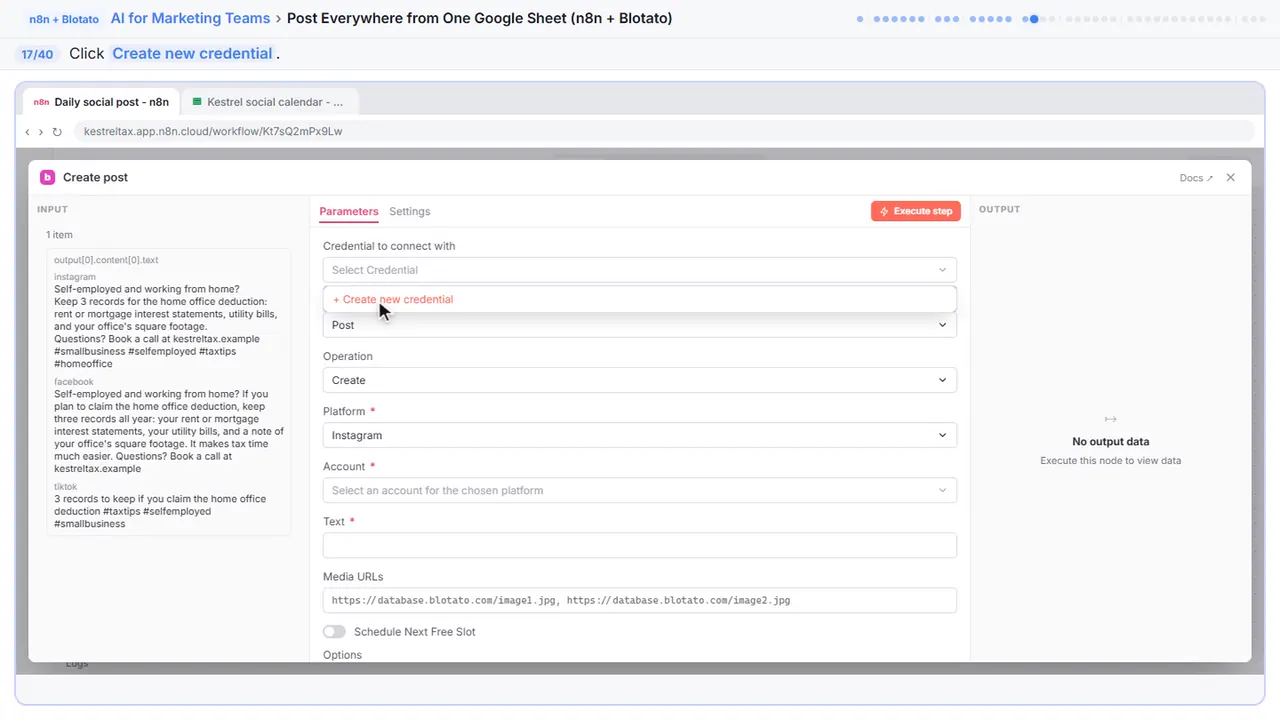
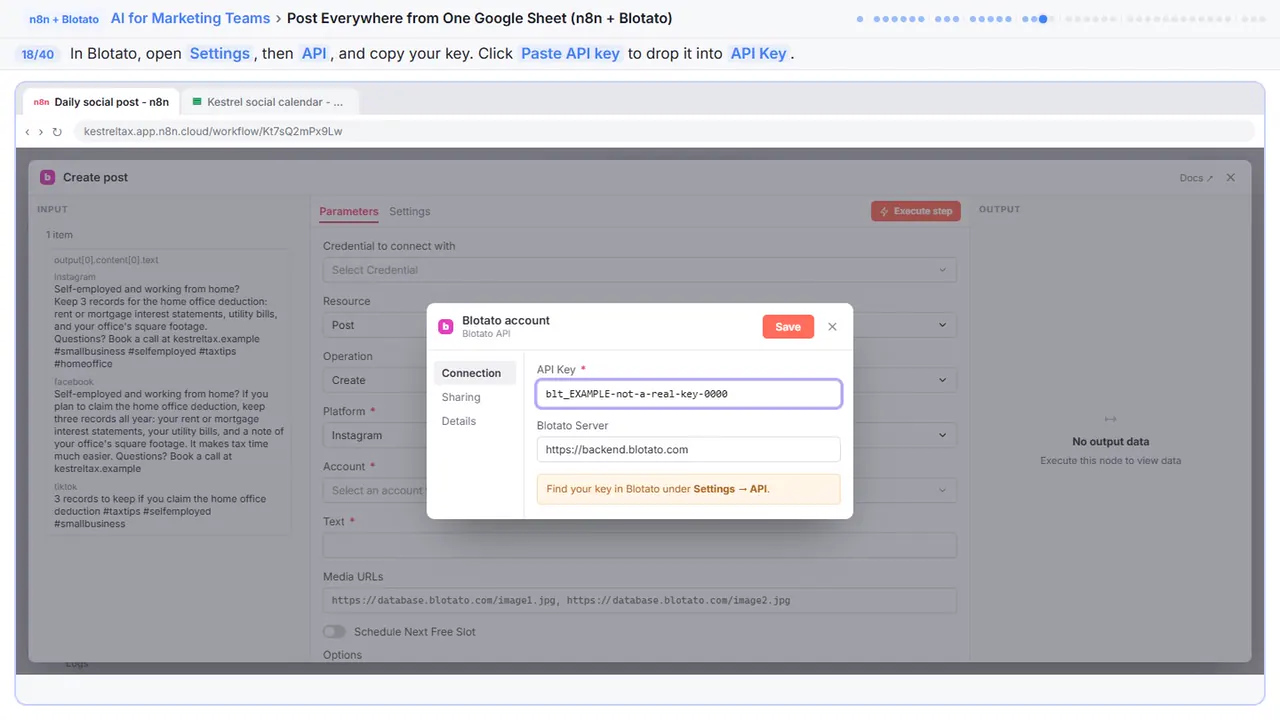
Step 18: Paste your Blotato key
Your key is in Blotato, under settings, then API. The API isn't in the free trial: making a key ends the trial and starts the paid plan. Starter is twenty-nine dollars a month.
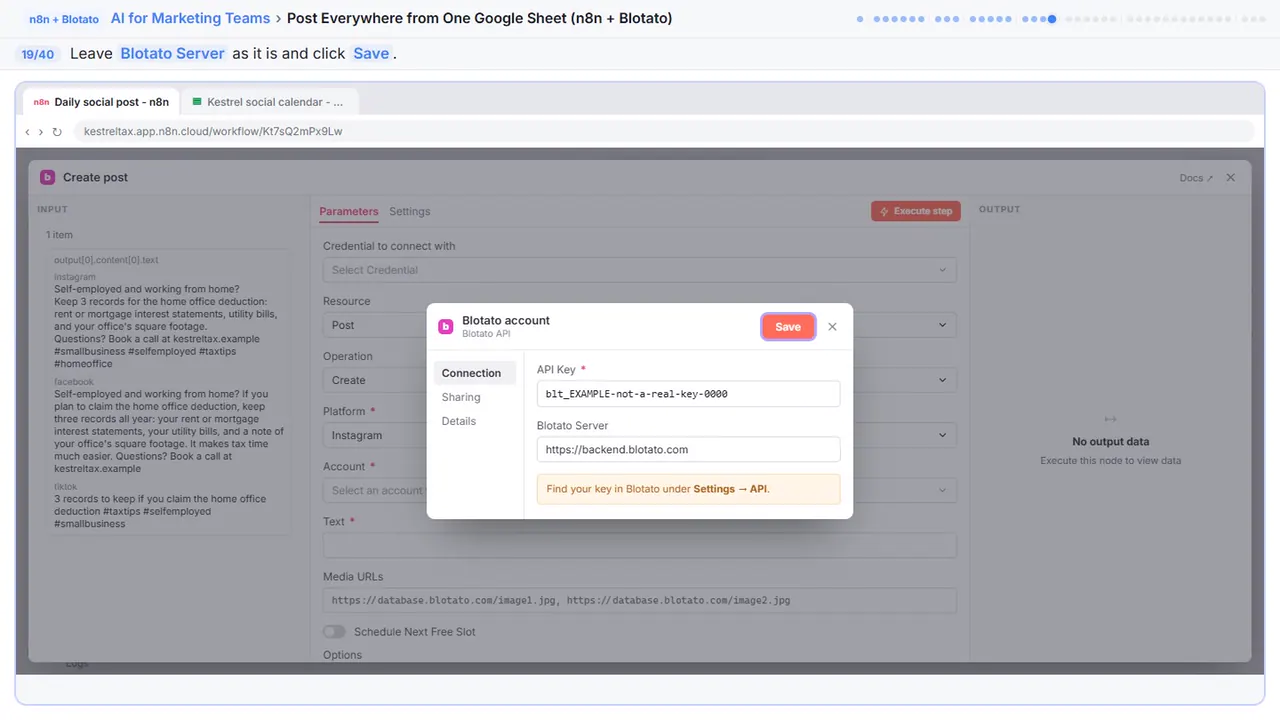
Step 19: Save
Leave the server as it is, and save.
Part 6: Post to Instagram
Step 20: Name it
You'll have three of these, so name them.
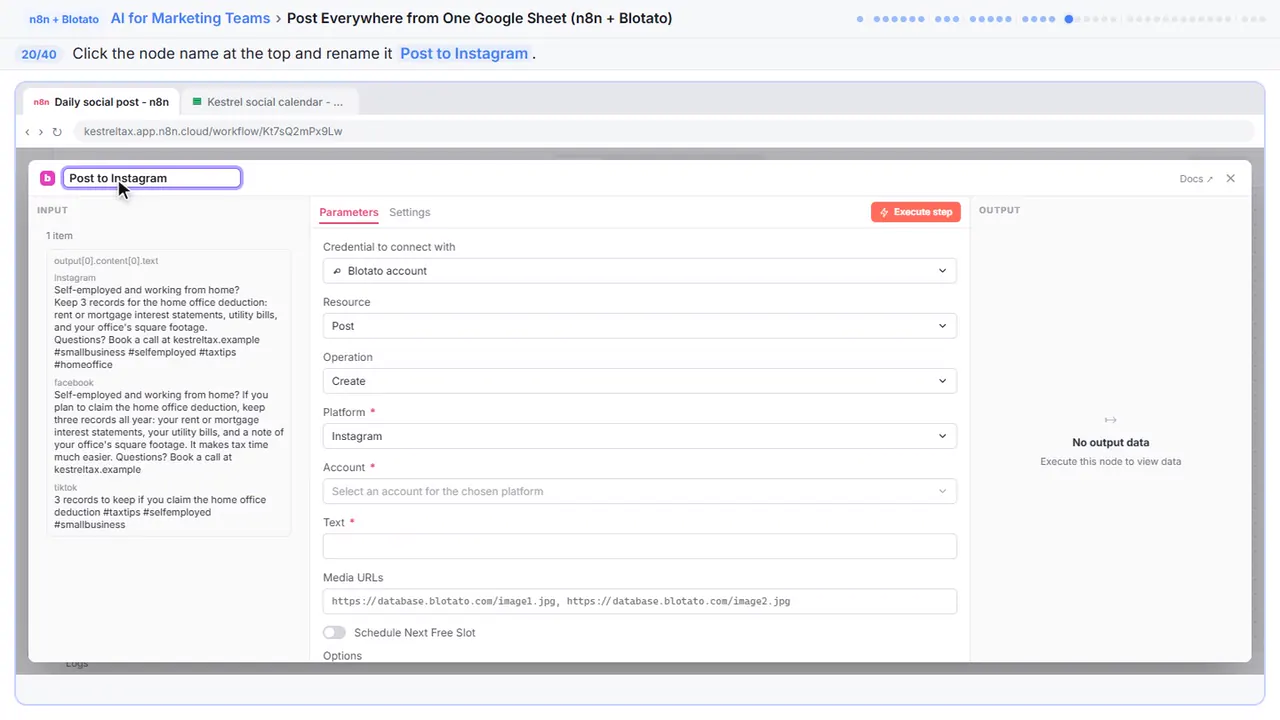
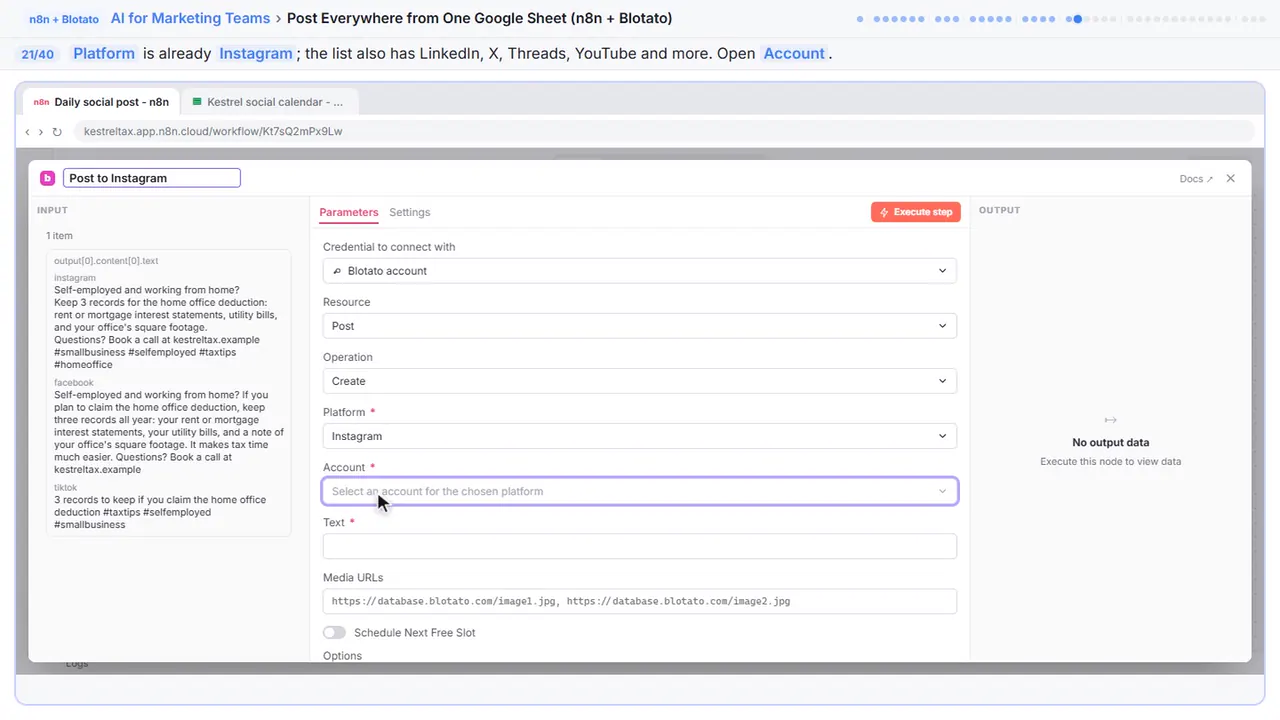
Step 21: Account
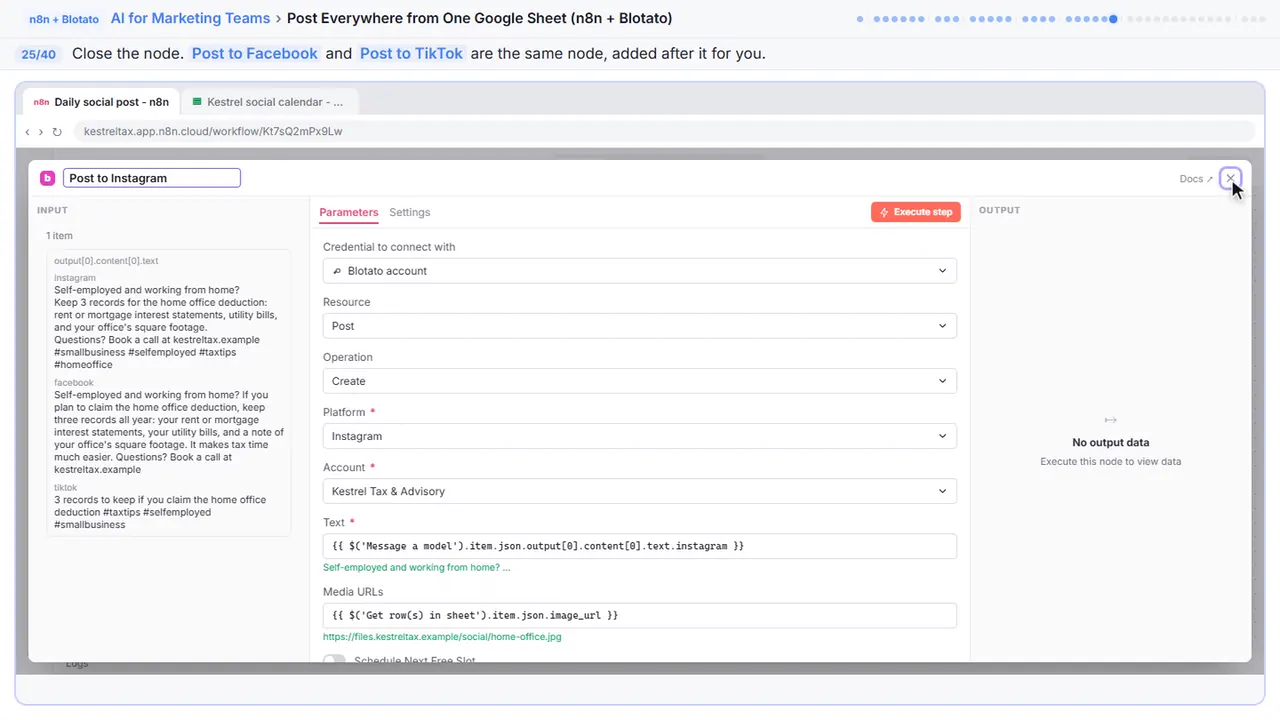
Platform is already Instagram. It lists the Instagram accounts you connected in Blotato.
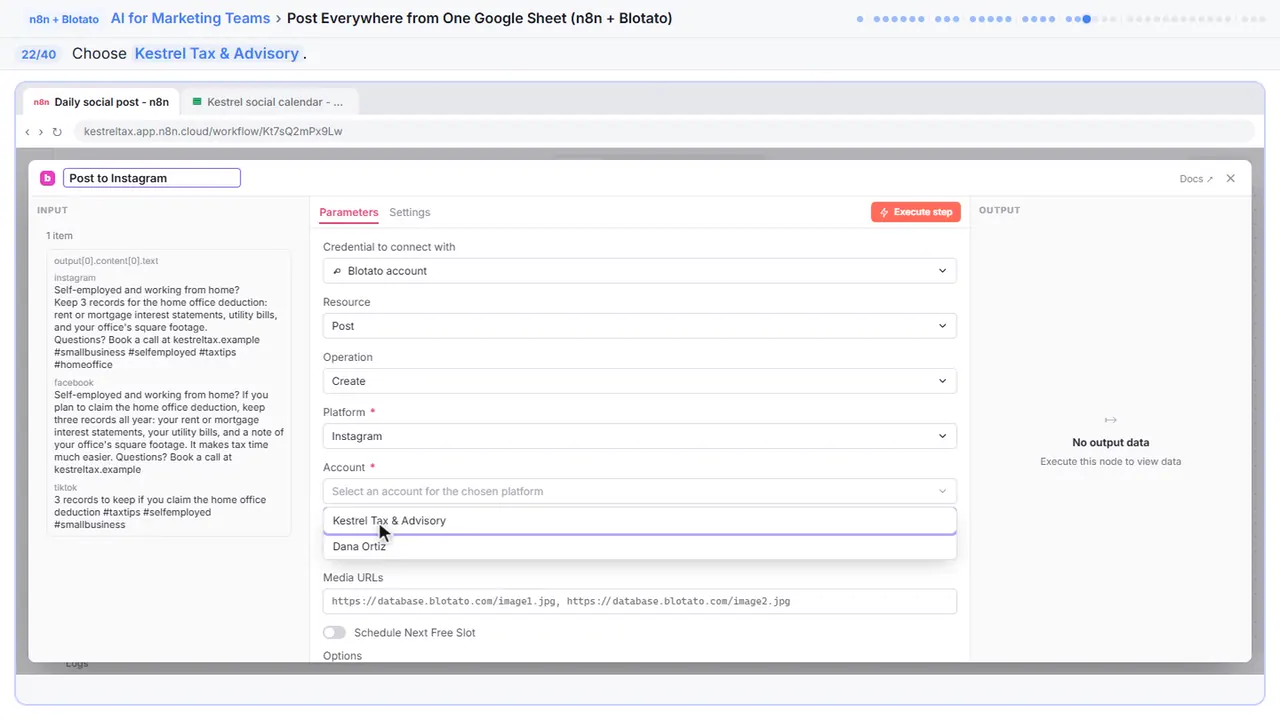
Step 22: Kestrel Tax & Advisory
Pick Kestrel Tax and Advisory, the firm's account, not someone's personal one.
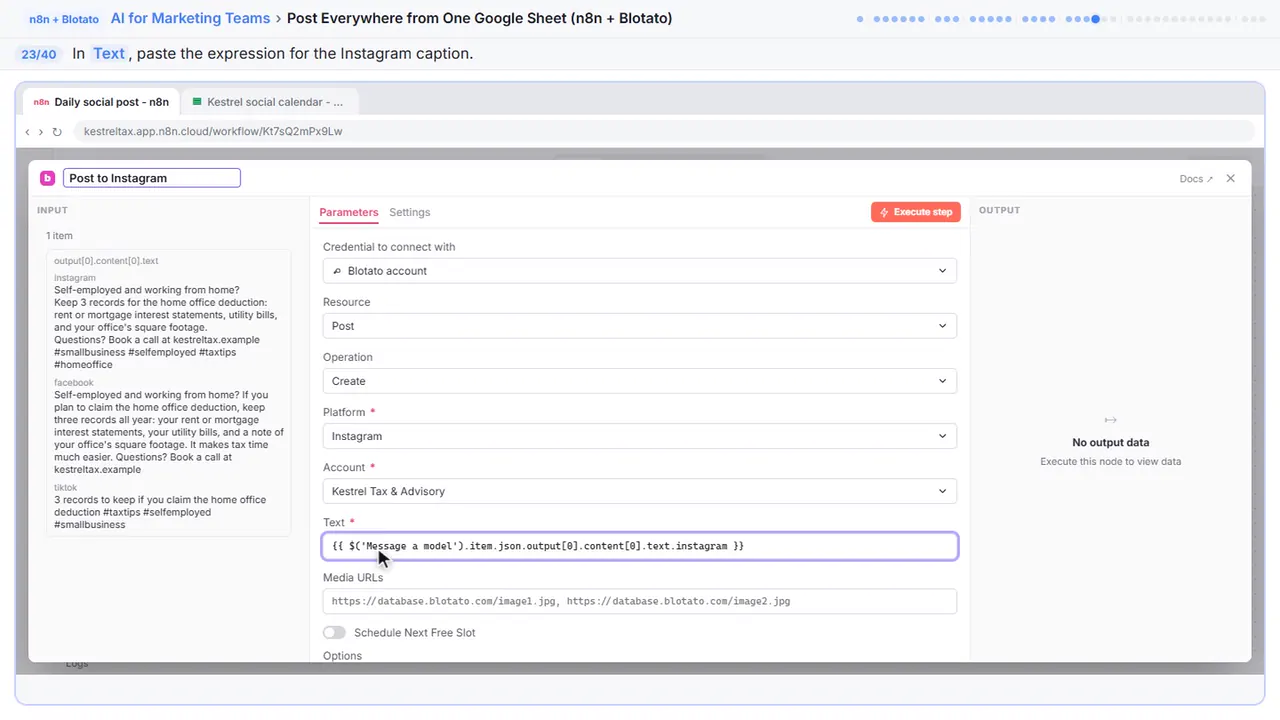
Step 23: The caption
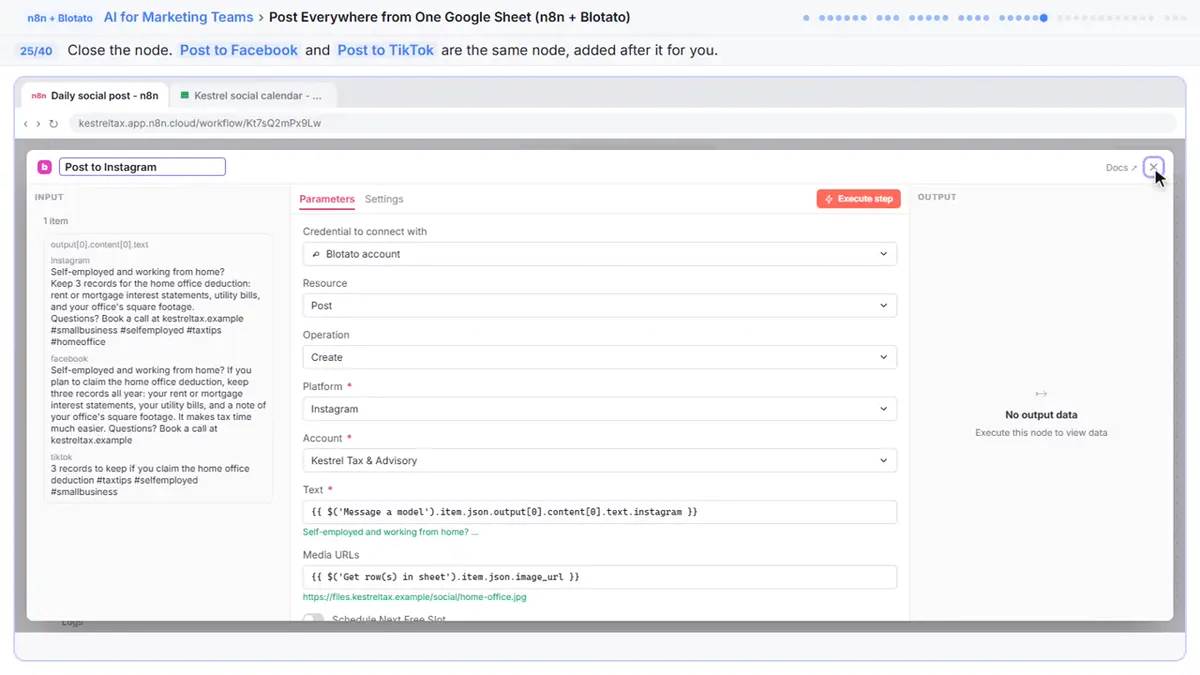
In text, paste this. It takes the Instagram caption from the AI step.
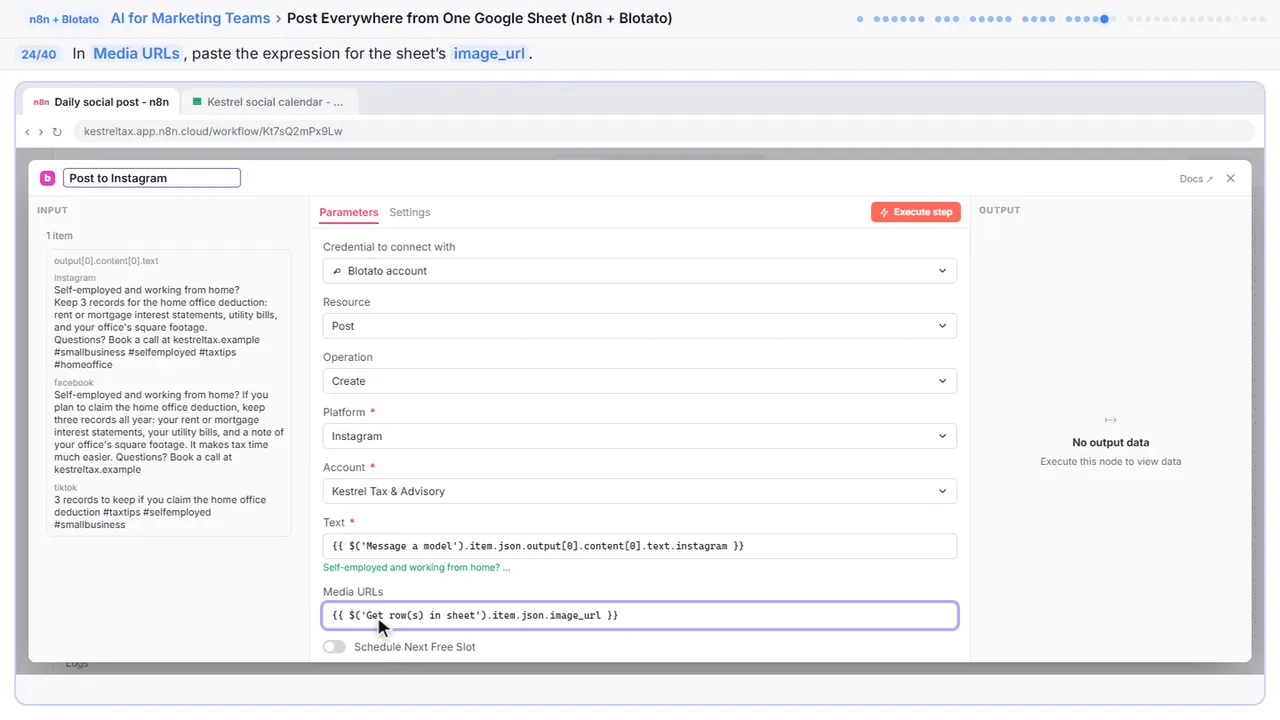
Step 24: The image
Now media URLs. Instagram won't post without an image or video.
Step 25: Close the node
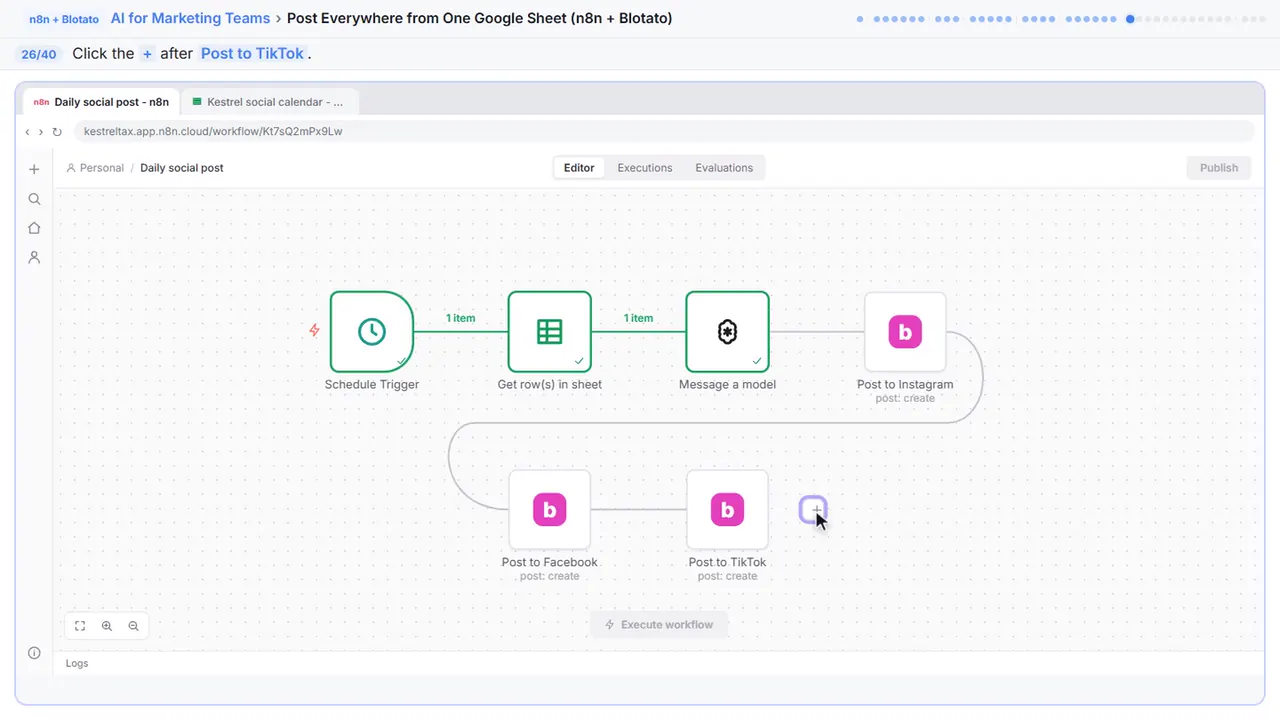
Close it. Facebook and TikTok are the same node twice more, with their own platform, account and caption, so we added them for you. Facebook also asks which page to post to.
Part 7: Mark it posted
Step 26: Add the last step
Last, mark the row posted, or tomorrow it posts the same thing again.
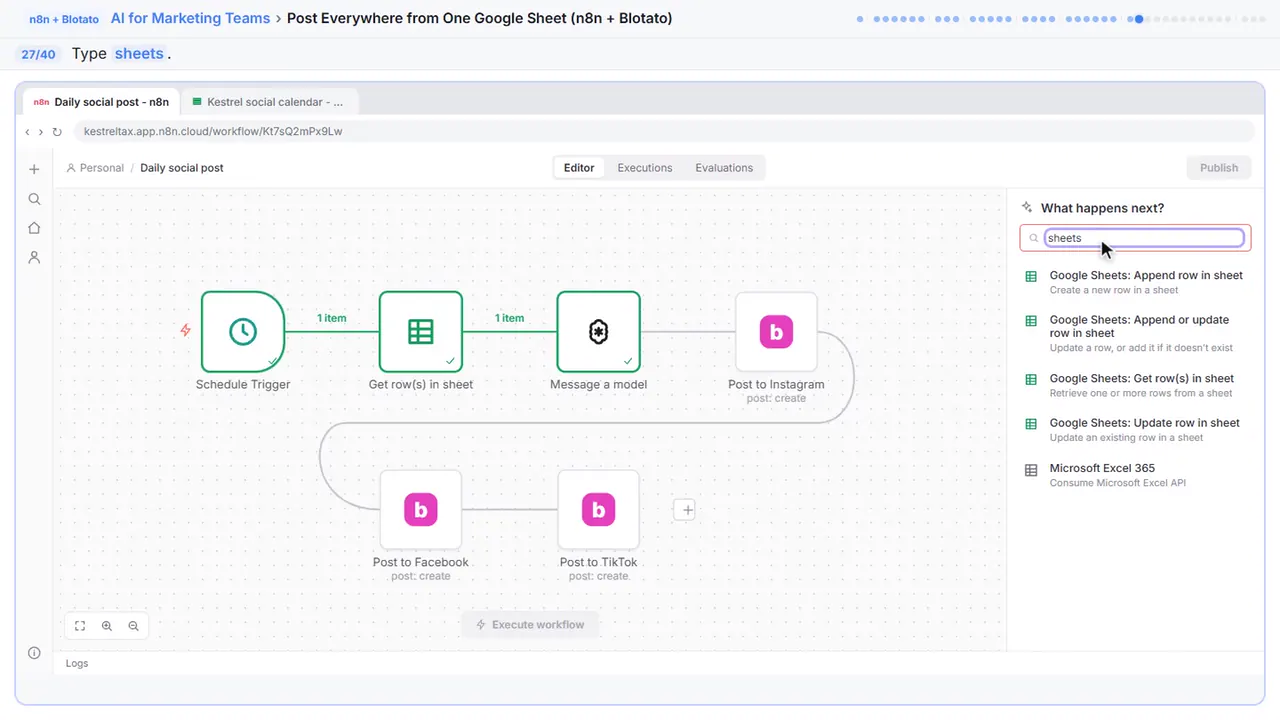
Step 27: Search for Sheets
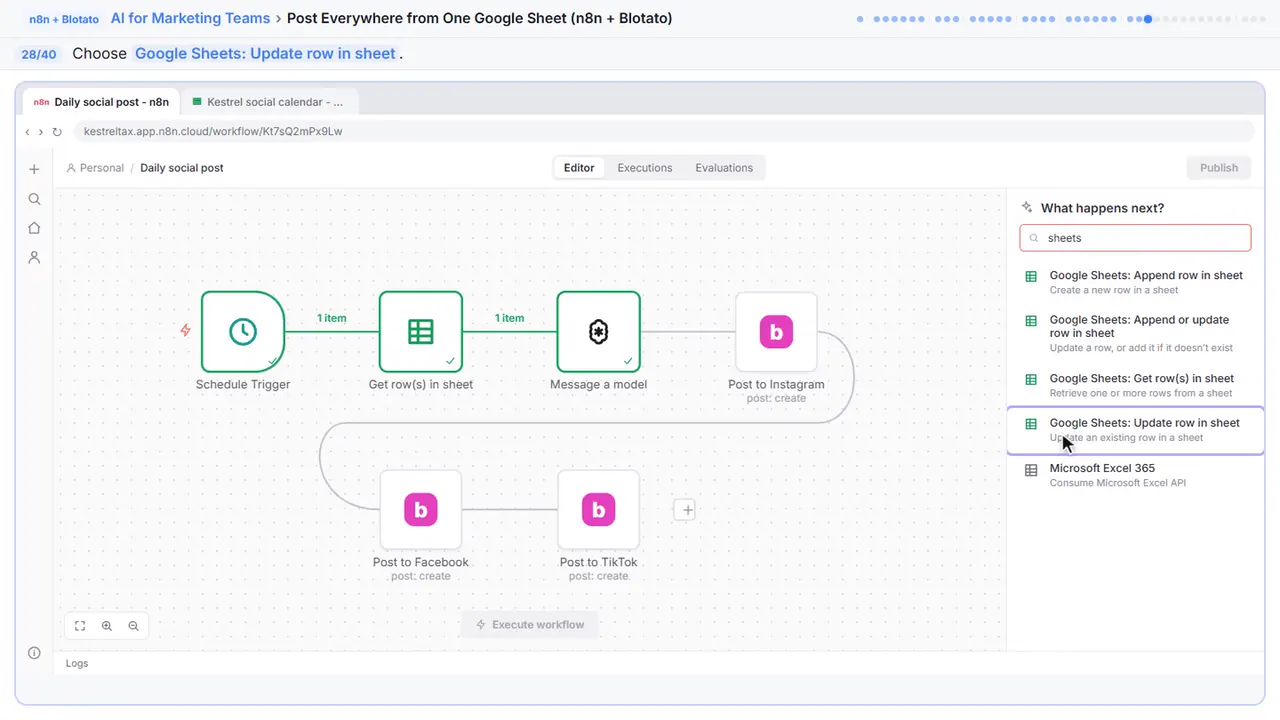
Step 28: Update row in sheet
Step 29: Pick the document
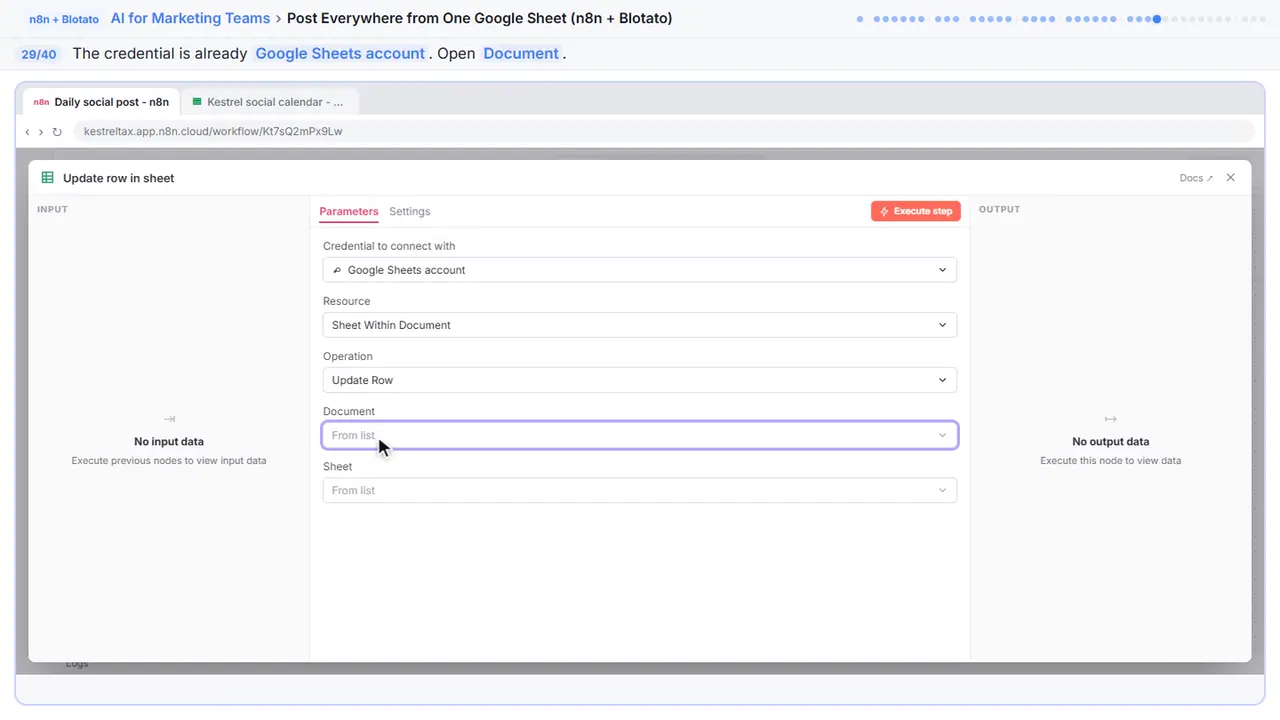
Step 30: Kestrel social calendar
Kestrel social calendar.
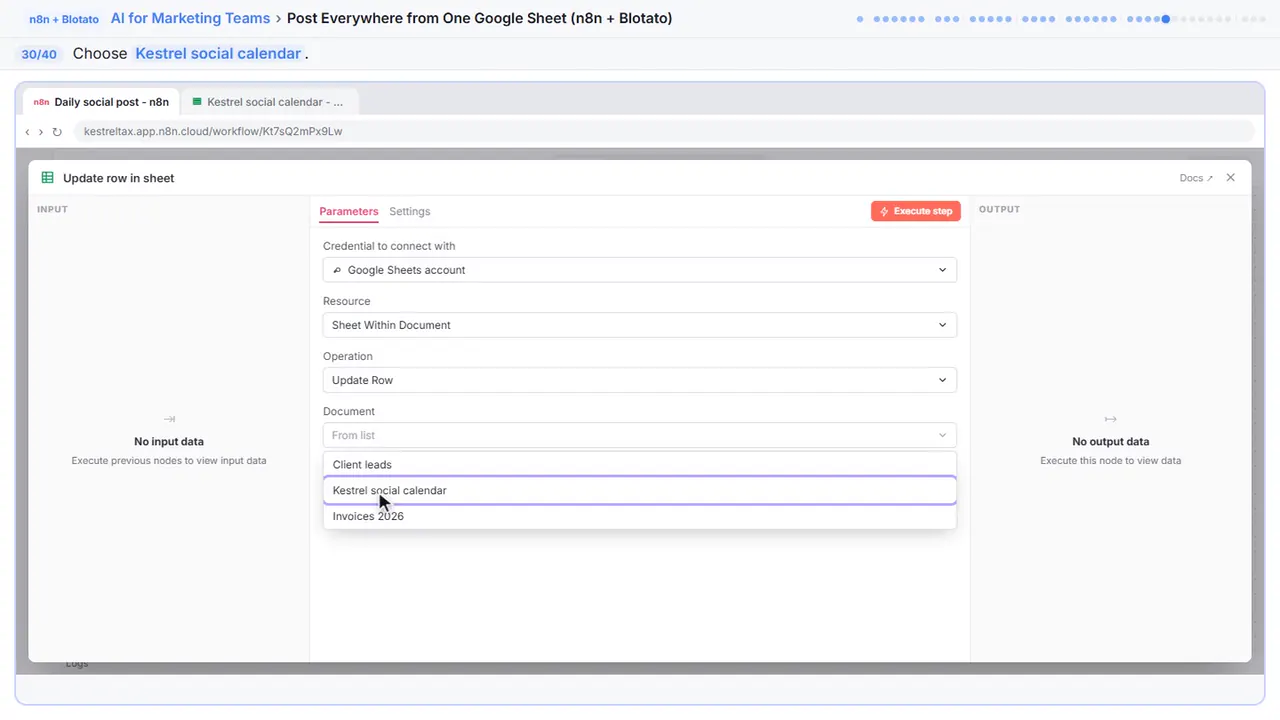
Step 31: Pick the tab
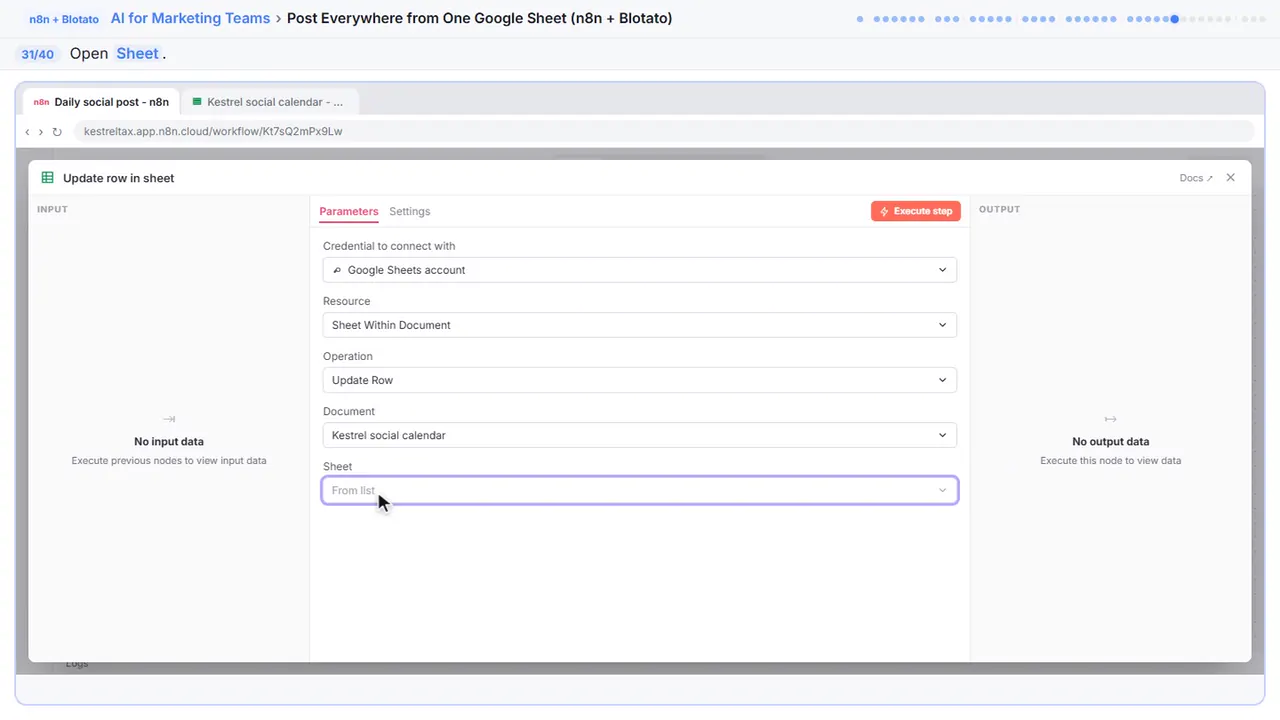
Step 32: Posts
The posts tab.
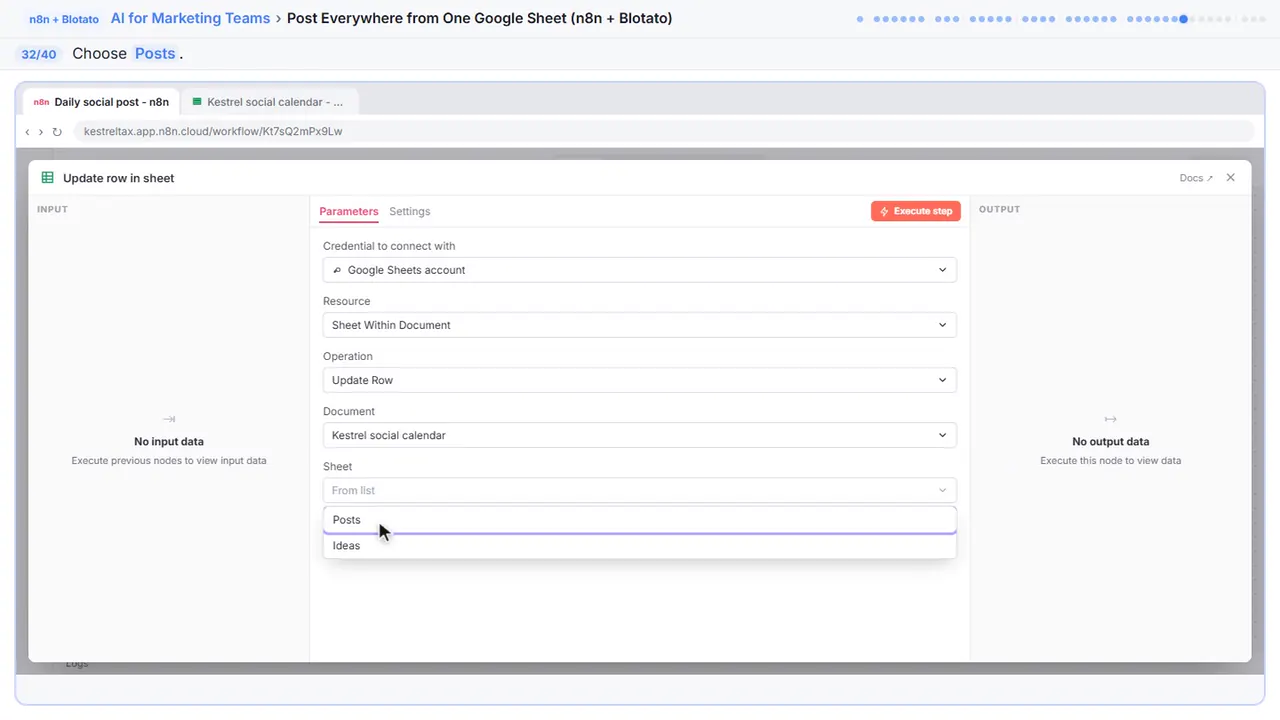
Step 33: Which row
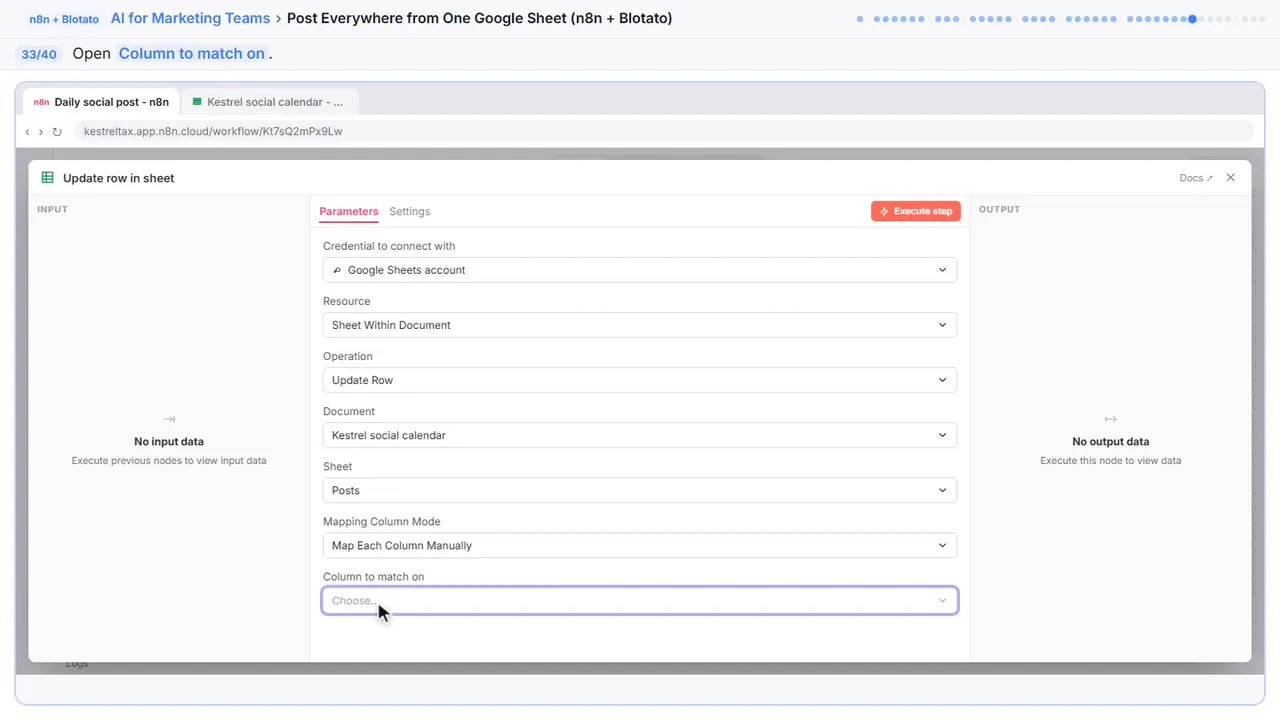
Now, which row to change.
Step 34: row_number
Row number. n eight n adds it to every row it reads, so it points at exactly the right one.
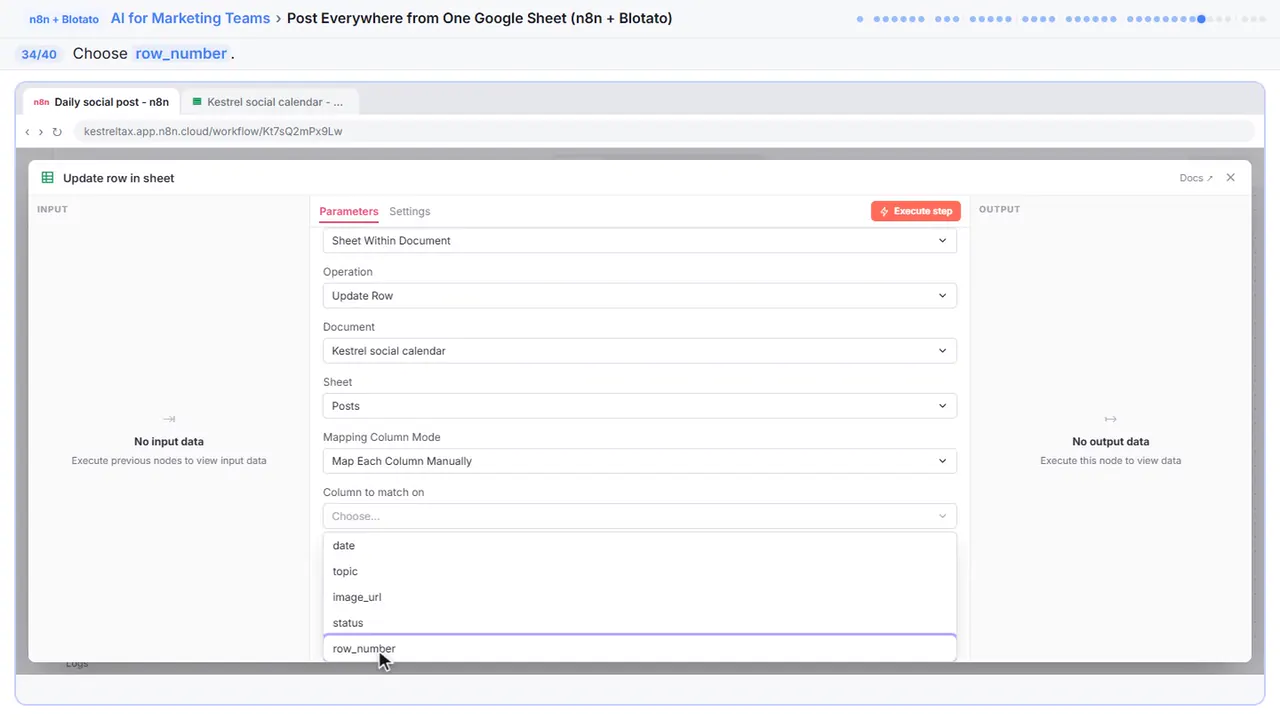
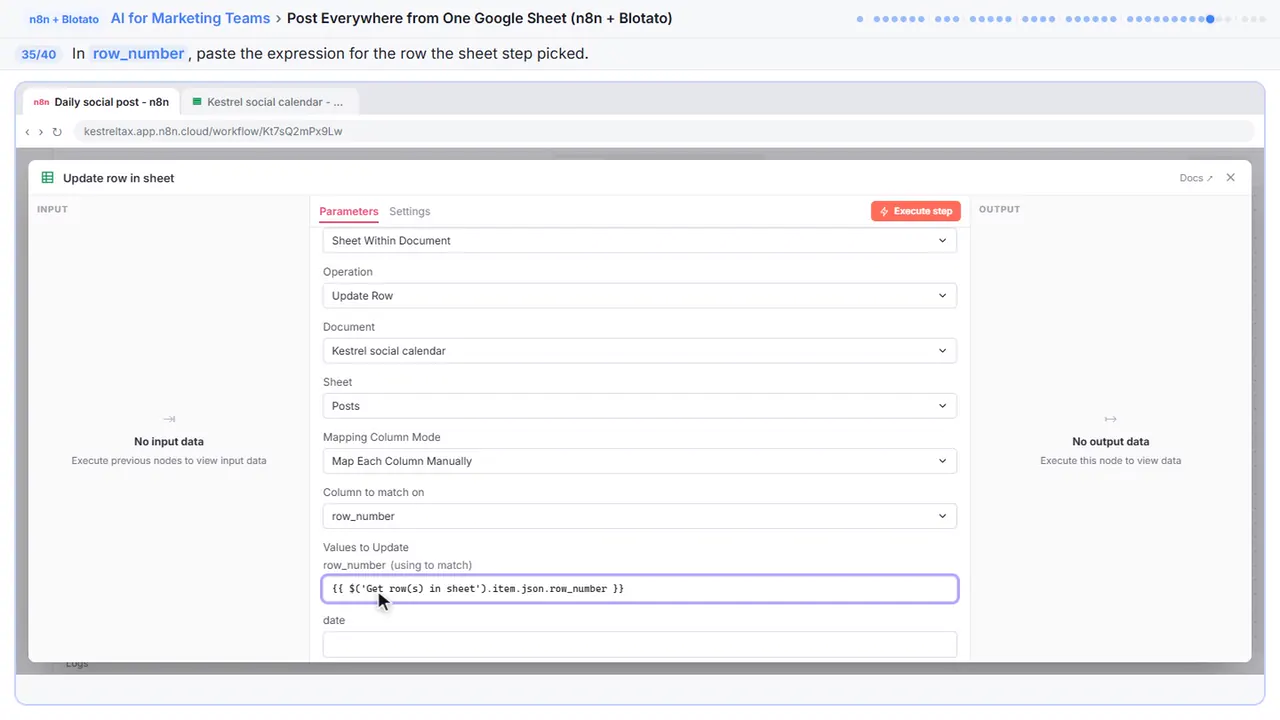
Step 35: The row it posted
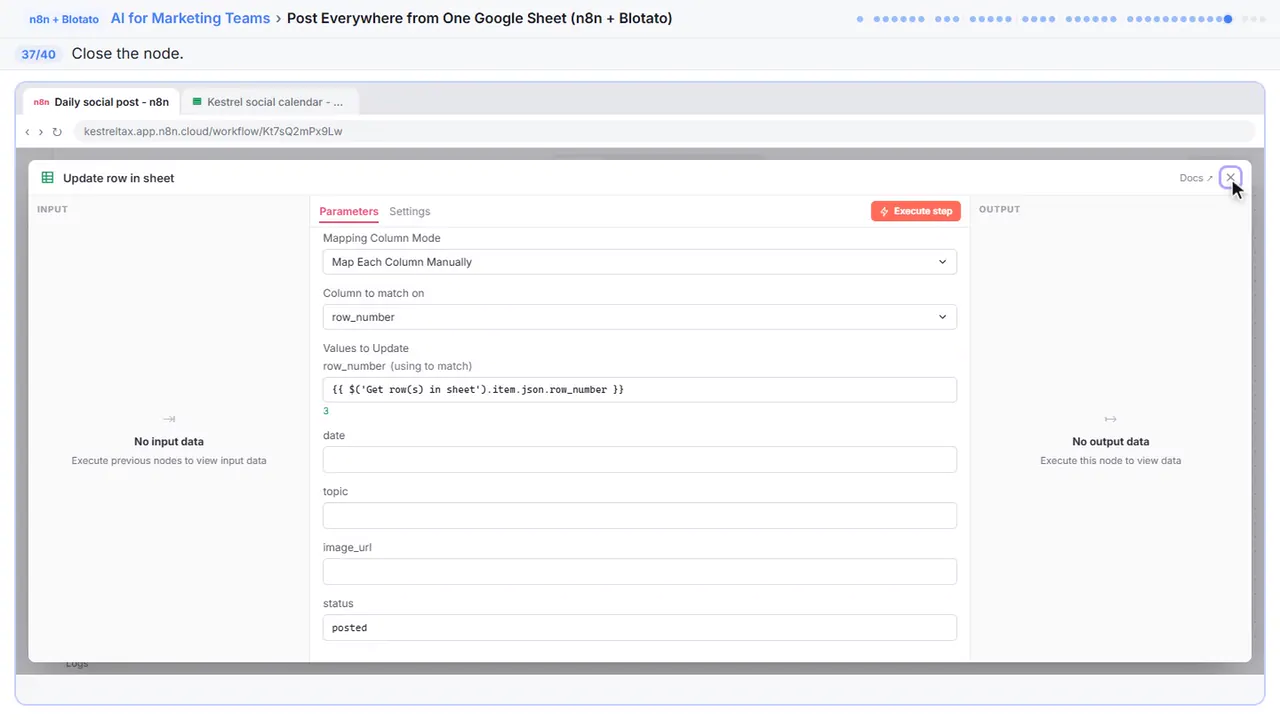
Row number only takes numbers, so click expression above it first. It is the row the sheet step picked: row three.
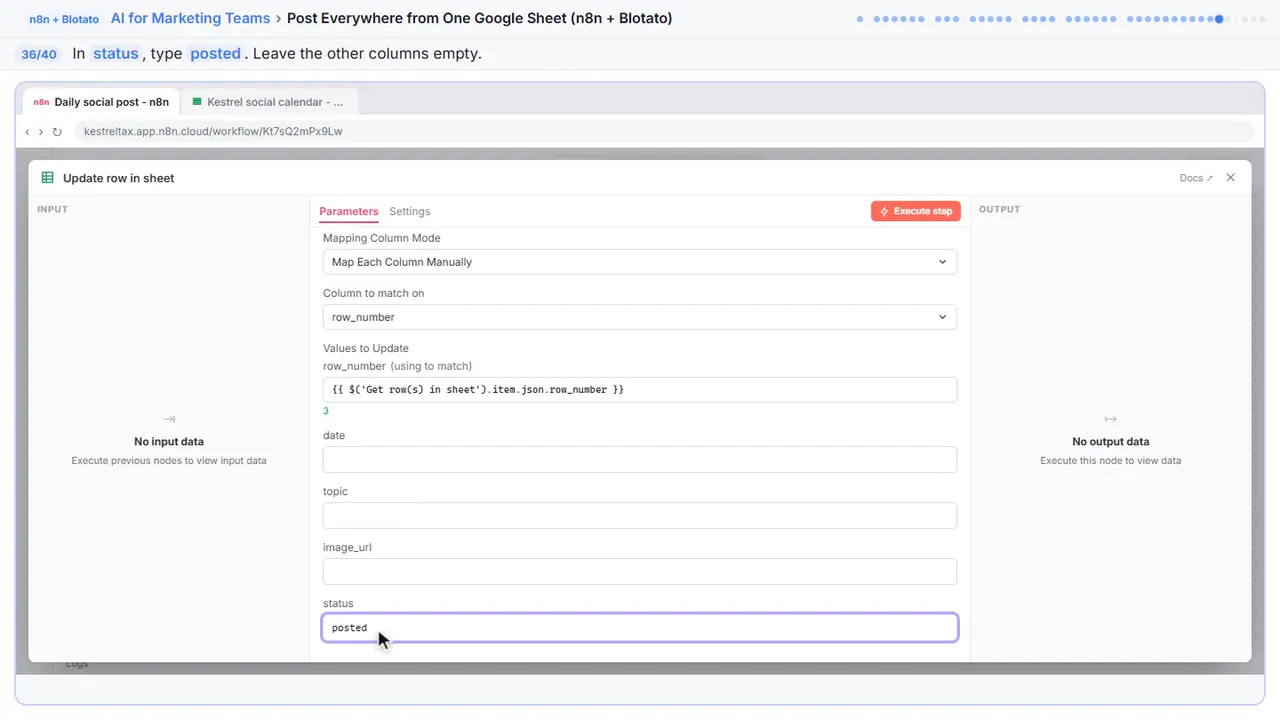
Step 36: Posted
In status, type posted. Leave the other columns empty: n eight n only changes the ones you fill in.
Step 37: Close the node
Close it.
Part 8: Test and publish
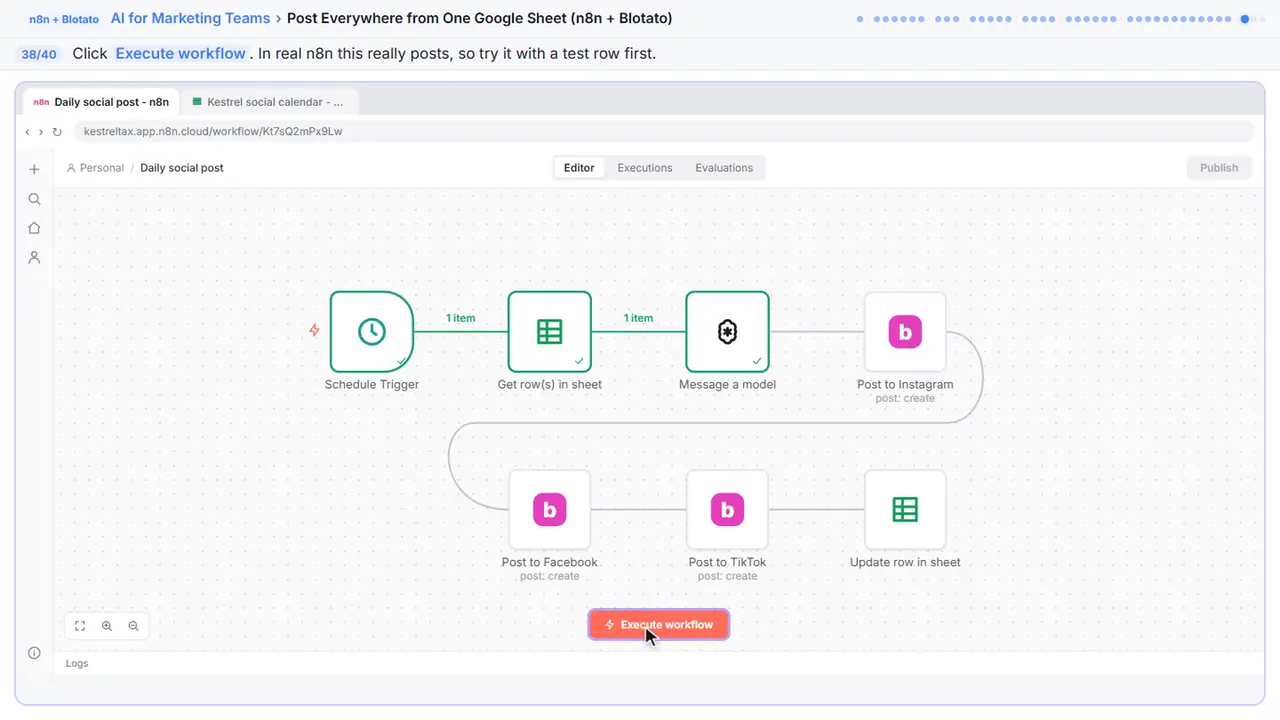
Step 38: Test it
In your real n eight n this really posts, so try it first with a test row. Here, row three went to all three platforms and now says posted.
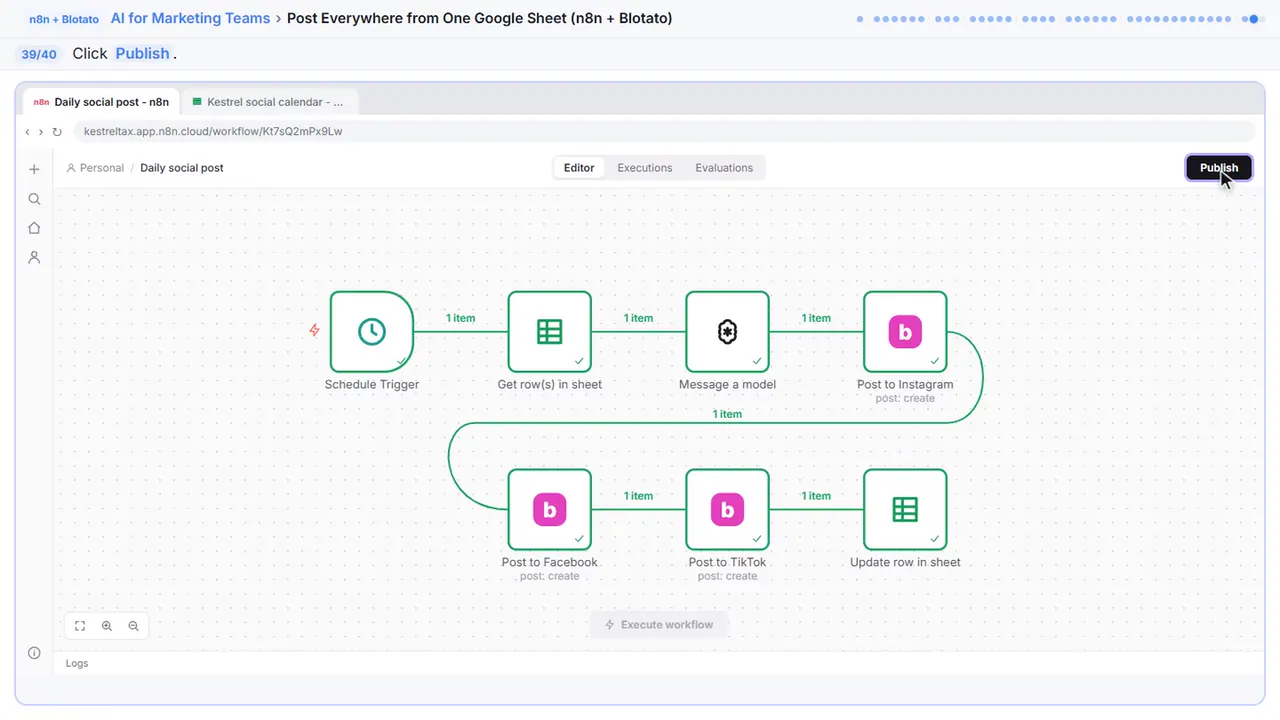
Step 39: Publish
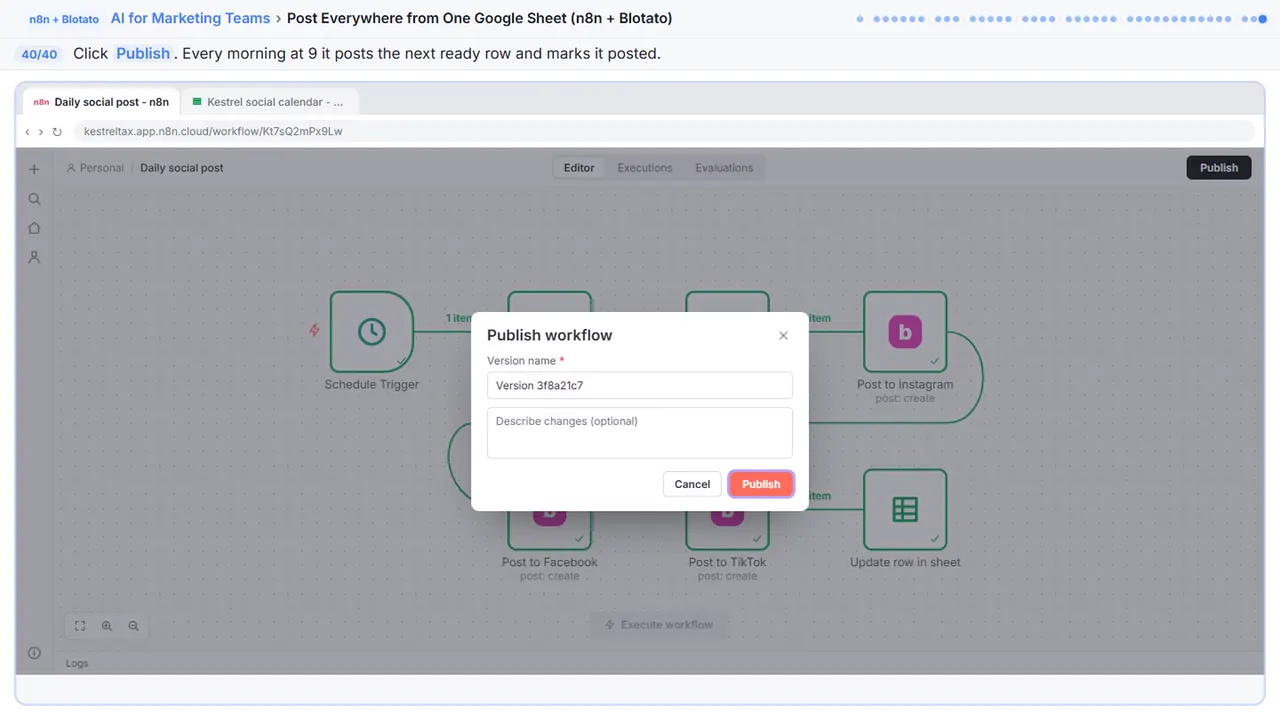
Step 40: Publish it
Publish. Every morning at nine it takes the next ready row, posts it everywhere and marks it posted. Your job is keeping the sheet stocked. For the first couple of weeks, glance at each post that morning.
Now do it yourself, free
Reading the steps is a start. Doing them is how it sticks. The interactive lesson puts you in a practice copy of n8n and Blotato: you do every step yourself, it checks your work, and “Do it for me” finishes any step you get stuck on. Nothing touches your real accounts.
Practice “Post to Every Channel Daily from One Sheet using n8n + Blotato” step by stepPost to Every Channel Daily from One Sheet using n8n + Blotato: video walkthrough
The whole lesson in 3:26, narrated step by step.
Simulated practice environment. Recorded in Stepthrough’s simulated practice environment, not the live tool. Practice it yourself free at learn.ynteractive.com.
Chapters
Click a chapter to jump the video there.
- 0:00 The plan
- 0:16 Only ready rows
- 0:42 A caption per platform
- 1:07 Add Blotato
- 1:32 Connect Blotato
- 1:50 Post to Instagram
- 2:24 Mark it posted
- 2:58 Test and publish
Now do it yourself, free
Watching is the warm-up. The interactive lesson puts you in a practice copy of n8n and Blotato: you do every step yourself, it checks your work, and “Do it for me” finishes any step you get stuck on. Nothing touches your real accounts.
Practice “Post to Every Channel Daily from One Sheet using n8n + Blotato” step by stepFull transcript
The plan
0:00 This is how we post Stepthrough's own videos: a list of what's ready, and Blotato sends each one out. Here you'll build it for Kestrel Tax and Advisory, a small CPA firm. Each post is a row. Ready means it can go out, posted means it's gone. Switch to the n eight n tab.
Only ready rows
0:16 The start is already built, like in earlier modules: a schedule that fires every morning at nine, a step that reads the sheet, and an AI step. Open get rows in sheet.
0:24 Right now it reads every row, even the ones already posted. Under filters, click add filter.
0:29 Open column.
0:31 Status.
0:32 In value, type ready. Under options, return only first matching row is already on. So even when several rows are ready, it posts one a day, top one first.
0:40 Close it.
A caption per platform
0:42 Open message a model. The prompt asks for three captions from the day's topic, Instagram, Facebook and TikTok, each in its own style. The output format is JSON, so each caption comes back separately.
0:53 Click execute step. It reads the sheet, picks row three, and writes the captions. Read them. Checking these is your job until you trust it.
1:01 No LinkedIn caption, on purpose. Blotato can post there too, but it isn't where we post, so we leave it out. Close it.
Add Blotato
1:07 Now the posting. Click the plus after message a model.
1:10 Type blotato, spelled b, l, o, t, a, t, o.
1:13 Blotato isn't built into n eight n. It's a verified community node, so it shows under more from the community. Choose it.
1:20 Click install node. Only the owner or an admin of your n eight n can do this, and only once.
1:26 You don't need upload media: Blotato takes the image link from the sheet directly. Choose create post.
Connect Blotato
1:32 Blotato needs an API key. Open credential to connect with.
1:35 Create new credential.
1:37 Your key is in Blotato, under settings, then API. The API isn't in the free trial: making a key ends the trial and starts the paid plan. Starter is twenty-nine dollars a month. Paste the key.
1:48 Leave the server as it is, and save.
Post to Instagram
1:50 You'll have three of these, so name them. Click the name at the top and call it post to Instagram.
1:55 Platform is already Instagram. Open account. It lists the Instagram accounts you connected in Blotato.
2:00 Pick Kestrel Tax and Advisory, the firm's account, not someone's personal one.
2:04 In text, paste this. It takes the Instagram caption from the AI step.
2:09 And in media URLs, the image link from the sheet. Instagram won't post without an image or video.
2:15 Close it. Facebook and TikTok are the same node twice more, with their own platform, account and caption, so we added them for you. Facebook also asks which page to post to.
Mark it posted
2:24 Last, mark the row posted, or tomorrow it posts the same thing again. Click the plus after post to TikTok.
2:30 Type sheets.
2:31 Choose update row in sheet.
2:33 Open document.
2:34 Kestrel social calendar.
2:36 Open sheet.
2:37 The posts tab.
2:39 Now, which row to change. Open column to match on.
2:42 Row number. n eight n adds it to every row it reads, so it points at exactly the right one.
2:47 Paste this into row number. It is the row the sheet step picked: row three.
2:51 In status, type posted. Leave the other columns empty: n eight n only changes the ones you fill in.
2:57 Close it.
Test and publish
2:58 Click execute workflow. In your real n eight n this really posts, so try it first with a test row. Here, row three went to all three platforms and now says posted.
3:08 Click publish.
3:09 Publish. Every morning at nine it takes the next ready row, posts it everywhere and marks it posted. Your job is keeping the sheet stocked. For the first couple of weeks, glance at each post that morning.
3:19 Simple as that. We show you and you do it. Sign up below to learn AI automation for free.
What you will build
You run the social accounts for Kestrel Tax & Advisory, a made-up small CPA firm. Their content calendar is a Google Sheet with four columns: date, topic, image_url and status. A status of ready means the topic and image are done and the post can go out. Posted means it has gone out. Anything else, such as idea, is ignored.
The workflow starts with three steps you have built in earlier modules: a Schedule Trigger that fires every morning at 9, a Google Sheets step that reads the sheet, and an OpenAI step (Message a model) whose prompt asks for three captions from the day's topic and returns them as JSON. You add a filter so it only reads the first row marked ready, run the AI step and read its captions, install the Blotato node, connect it with an API key, and set up the Instagram post with the firm's account, the Instagram caption and the image link from the sheet. Facebook and TikTok are the same Blotato node with their own platform, account and caption. Finally you add an Update row in sheet step that changes the row's status to posted, test the whole thing and publish it.
Why the status column matters
The status column is what makes this safe to run every day. The filter only picks rows marked ready, Return only First Matching Row limits each run to one post, and the last step flips that row to posted. Without that last step, tomorrow's run would find the same row and post it again. To queue a week of posts, fill in seven rows and mark them ready; they go out one a day in the order they sit in the sheet.
Matching on row_number is the reliable way to update the right row. n8n adds a row_number to every row it reads from Google Sheets, so the Update row step changes exactly the row that was posted, even if two topics look alike. Columns you leave empty in Values to Update are not changed.
One caption per platform
The same sentence rarely works everywhere. The prompt asks for a short Instagram caption with a few hashtags, a plain two-to-four-sentence Facebook post without hashtags, and a single line with a couple of hashtags for TikTok. The OpenAI node's Output Format is set to JSON Object, so the three captions come back as separate fields (instagram, facebook, tiktok) and each Blotato step can pick its own. Blotato can also post to LinkedIn, X, Threads, Pinterest, Bluesky and YouTube; we leave LinkedIn out because it isn't where we post, but adding it is one more node and one more key in the prompt.
Gotchas worth knowing
- Blotato's API, which the n8n node uses, is not part of the 7-day free trial. Generating an API key during the trial ends the trial and starts the paid Starter plan.
- Instagram, TikTok, Pinterest and YouTube posts need at least one image or video. The image link in the sheet must be publicly reachable; Blotato fetches it, so a separate Upload media step is optional.
- Facebook posts also need the Facebook Page chosen, and TikTok has its own Privacy Level and Post As Draft settings.
- The Account list only shows accounts you've already connected in Blotato, filtered by the platform you picked. Connect them in Blotato first.
- Only the owner or an admin of your n8n can install the Blotato community node.
- Execute workflow really posts. Test with a row you don't mind going out, or a test account.
What you need
- A paid Blotato plan with your social accounts connected. Starter is $29 a month (20 social accounts); annual billing saves about 17%.
- An n8n account: n8n Cloud from about €20 a month with a free trial, or the free self-hosted Community Edition.
- An OpenAI API key with a little credit, and Google Sheets connected in n8n.
Review before you go fully automatic
AI captions are usually fine and occasionally wrong, and for a tax firm a wrong claim is worse than a missed post. For the first couple of weeks, run the workflow by hand and read every caption before it goes out, or check each morning's posts as soon as they publish. Keep the prompt's rules strict: no promises about refunds or savings, and no advice for one person's situation. Once the captions have been right for a while, let the schedule take over and spend the time you saved on better topics.
Try it yourself, free
Reading the steps is a start. Doing them is how it sticks. The interactive module walks you through every click in a practice copy of n8n and Blotato, checks each step, and never touches your real accounts.
Start “Post to Every Channel Daily from One Sheet using n8n + Blotato”Screenshots
Frequently asked questions
- How does the interactive lesson work?
- Each step is shown to you first on the left (Watch). Then you do it yourself in a practice copy on the right (Your turn), and every click is checked. If you get stuck, press Do it for me. It is a practice copy, so no real accounts are touched.
- Is this free?
- Stepthrough is completely free. Running this for real needs a paid Blotato plan (Starter is $29 a month; the free trial doesn't include the API), an n8n account, an OpenAI API key with some credit, and Google Sheets.
- Do I need to upload the image to Blotato first?
- No. Blotato's Media URLs field takes any publicly accessible image or video link and fetches it for you. The Upload media action is still there if your file isn't public.
- How do I stop the same post going out twice?
- The last step updates the row's status from ready to posted, matching on row_number. The next run's filter only looks for ready rows, so it moves on to the next one.
- Can it post to LinkedIn?
- Yes. Blotato supports LinkedIn personal profiles and company pages. Add another Create post node with Platform set to Linkedin and ask the prompt for a linkedin caption.
- Can I check posts before they go live?
- Yes. Run the workflow by hand at first and read the captions in the Message a model step before you publish it. For TikTok, Blotato's Post As Draft switch sends the post to your TikTok inbox to finish in the app.
More in AI Automation for Marketing
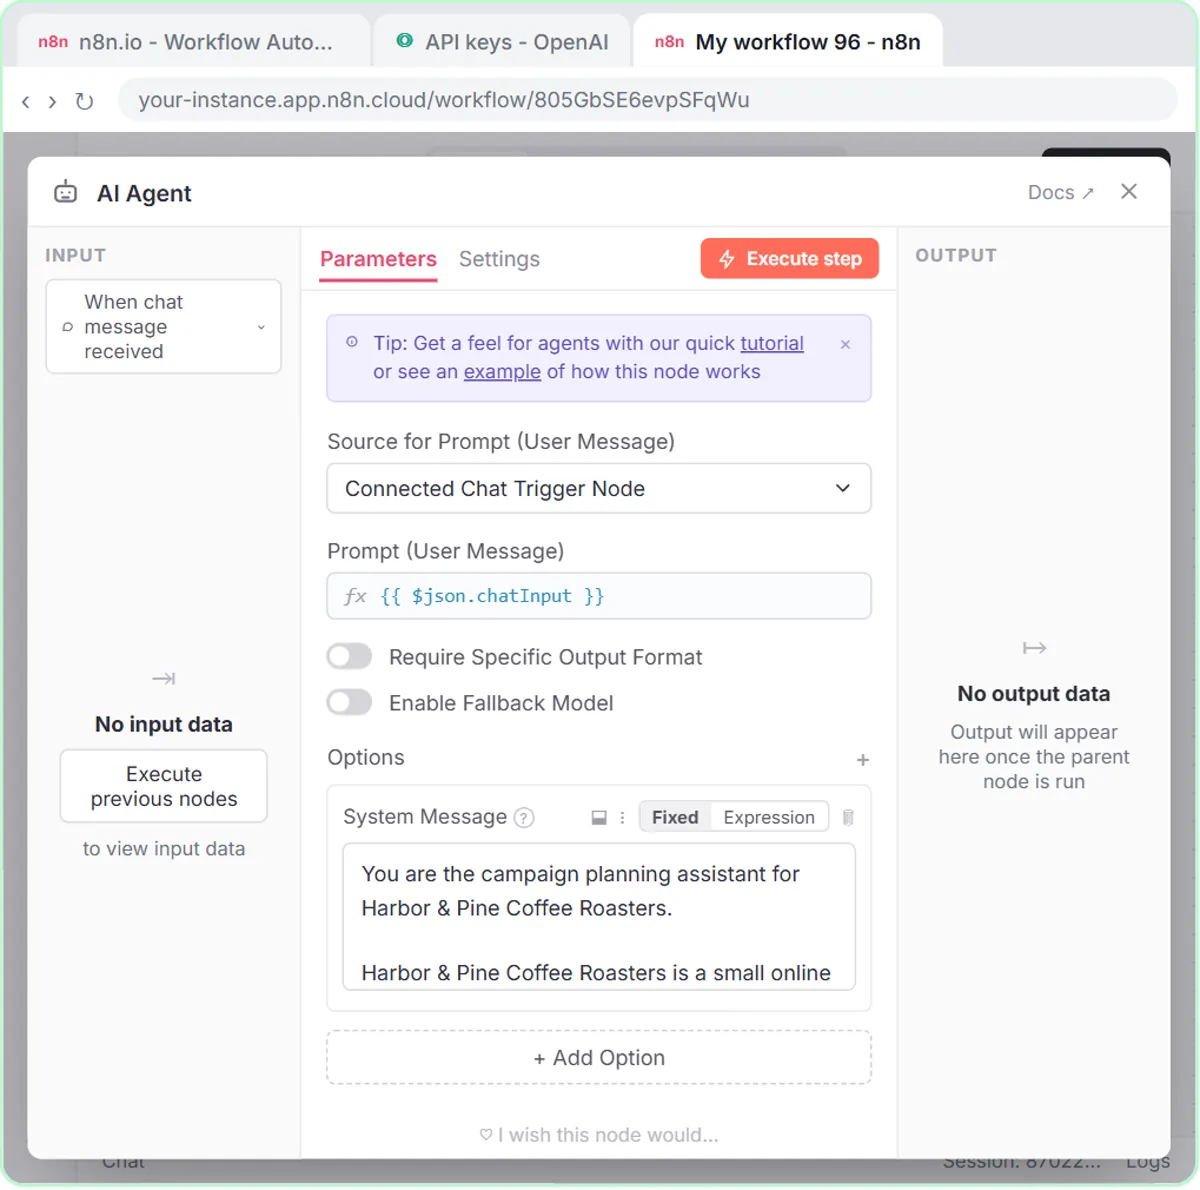 Build an n8n AI Agent That Plans Your Content Calendar
Build an AI agent for Harbor & Pine Coffee Roasters that turns one campaign theme into a two-week email and content calendar in Google Sheets — chat trigger, AI Agent…
Free · Live ~12 min Intermediate
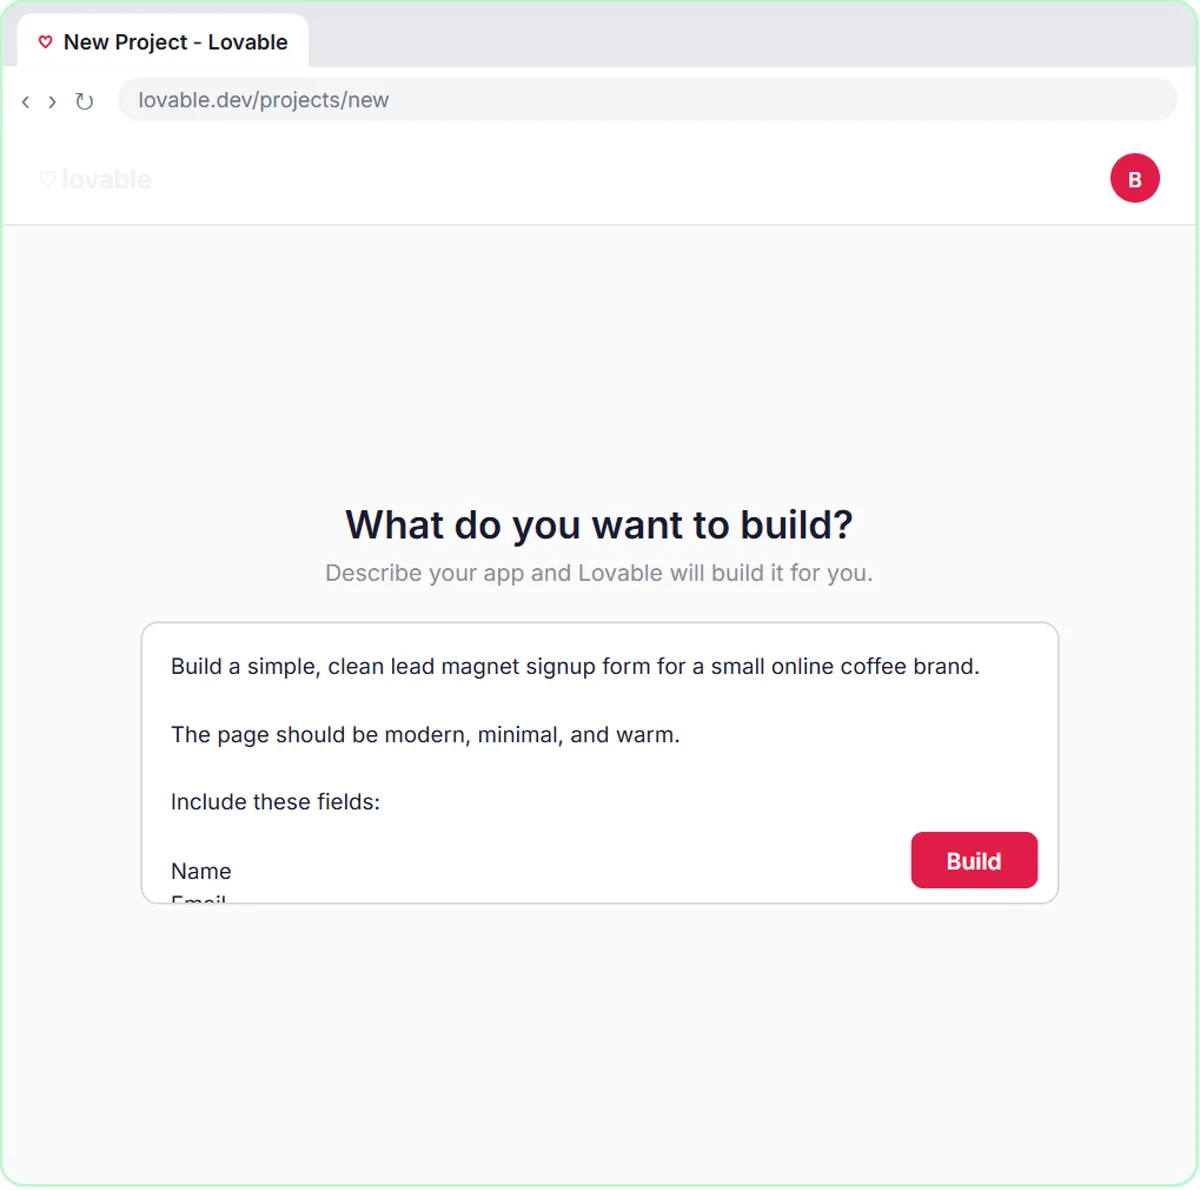 Build a Lead Magnet Signup Form with an AI Welcome Email
Build a "Get the free guide" signup form in Lovable for Harbor & Pine Coffee Roasters and connect it to n8n — the AI agent tags each lead by interest, saves it to…
Free · Live ~15 min Advanced
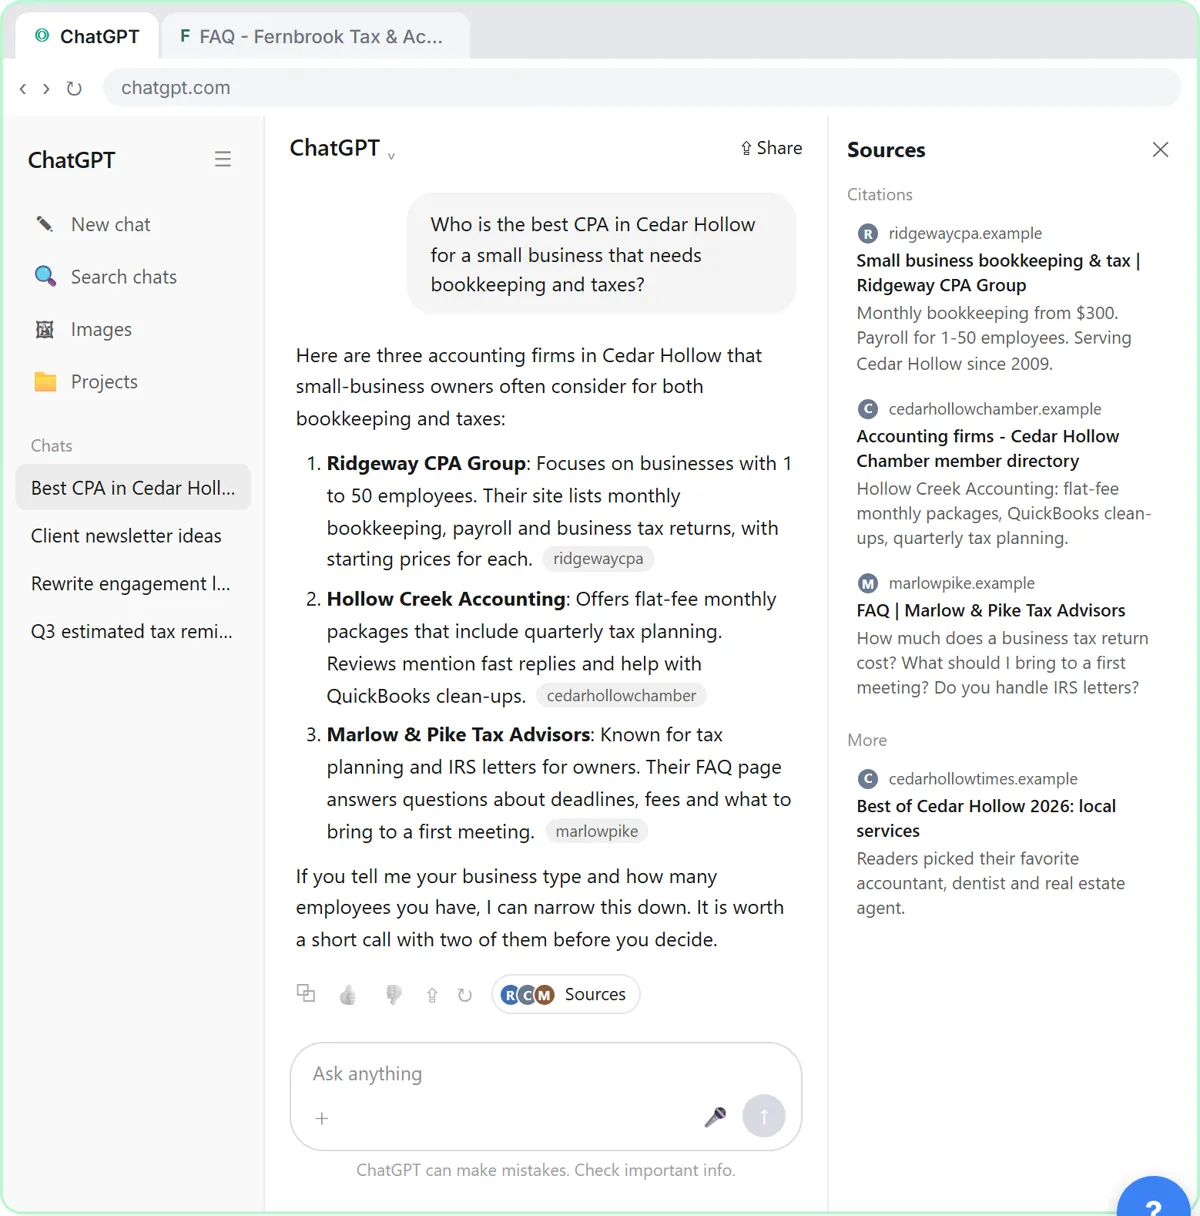 Get Your Business Recommended by ChatGPT
Ask ChatGPT who it recommends in your town, see which pages it trusts, then use it to write an FAQ page and Business Profile copy that answer real customer questions.
Free · Live ~10 min Intermediate
 Flova: Plan a Promo Video from a Script Before You Spend a Credit
Give Flova's AI video agent a ten-second script for a small business, check its storyboard and credit estimate first, then make and fix one reference image.
Free · Live ~7 min Beginner
◷Turn a Product Update into an Explainer Video using RenderforestA business case for small firms that launch something clients ignore: price the calls and the freelancer quote, then use Renderforest's Long AI Video to turn the update…
Free · Live ~9 min Beginner
 DomoAI: Turn a Product Photo into a Short Video for Social
Open Image to Video in DomoAI, upload one product photo, pick a model and a vertical size, write a motion prompt that keeps the product the same, compare two versions…
Free · Live ~6 min Beginner
All 12 modules in AI Automation for Marketing
More n8n and Blotato tutorials
 n8n AI Agent Tutorial: Save Social Media Ideas to Google Sheets
Build an AI agent for BrightPath Marketing that generates social media post ideas and saves them to Google Sheets — chat trigger, AI Agent, system prompt, model…
Free · Live ~12 min Intermediate
 Lovable + n8n: Build a Web App with an AI Backend
Build a contact form in Lovable and connect it to an n8n workflow — webhook trigger, AI Agent, Google Sheets, Gmail, and a Respond node that ties it all together.
Free · Live ~15 min Advanced
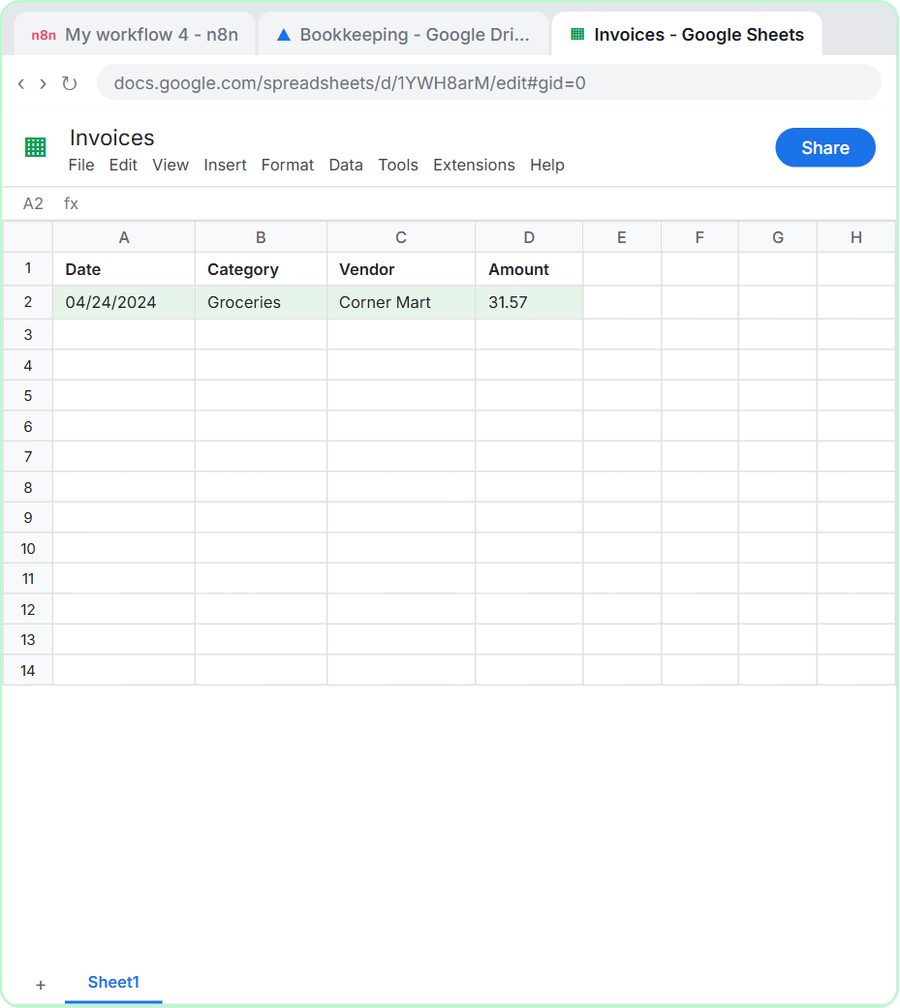 AI Receipt Extractor: Receipts to Google Sheets with n8n
Drop a photo of a receipt into an n8n chat. An AI agent reads it, pulls out the date, vendor and amount, picks a category, and adds a row to Google Sheets.
Free · Live ~12 min Intermediate
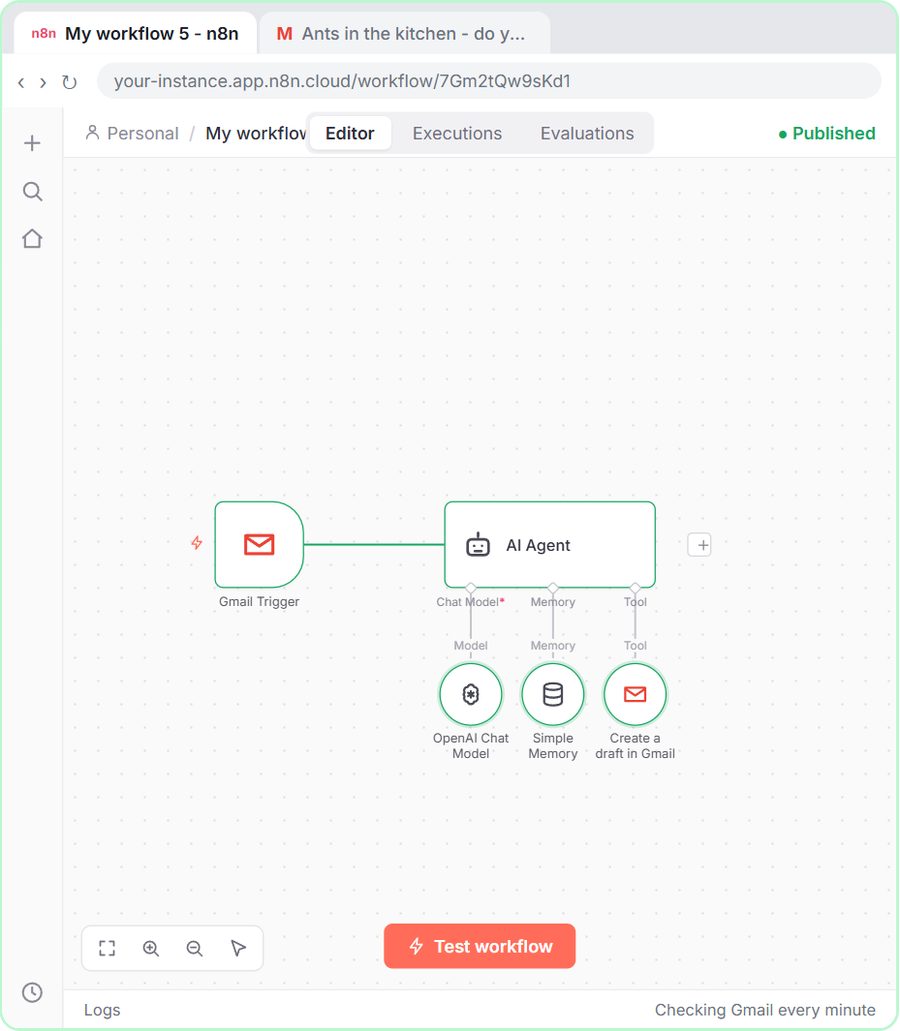 n8n AI Email Responder: Draft Gmail Replies Automatically
Build an n8n agent that watches your Gmail, reads each new customer email, and writes a reply as a draft in the same thread, ready for you to check and send.
Free · Live ~12 min Intermediate
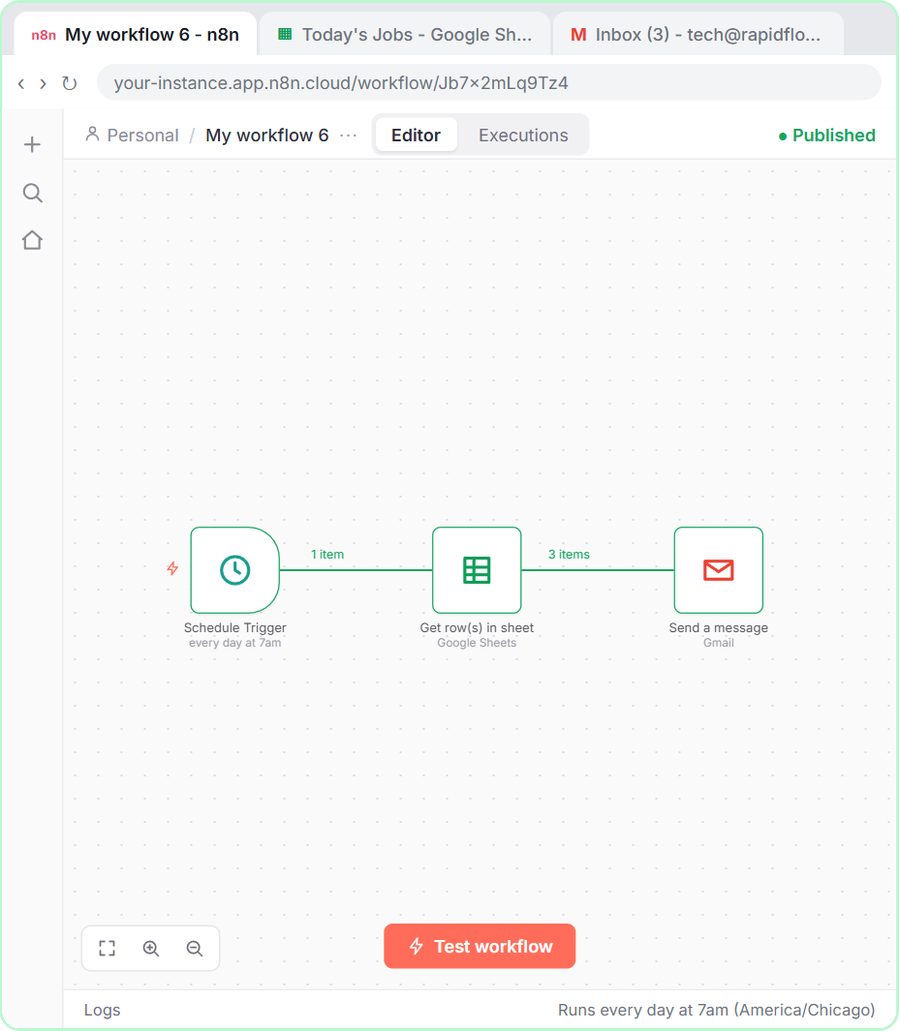 Daily Job Alerts: Email Each Tech Their Jobs from Google Sheets with n8n
Every morning at 7, n8n reads a plumbing company's jobs sheet, skips anything not assigned yet, and emails each job to the tech it's assigned to — customer, address…
Free · Live ~10 min Intermediate
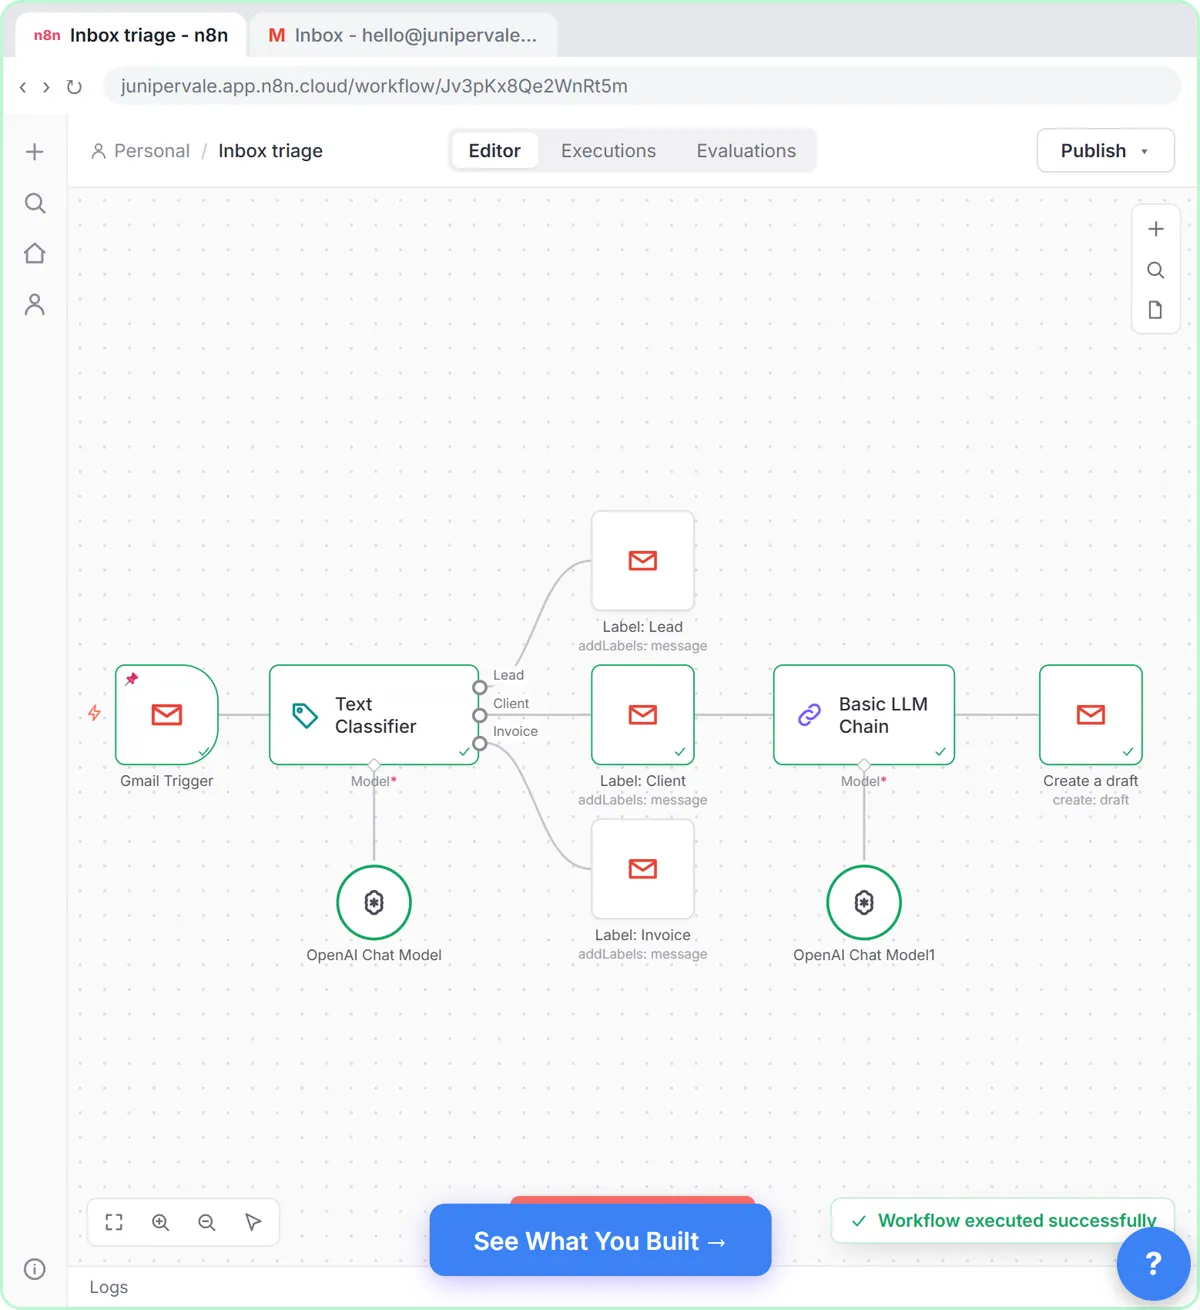 Gmail AI Triage: Auto-Label Every Email and Draft Replies
Build an n8n workflow that reads each new email, sorts it as a lead, a client or an invoice with a Text Classifier, adds the matching Gmail label, and drafts a reply to…
Free · Live ~18 min Advanced
Terms in this lesson
Plain-English definitions, each with an example from a free lesson.