Updated . Built against the tool’s current screens and checked step by step. How we check this lesson
Lots of website forms have no Make app of their own. Most of them can still send each submission to a web address, and that address can be a Make webhook. In this free Make.com tutorial you start a scenario with the Webhooks app's Custom webhook trigger, paste its URL into a website form's settings, send one test request so Make learns the form's fields, and add every new request as a row in Google Sheets the moment it arrives.
At a glance
| Question | Answer |
|---|---|
| What you build | Start a Make scenario with a Custom webhook, paste its URL into your website form's webhook setting, send a test so Make learns the fields, and save every request to Google Sheets the moment it arrives. |
| Tools | Make |
| Time | About 12 minutes, 41 steps in 5 parts |
| Level | Beginner, no coding needed |
| Cost | Free |
| Ways to learn it | Practice it step by step |
The 5 parts, in short
- Create the webhook: Create a scenario, Add the trigger, Webhooks, Custom webhook, and 4 more steps.
- Connect the website form: Open the website editor, Select the form, Integrations, Paste the webhook URL, and 2 more steps.
- Send a test request: Your name, Email, Reason for visit, Send the request, and 2 more steps.
- Add a row to the sheet: Add the next module, Google Sheets, Add a Row, Choose the spreadsheet, and 10 more steps.
- Test it and switch it on: Run once, Back to the website, Send one more test, Back to Make, and 3 more steps.
Start here first: Your First Make.com Scenario: Google Forms to Google Sheets (module 1 of Make.com Automation Basics)
In the course: Part 8 · Make.com Automation Basics (Module 36 of the full course)
Part of: Webhooks & Website Forms (step 2 of 2)
What you will build
Brookside Dental, a small, made-up family dental practice, has an appointment request form on its own website. The form asks for a name, an email and a reason for the visit. The website tool has no Make app, but its form settings can send each submission to a webhook.
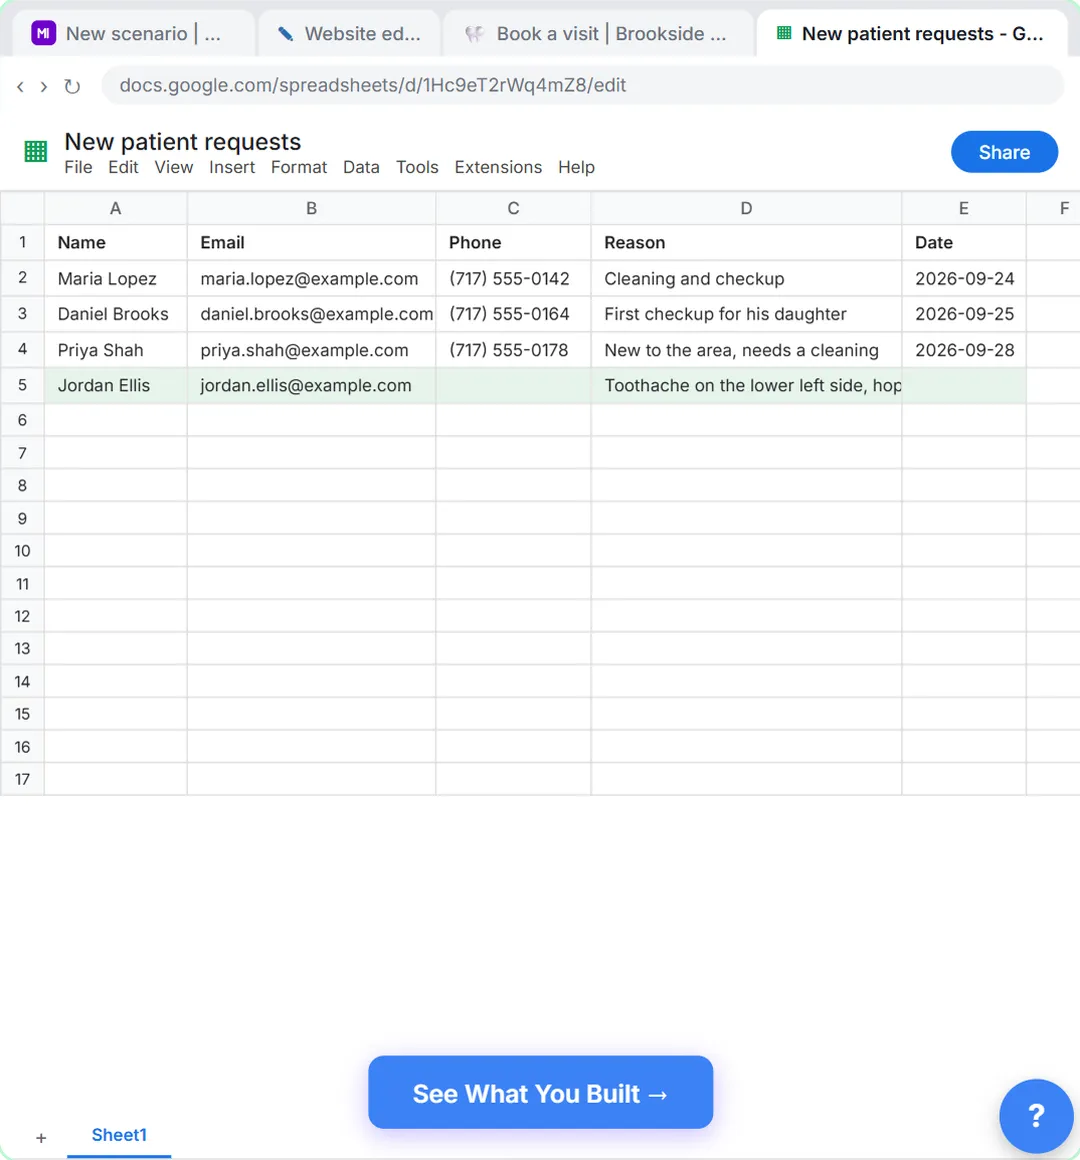
You build a two-module scenario. Module 1 is Webhooks, Custom webhook. It gives you a unique webhook URL and runs the scenario as soon as a request reaches that URL. Module 2 is Google Sheets, Add a Row, which writes the name, email and reason into the New patient requests sheet. You test it with Run once, save the scenario and switch it on.
The website editor in the lesson is made up on purpose. In your own site builder, look for a setting called webhook, send to URL, or integrations.
What you need to build it for real
- A Make account. Webhooks is one of Make's built-in apps, and each module run uses credits from your plan.
- A Google account with a spreadsheet that has a header row, for example Name, Email, Phone, Reason and Date.
- A website form or other tool that can send its submissions to a webhook URL.
What a webhook is
A webhook is a web address that waits for data. When something happens in another tool, such as a form being submitted, that tool sends the details to the address, and Make starts your scenario right away. Most triggers in Make check an app for new data on a schedule, every 15 minutes by default. A webhook trigger is instant, so there is no schedule to set: the toolbar shows Immediately as data arrives.
Treat the webhook URL like a password. Anything sent to it runs your scenario. If you need more protection, the Create a webhook dialog lets you require an API key, which the sending tool passes in the x-make-apikey HTTP header.
How Make learns your form's fields
Right after you create the webhook, Make listens for a request with sample data and works out the data structure from it. That is why you send one real test from the form before adding the next module: once Make has seen the name, email and reason, it can offer them in the mapping panel of every module after the trigger.
If you add a field to your form later, open the Webhooks module and click Detect new values, then send another test so Make picks up the new field.
Testing with Run once
The test request you send while the webhook is listening only teaches Make the form's fields; it isn't kept for a run. So when you click Run once, Make waits for the next request: send one more test from the form. If requests did reach the webhook while the scenario wasn't running, Make keeps them in the webhook's queue, and Run once asks whether to use that existing data or wait for new data.
Replying to the website: the Webhook response module
By default Make answers every accepted request with status 200 and the word Accepted. If your website should show a custom reply, add the Webhooks app's Webhook response module at the end of the scenario and set its Status and Body.
Try it yourself, free
Reading the steps is a start. Doing them is how it sticks. The interactive module walks you through every click in a practice copy of Make, checks each step, and never touches your real accounts.
Start “Webhooks: Connect a Website Form to Make.com”Step by step: Webhooks: Connect a Website Form to Make.com
All 41 steps of the interactive module, in order. In the module you watch each one, then do it yourself in a practice copy that checks your work.
1. Create the webhook
- Create a scenario. Brookside Dental's website has its own request form. Start a new scenario: click + Create scenario.
Brookside Dental's website has its own appointment request form, and there's no Make app for it. What it can do is send each request to a web address. Make calls that address a webhook.
- Add the trigger. Click the big +.
- Webhooks. Click Webhooks.
Webhooks is one of Make's built-in apps.
- Custom webhook. Under Triggers, click Custom webhook. Its Instant tag means it runs the moment data arrives.
Under triggers, click custom webhook. The instant tag means it runs the moment a request arrives, instead of checking on a timer.
- Create a webhook. Click Create a webhook. (If your account already has webhooks, you see a list with Add next to it: click Add.)
You need a new webhook address.
- Name the webhook. Replace the name in Webhook name with Brookside website form
Give it a name you'll recognize later. Replace the suggested name with Brookside website form.
- Save the webhook. Leave API Key authentication empty and click Save.
You could require an A P I key here, but many website forms can't send one, so leave it empty.
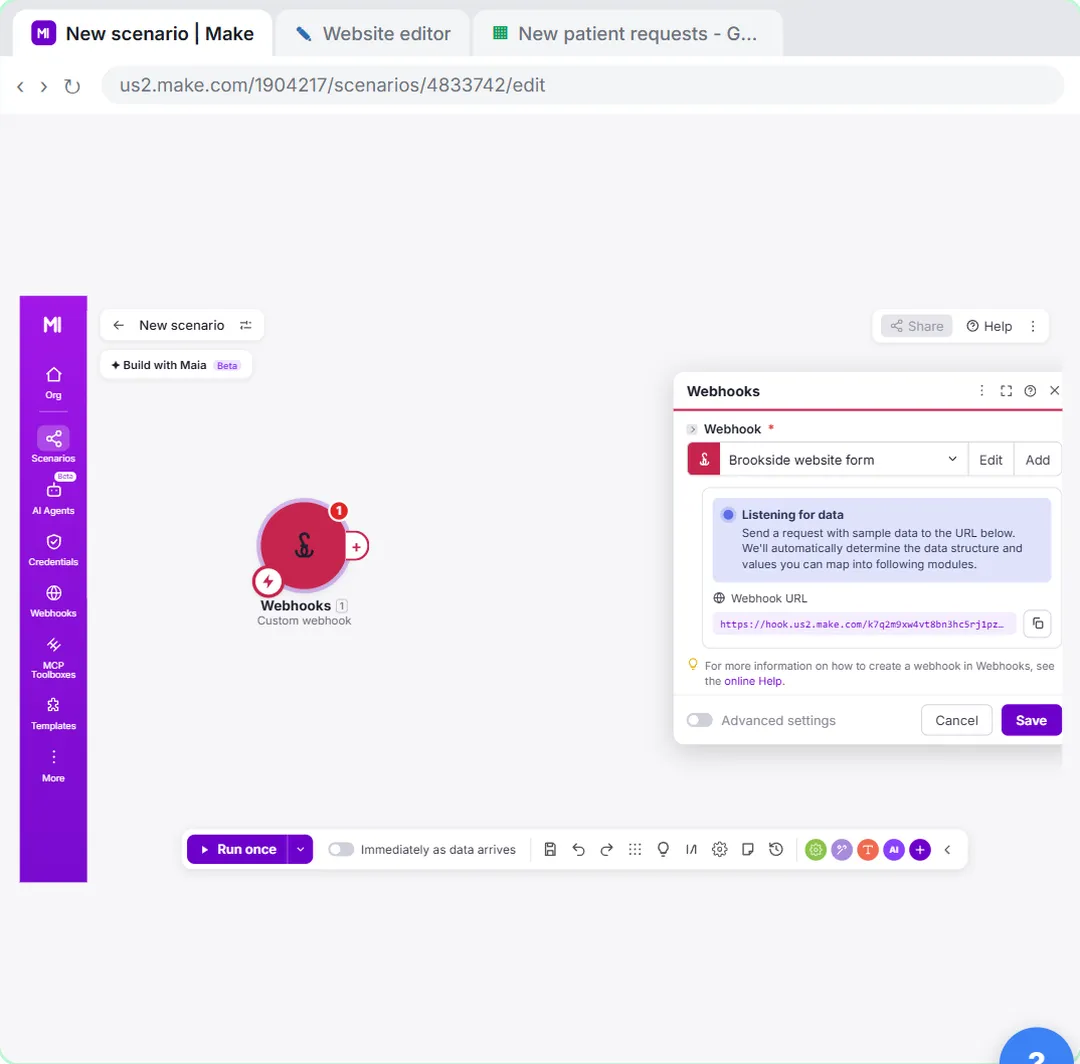
- Copy the webhook URL. Make is Listening for data. Click the copy icon next to the Webhook URL.
Make is now listening for data. That web address is your webhook. Treat it like a password, because anything sent to it runs your scenario.
2. Connect the website form
- Open the website editor. Keep Make open. Click the Website editor tab.
Leave Make listening, and switch to the website editor tab. This one is made up. Your own site builder will look different, but most have the same setting.
- Select the form. Click the Request an appointment form on the page.
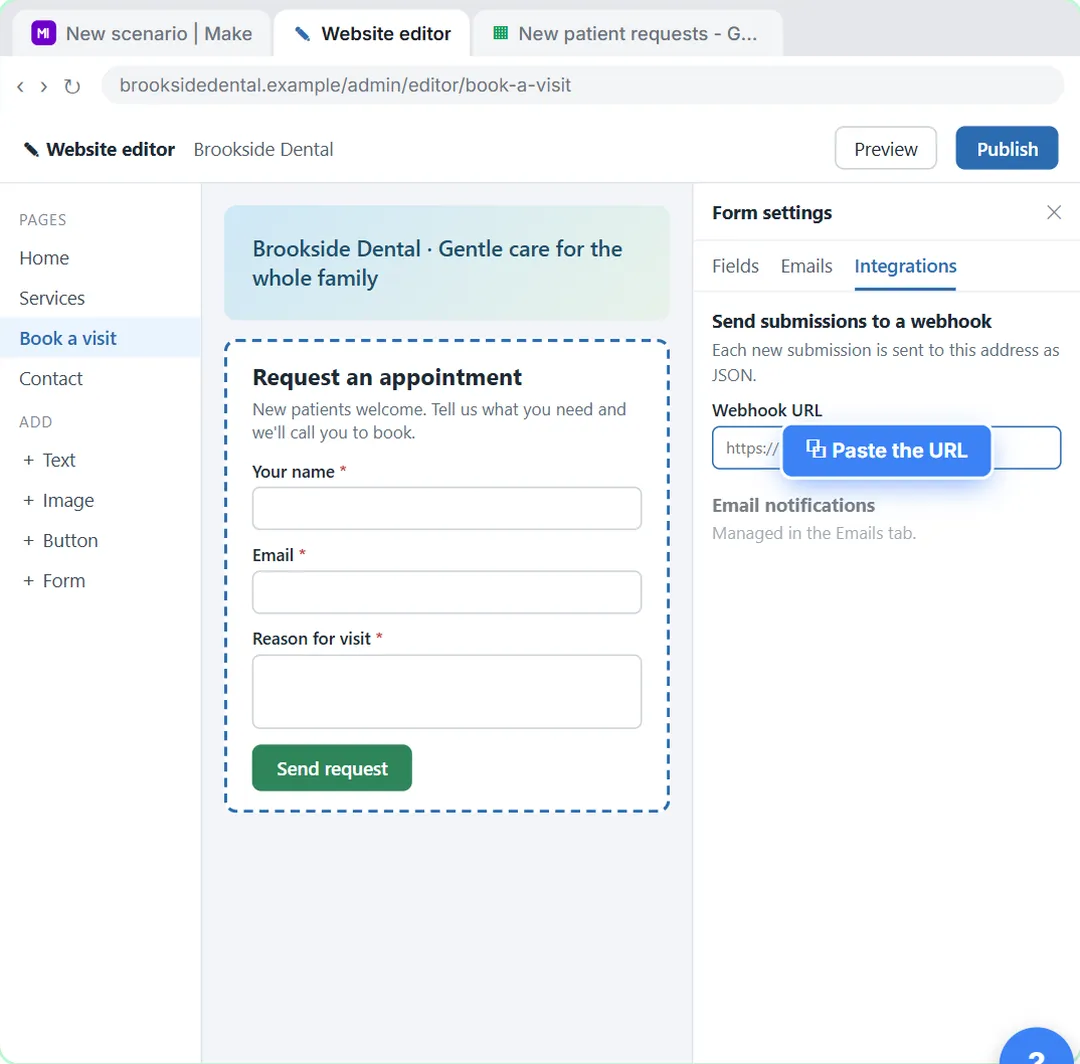
- Integrations. In Form settings, click the Integrations tab.
- Paste the webhook URL. Under Send submissions to a webhook, paste the URL into Webhook URL.
Look for a setting like send submissions to a webhook.
- Publish. Click Publish so the live form uses the new setting.
- View the live site. Click View site in the message at the bottom.
3. Send a test request
- Your name. Send a test request, like a patient would. In Your name, type Jordan Ellis
Now send one test request, the way a patient would. Make needs a real example to learn the form's fields.
- Email. In Email, type [email protected]
- Reason for visit. Paste a reason into Reason for visit.
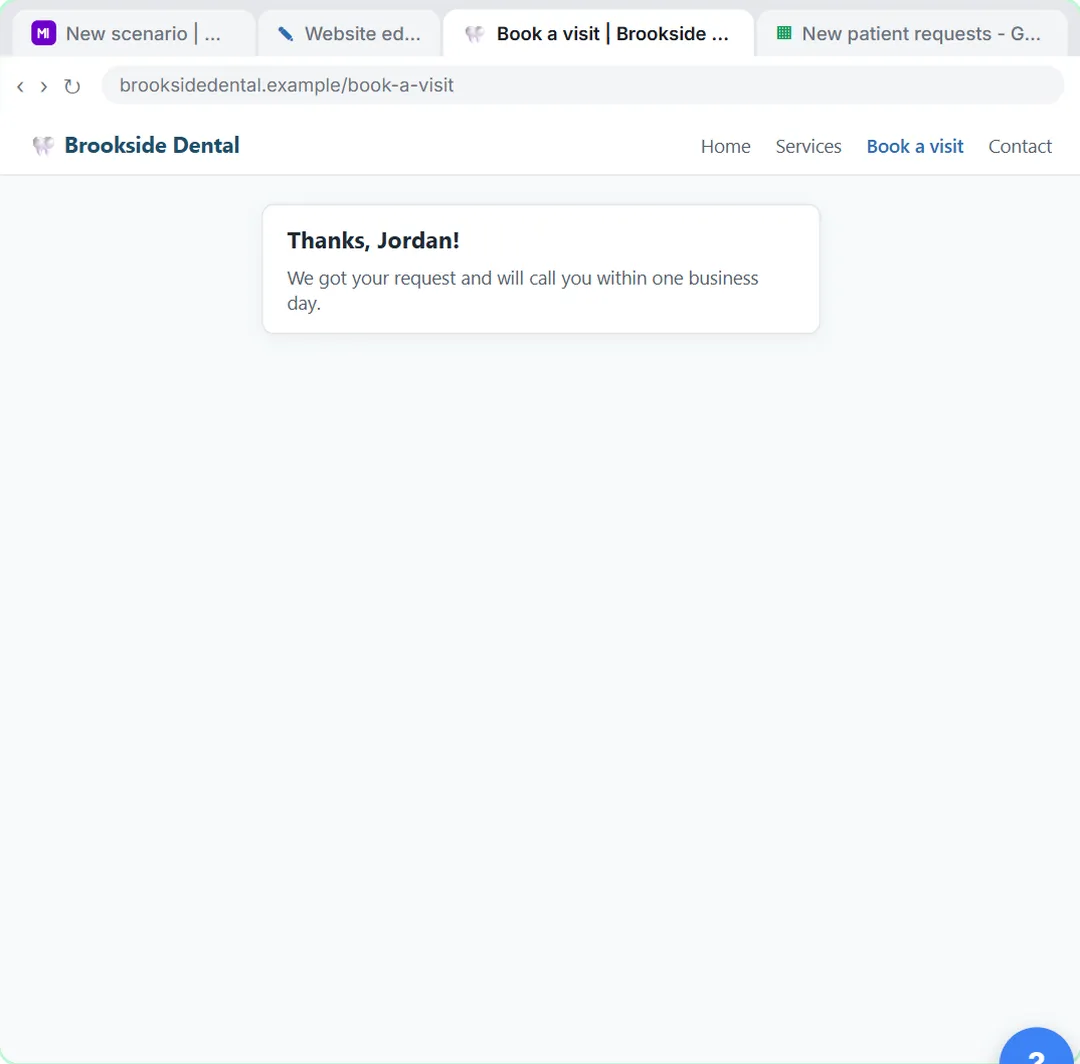
- Send the request. Click Send request.
- Back to Make. Go back to the Make tab.
- Save the trigger. Make shows 3 values detected and ready to map: name, email and reason. Click Save.
Make caught the request. It says three values detected and ready to map: name, email and reason. Those are the form's fields.
4. Add a row to the sheet
- Add the next module. Click the + on the right of Webhooks.
Now save each request to the sheet.
- Google Sheets. Click Google Sheets.
- Add a Row. Click Add a Row.
- Choose the spreadsheet. Your Google connection is already filled in. Keep Search by path and My Drive, and click Click here to choose file.
Your Google connection from the earlier modules is already picked. Keep search by path and my drive.
- New patient requests. Click New patient requests.
- Sheet Name. Open Sheet Name.
- Sheet1. Click Sheet1.
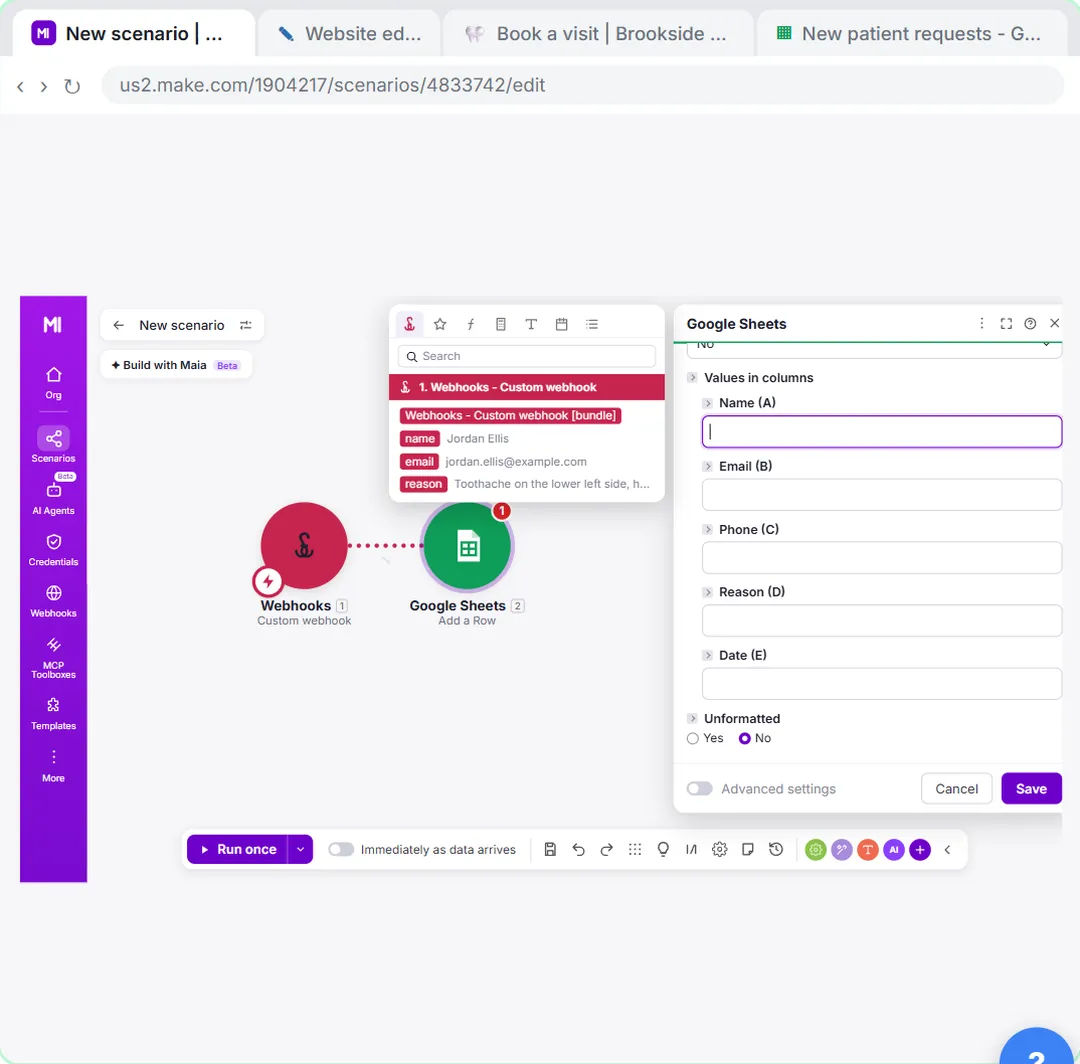
- Name (A). Under Values in columns, click the Name (A) field.
Make shows the columns from your sheet.
- Map the name. In the mapping panel, click name.
The mapping panel shows what the webhook learned.
- Email (B). Click the Email (B) field.
- Map the email. Click email.
- Reason (D). The form has no phone field, so leave Phone (C) empty. Click the Reason (D) field.
The form doesn't ask for a phone number, so leave phone empty.
- Map the reason. Click reason.
- Save the module. Click Save.
5. Test it and switch it on
- Run once. Click Run once. Make now waits for a new request. The test you sent earlier only taught it the form's fields, so you send one more. (If Make asks whether to Use existing data, click that instead and skip ahead to saving.)
Test the whole scenario. Make now waits for a new request. The test you sent earlier only taught it the form's fields, so send one more.
- Back to the website. Go to the Book a visit tab.
- Send one more test. The form is filled in with the same test request. Click Send request.
The form has the same test request in it.
- Back to Make. Go back to the Make tab.
- Save the scenario. Both modules ran once: each shows a 1. Click the Save icon in the toolbar.
Both modules ran once, so the request is in the sheet. Save the scenario with the save icon.
- Switch it on. Click the switch next to Immediately as data arrives.
There's no schedule to set. With a webhook trigger, the toolbar says immediately as data arrives.
- Check the sheet. Open the Google Sheets tab to see the new row.
It's live. Every request from the website now lands in the sheet within seconds.
Screenshots
Frequently asked questions
- How do I create a webhook in Make.com?
- In a new scenario, click the big plus, choose Webhooks and then Custom webhook. Click Create a webhook (or Add), give it a name and click Save. Make shows the webhook URL with a copy icon next to it.
- Why does Make say no data detected for my webhook?
- Make needs a real request to learn the fields. Send a test submission to the webhook URL while the module is listening, or click Detect new values in the Webhooks module and then send a new request.
- Do I need to schedule a scenario that starts with a webhook?
- No. Custom webhook is an instant trigger, so the scenario runs as soon as data arrives. Save the scenario and switch it on next to Immediately as data arrives.
- How does the interactive lesson work?
- Each step is shown to you first on the left (Watch), with a short voice-over. Then you do it yourself on a practice copy of Make on the right (Your turn), and every click is checked. If you get stuck, press Do it for me. Nothing touches a real Make, website or Google account.
More in Make.com Automation Basics
Build your first Make.com scenario: every new Google Forms response becomes a new row in Google Sheets. Trigger, connection, mapping, Run once and a schedule.
Free · Live ~12 min
◷Filters and Routers in Make.com: Send Urgent Requests One Way, Routine Ones AnotherAdd a router to your Make scenario, email the front desk about urgent requests with a filter, and send everything else to Google Sheets with a fallback route.
Free · Live ~12 min
◷Add AI to Make.com: ChatGPT Writes a Personal Reply, Gmail Sends ItConnect OpenAI to your Make scenario, have ChatGPT write a personal reply from each patient's form answers, and send it with Gmail.
Free · Live ~12 min
All 5 modules in Make.com Automation Basics
Terms in this lesson
Plain-English definitions, each with an example from a free lesson.