Updated . Built against the tool’s current screens and checked step by step. How we check this lesson
When client inquiries sit in a form until someone copies them into a spreadsheet, prospects wait, and the firm that replies first usually wins the work. In this free Zapier tutorial you build a Zap that logs every inquiry the moment it arrives: each new Google Forms response becomes a new row in Google Sheets. You set up the trigger and the action, connect both Google apps, map each answer to the right column and test it with a real row.
At a glance
| Question | Answer |
|---|---|
| What you build | Prospects who wait days for a reply hire someone else. Build a Zap that copies every new client inquiry from Google Forms into your tracking sheet the moment it arrives, so nothing sits unseen. |
| Tools | Zapier |
| Time | About 10 minutes, 41 steps in 8 parts |
| Level | Beginner, no coding needed |
| Cost | Free |
| Ways to learn it | Practice it step by step |
The 8 parts, in short
- Start a Zap: Click Create, Choose Zaps.
- The trigger: Click the Trigger step, Search for Google Forms, Pick Google Forms, Open Trigger event, and 1 more step.
- Connect Google Forms: Sign in to Google Forms, Allow access, Choose your Google account, Tick Select all, and 2 more steps.
- Pick the form and test: Open the Form list, Pick your form, Continue to Test, Test the trigger, and 1 more step.
- The action: Pick Google Sheets, Open Action event, Choose Create Spreadsheet Row.
- Connect Google Sheets: Sign in to Google Sheets, Allow access, Choose your Google account, Tick Select all, and 6 more steps.
- Map the fields: Map the Name column, Pick "Your name", Map the Email column, Pick "Email", and 2 more steps.
- Test it: Continue to Test, Test the step, Check the sheet, Back to Zapier.
In the course: Part 7 · Zapier Automation Basics (Module 44 of the full course)
What you will build
You will build a two-step Zap for Northgate Accounting, a small, made-up CPA firm that takes new client inquiries through a Google Form called New Client Inquiry. The form asks for a name, an email address and the service the prospect needs, such as monthly bookkeeping or tax preparation. Right now someone copies each answer into a spreadsheet called Client Inquiries, and in busy season that copying can wait for days.
The Zap replaces that copying. The trigger is New Form Response in Google Forms, and the action is Create Spreadsheet Row in Google Sheets. Once it is turned on, every new inquiry lands in the sheet within minutes, with the name, email and service in the right columns, so the team can see and answer it the same day.
Who this Zapier tutorial is for
This module is for office managers, firm owners, practice managers and anyone at an accounting, consulting or professional services firm who moves information between apps by hand. You do not need to code, and you do not need a Zapier account to practice. It is the first module in Zapier Automation Basics, so it teaches the pattern every later module builds on: a trigger, an action, fields mapped from one to the other, a test, then turning it on.
What you need to build it for real
- A Zapier account. Two-step Zaps like this one run on Zapier's free plan.
- A Google Form, and one practice response you submit yourself so Zapier has something to find when you test.
- A Google Sheet with your column headers typed in row 1 (here: Name, Email and Service). Zapier reads those headers to build the fields you map.
Why the Zap works
A Zap always starts with one trigger and then runs one or more actions. The trigger test matters more than it looks. When Zapier pulls in a real form response, it learns the exact questions your form sends, and those become the items you can pick in the data picker. That is why you submit one practice response before testing.
Mapping is what makes the row correct. When you pick Your name for the Name column, you are not copying the words Dana Whitfield. You are telling Zapier to use whatever name comes in with each new response. The sample value only shows you what the data looks like.
The action test sends a real row, so you can open the spreadsheet and see the result before anything goes live. Until you click Publish the Zap is only a draft and nothing runs. After you publish, Zapier watches the form and adds a row for every new response.
How to use this in your business
Any form that feeds a list works the same way: new client inquiries, engagement requests, job applications, event sign-ups or client feedback. Set up the sheet headers first, match each header to a form question, and test with a real response. Once the rows arrive on their own, nobody spends time re-typing answers, nothing gets missed in busy season, and the sheet becomes a live pipeline you can sort, filter and share with your team.
How the interactive lesson works
Every step is shown first on the left, in the Watch panel, with a short voice-over. Then you do it yourself on the right, in Your turn, on a practice copy of Zapier, Google and Google Sheets. Each click is checked, so you know right away if you picked the right button. If you get stuck, press Do it for me. Nothing touches a real account, so you can make mistakes freely, then go build it for real.
Try it yourself, free
Reading the steps is a start. Doing them is how it sticks. The interactive module walks you through every click in a practice copy of Zapier, checks each step, and never touches your real accounts.
Start “Never Miss a New Client Inquiry using Zapier”Step by step: Never Miss a New Client Inquiry using Zapier
All 41 steps of the interactive module, in order. In the module you watch each one, then do it yourself in a practice copy that checks your work.
1. Start a Zap
- Click Create. You're signed in to Zapier. Click + Create at the top left.
At Northgate Accounting, new client inquiries come in through a Google Form. Someone copies each one into a spreadsheet by hand, and when they're busy, a prospect waits days for a reply. Let's have Zapier do that copying the moment an inquiry arrives. You're signed in to Zapier, so click Create.
- Choose Zaps. In the menu, choose Zaps.
An automation in Zapier is called a Zap.
2. The trigger
- Click the Trigger step. This is the Zap editor. Click the Trigger step: *Select the event that starts your Zap*.
This is the Zap editor. A Zap is a trigger, the event that starts it, followed by one or more actions. You could describe it to Copilot, but we'll build it by hand so you see every part.
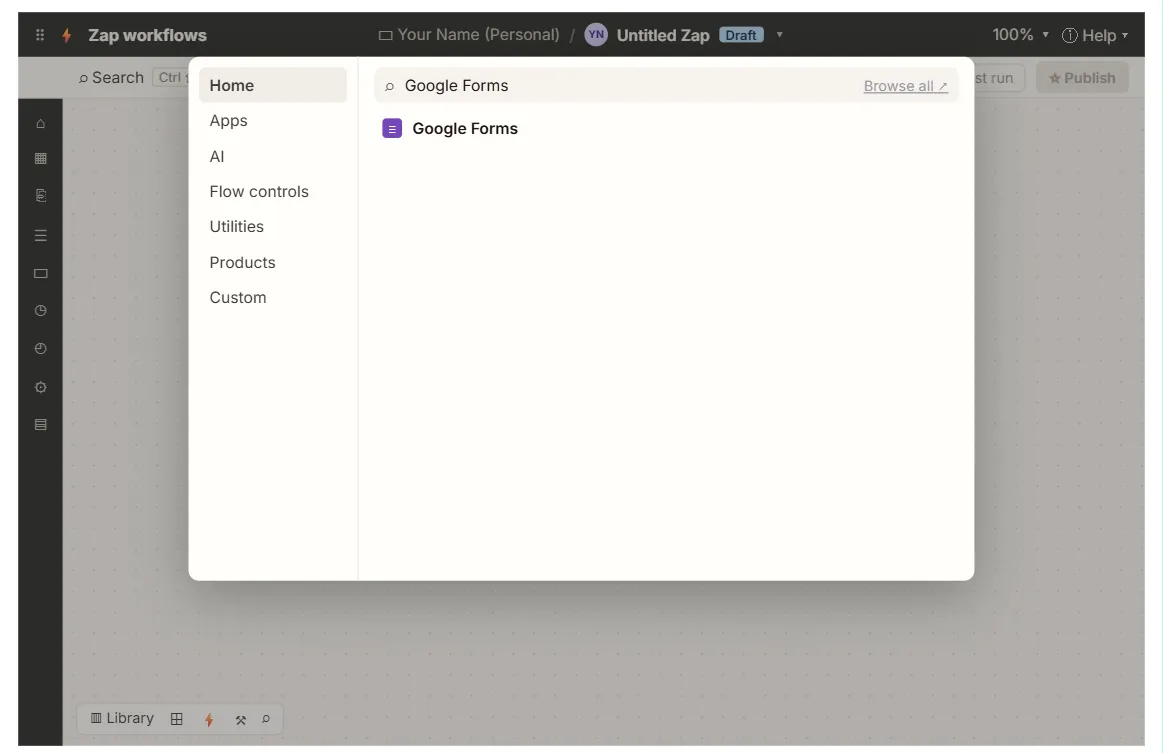
- Search for Google Forms. In the search box, type Google Forms.
Zapier connects to thousands of apps. Search for Google Forms.
- Pick Google Forms. Click Google Forms in the results.
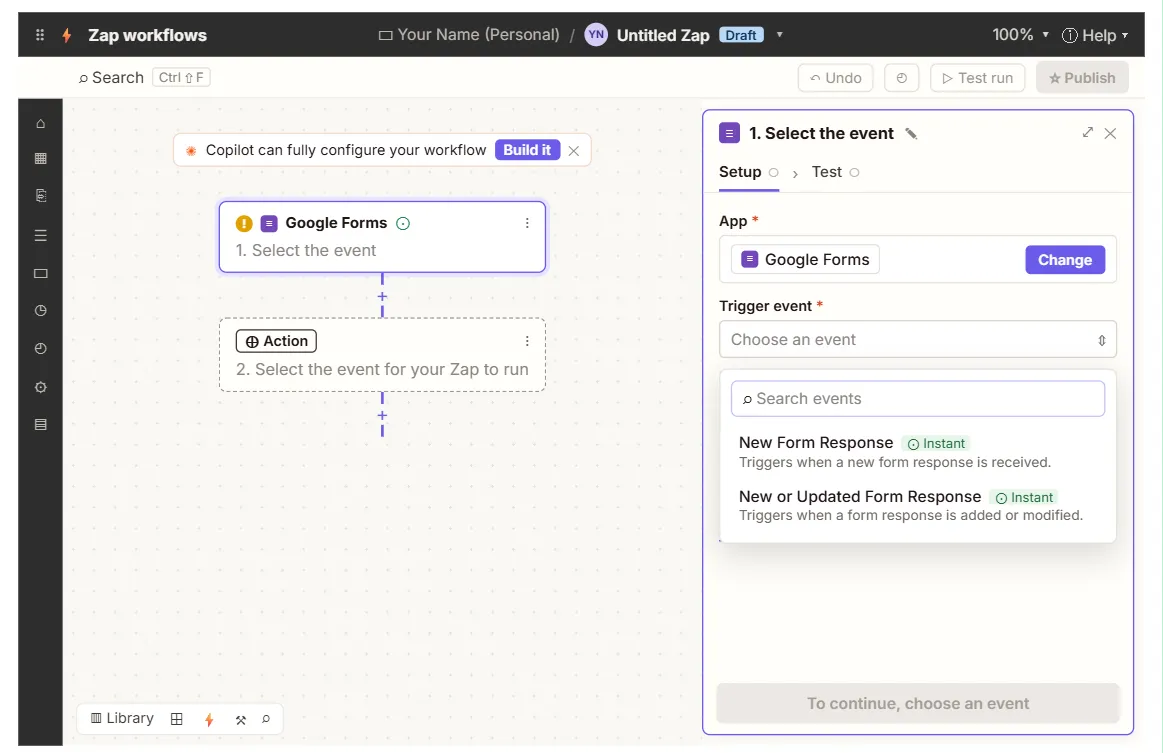
- Open Trigger event. The step panel opens on the Setup tab. Click the Trigger event box.
The step opens on the right, on the Setup tab. Now tell Zapier which event to watch for.
- Choose New Form Response. Choose New Form Response.
It fires every time someone submits your form.
3. Connect Google Forms
- Sign in to Google Forms. Next to Connect Google Forms, click Sign in.
Zapier needs permission to read your forms. Next to Connect Google Forms, click Sign in.
- Allow access. A sign-in window opens. Click Connect.
A small sign-in window opens.
- Choose your Google account. Pick the Google account that owns the form.
Pick the Google account that owns your form.
- Tick Select all. Google lists each permission with its own checkbox. Tick Select all.
Google lists each permission Zapier is asking for, each with its own checkbox. Zapier needs all of them to read your responses, so tick Select all.
- Give Zapier access. Click Continue.
- Continue to Configure. Your account is connected. Click Continue.
Your Google account is connected.
4. Pick the form and test
- Open the Form list. On the Configure tab, click the Form box.
Now the Configure tab. Pick which form to watch.
- Pick your form. Choose New Client Inquiry.
That's the form on the Northgate website where prospects ask for help.
- Continue to Test. Click Continue.
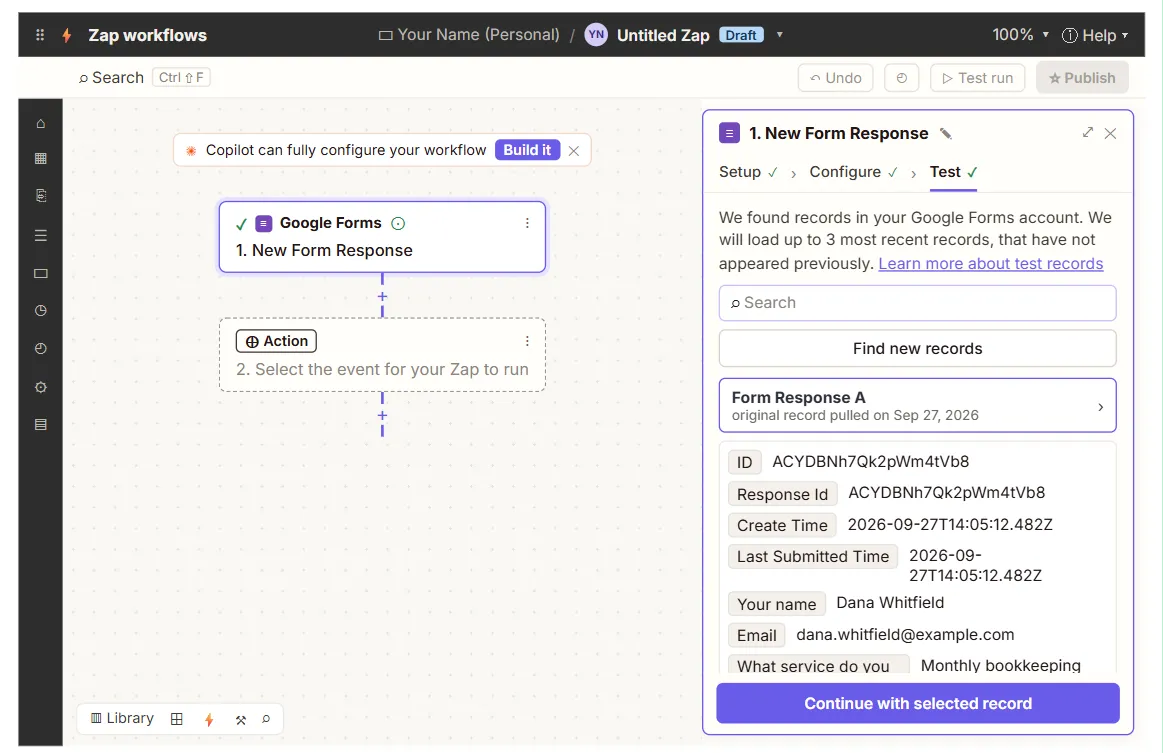
- Test the trigger. Click Test trigger. Zapier looks for recent responses to the form.
Zapier needs one real response to learn what your form sends. Before you test, fill out the form once yourself. I've already sent one in.
- Use this response. Zapier found Form Response A with the practice answers. Click Continue with selected record.
Zapier found the practice response, with Dana Whitfield's name, email and the service she needs. That's the sample you'll build with.
5. The action
- Pick Google Sheets. The trigger is done and the app picker opens for step 2. Click Google Sheets.
The trigger has a green check. Zapier jumps right to step two, the action, and opens the app picker. If it isn't in your list, search for it.
- Open Action event. Click the Action event box.
- Choose Create Spreadsheet Row. Choose Create Spreadsheet Row.
Each new response becomes one new row.
6. Connect Google Sheets
- Sign in to Google Sheets. Google Sheets is a separate connection. Click Sign in.
Google Sheets is its own connection, so you sign in once more.
- Allow access. Click Connect.
- Choose your Google account. Pick the same Google account. It must be able to edit the spreadsheet.
Pick the same account. It needs to be one that can edit your spreadsheet.
- Tick Select all. Tick Select all.
Tick Select all again, so Zapier can write to your sheet.
- Give Zapier access. Click Continue.
- Continue to Configure. Click Continue.
Connected.
- Open the Spreadsheet list. Leave Drive empty for My Drive. Click the Spreadsheet box.
You can leave Drive empty if the file is in your own Drive.
- Pick Client Inquiries. Choose Client Inquiries, the sheet with Name, Email and Service in row 1.
You made this sheet ahead of time, with the headers Name, Email and Service in row one. Zapier reads those headers, so set them up before this step.
- Open the Worksheet list. Click the Worksheet box.
A spreadsheet can have several tabs.
- Pick Sheet1. Choose Sheet1.
7. Map the fields
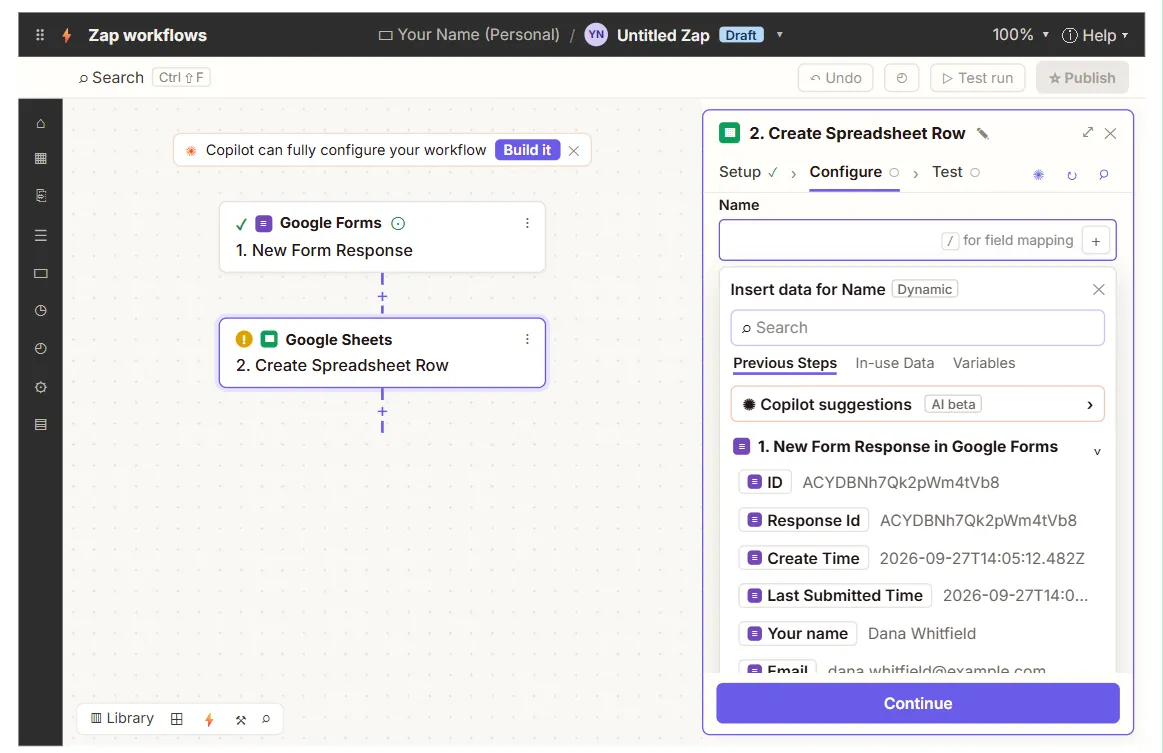
- Map the Name column. Click the + at the end of the Name field to insert data from the form.
Zapier loaded a field for each column header. Now match each one to an answer from the form.
- Pick "Your name". Under 1. New Form Response in Google Forms, pick Your name.
The data picker shows everything from step one, the form response. Pick Your name. If you don't see it, type it in the search box. It shows Dana Whitfield, but that's only the sample. Each new inquiry brings its own name.
- Map the Email column. Click the + at the end of the Email field to insert data from the form.
Next, click the plus on the Email field.
- Pick "Email". Under 1. New Form Response in Google Forms, pick Email.
Pick Email.
- Map the Service column. Click the + at the end of the Service field to insert data from the form.
- Pick "What service do you need?". Under 1. New Form Response in Google Forms, pick What service do you need?.
Pick What service do you need.
8. Test it
- Continue to Test. All three columns are mapped. Click Continue.
All three columns are mapped.
- Test the step. This is the row Zapier will send. Click Test step.
Here is the row Zapier is about to add. Testing sends a real row to your sheet.
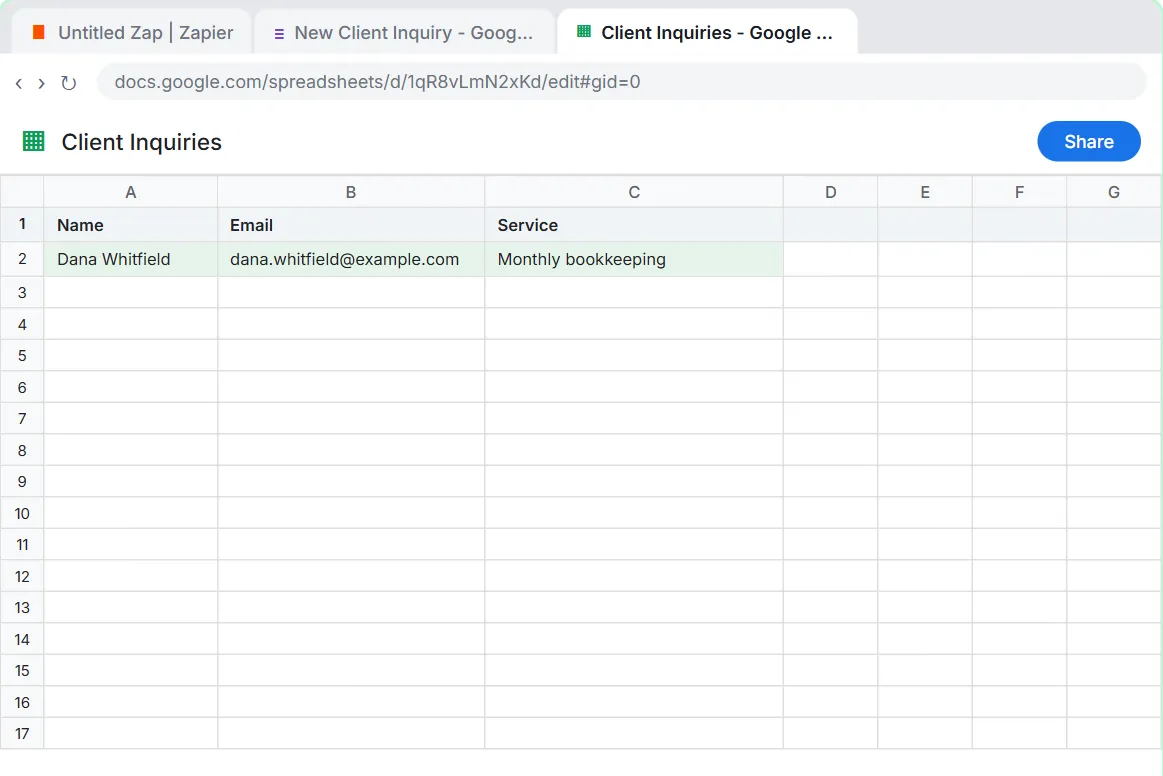
- Check the sheet. A row was sent. Click the Client Inquiries tab to check your sheet.
Zapier says a row was sent. Let's check.
- Back to Zapier. Dana Whitfield's inquiry is in row 2. Click the Untitled Zap tab to go back to Zapier.
There it is in row two: name, email and service, each in the right column. Your Zap is built and tested. The last move, Publish, you'll make in your own account.
Screenshots
Frequently asked questions
- Can I connect Google Forms to Google Sheets with Zapier for free?
- Yes. Zapier's free plan runs two-step Zaps, and this Zap has exactly two steps: New Form Response in Google Forms and Create Spreadsheet Row in Google Sheets. Check Zapier's current plans for monthly task limits.
- Is this course really free?
- Yes. Stepthrough is completely free, and the practice copy needs no accounts. To build it for real you need your own Zapier and Google accounts.
- Why does Zapier say it found no responses when I test the trigger?
- The trigger test needs at least one response. Fill out your form once yourself, then click Test trigger again or use Find new records.
- Why don't I see my columns in the action step?
- Zapier builds the fields from the headers in row 1 of the worksheet you pick. Type the headers into the sheet first, then pick the spreadsheet and worksheet again.
- Google Forms already has a "Link to Sheets" button. Why use Zapier?
- The built-in link dumps every answer into its own sheet. With Zapier you choose the spreadsheet, the columns and their order, and the same Zap can grow to reply to the prospect, alert your team or add AI in later steps.
Terms in this lesson
Plain-English definitions, each with an example from a free lesson.